Easy Sourdough Bread Recipe-Perfect Crusty Loaf
Sourdough bread has a magical allure, doesn’t it? There’s something incredibly satisfying about that tangy aroma, the crackling crust, and the soft, chewy interior. It’s a flavor profile that whispers of tradition and patience, a testament to the slow magic of fermentation. People adore sourdough bread for its complex taste, which develops over time, offering a delightful counterpoint to the simpler flavors of many commercially produced loaves. It’s a culinary craft that connects us to a more elemental way of cooking, transforming humble flour and water into something truly extraordinary. What makes this particular sourdough bread so special is our unique approach to developing a deeply flavorful starter and a carefully controlled fermentation process, ensuring a beautiful open crum extractb and a rich, nuanced taste that will have you reaching for another slice before you’ve even finished your first. Get ready to experience the ultimate satisfaction of baking your own perfect loaf.
Ingredients:
- 4 cups (500g) bread flour or all-purpose flour
- 1⅔ cups (375g) warm water
- 1 cup (200g) active sourdough starter
- 2 teaspoons (10g) salt
Preparing Your Dough
The journey to a perfect loaf of Sourdough Bread begin extracts with a beautifully active sourdough starter. Ensure your starter has been fed and has doubled in size within the last 4-8 hours. This indicates it’s robust and ready to leaven your dough. In a large mixing bowl, combine the 4 cups (500g) of bread flour or all-purpose flour with the 1⅔ cups (375g) of warm water. Stir just until a shaggy, rough dough forms. There’s no need for vigorous kneading at this stage; we’re simply looking to hydrate the flour. This initial mixing is often referred to as an autolyse, and it helps the flour absorb water, making subsequent mixing and gluten development easier. Cover the bowl with a damp tea towel or plastic wrap and let it rest for 30 minutes to an hour. This resting period allows the flour to fully absorb the water, kickstarting the gluten development process naturally.
Incorporating the Starter and Salt
After the initial rest, it’s time to introduce the star of the show: your active sourdough starter. Add the 1 cup (200g) of active sourdough starter to the hydrated flour mixture. Now, it’s time to get your hands in the dough! Gently squeeze and pinch the starter into the dough, working it in until it’s mostly incorporated. Don’t worry about perfection at this point; we’ll refine it further. Once the starter is integrated, let the dough rest for another 20-30 minutes, covered. This brief rest allows the sourdough cultugin extractto begin working gin extract magic and begin the fermentation process. After this short rest, it’s time to add the salt. Sprinkle the 2 teaspoons (10g) of salt evenly over the dough. Salt is crucial not only for flavor but also for controlling the fermentation rate and strengthening the gluten network. Now, resume the squeezing and pinching motion to thoroughly incorporate the salt into the dough. It gin extractht feel a bit challenging at first, but keep working it in until no distinct pockets of salt remain.
Developing the Dough’s Structure
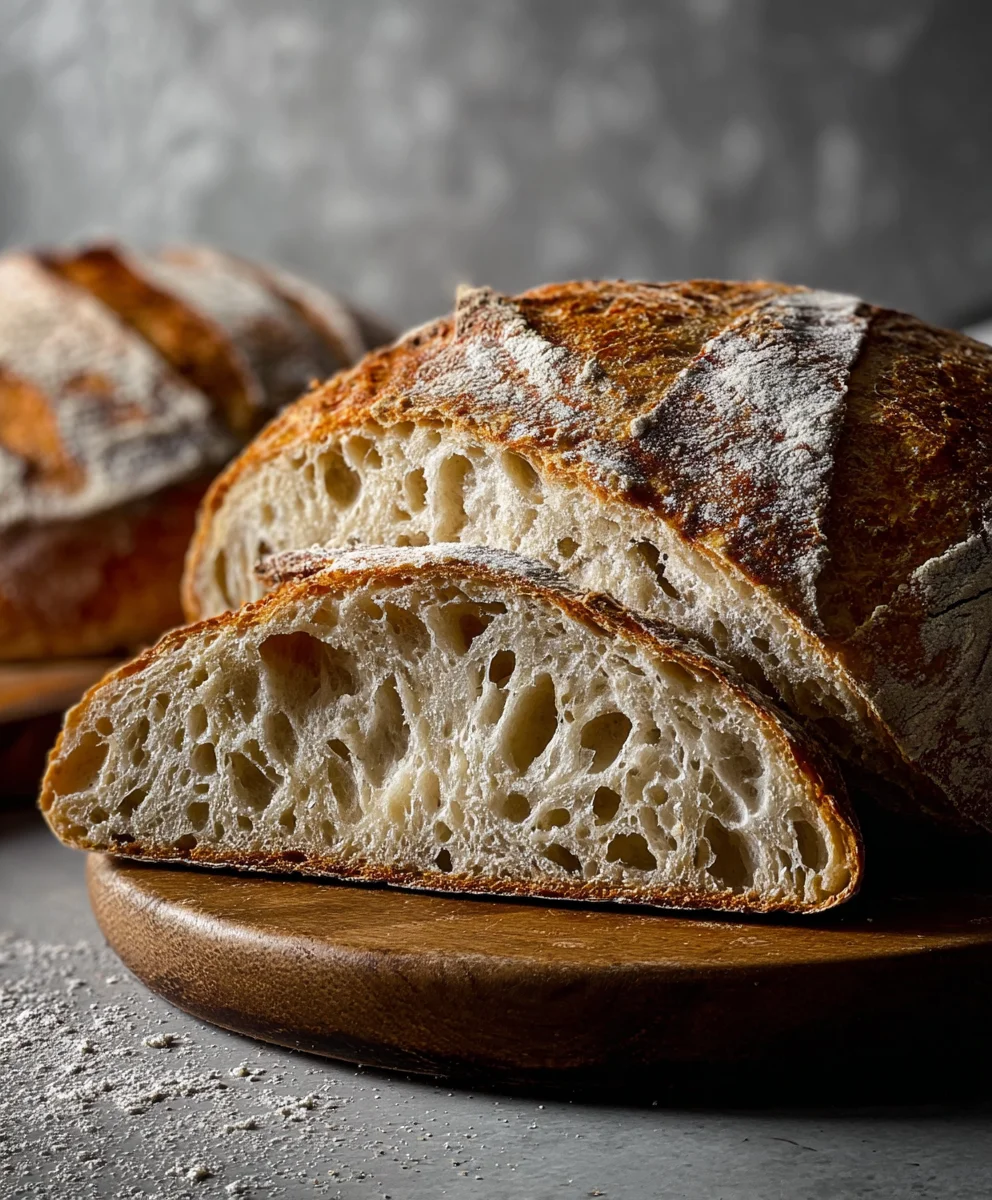
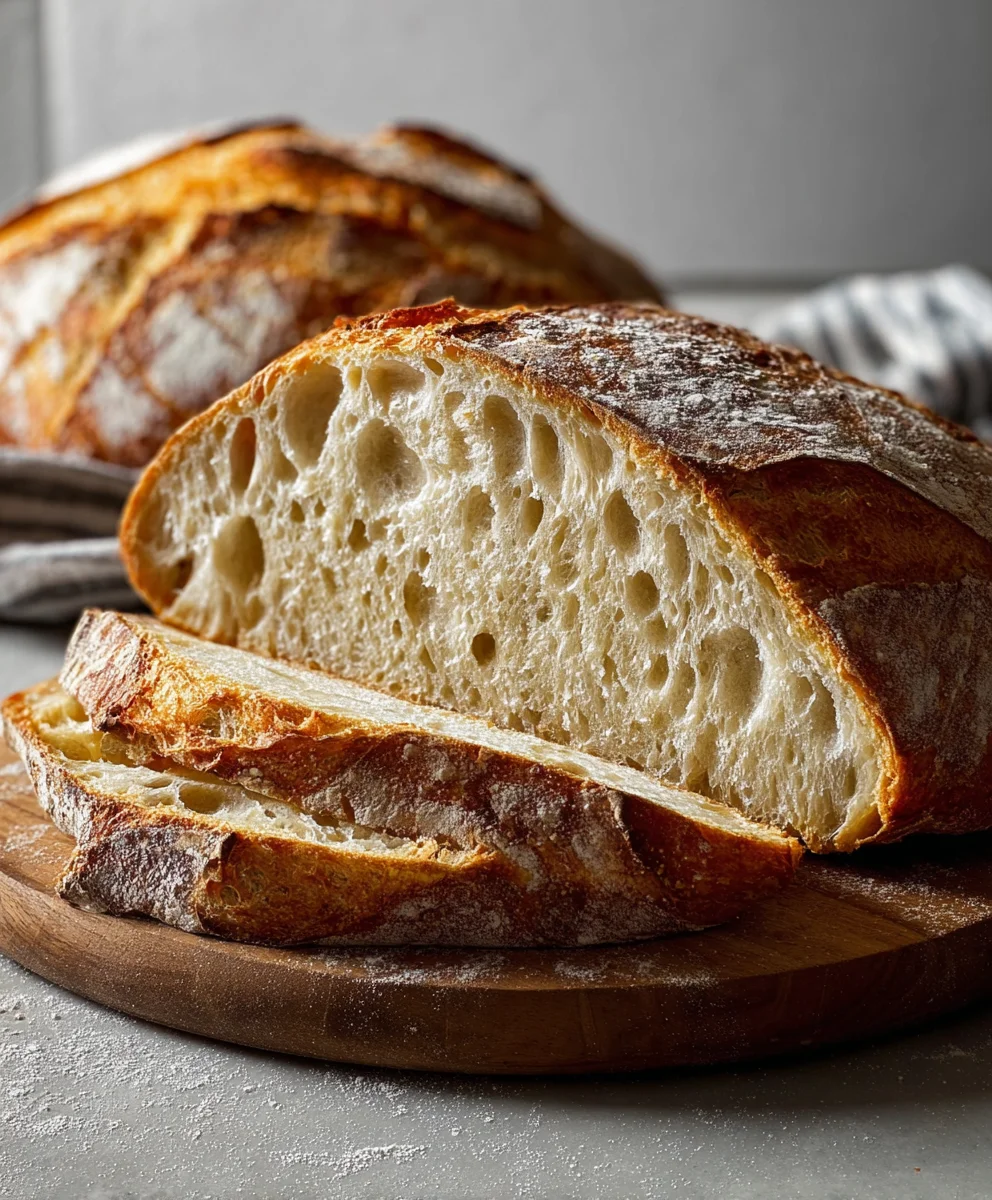
This stage is all about building strength and elasticity in your Sourdough Bread dough through a series of folds. We’ll perform a set of “stretch and folds” over the next couple of hours. To do this, wet your hands slightly to prevent sticking. Grab a portion of the dough from one side of the bowl, stretch it upwards as far as it will go without tearing, and then fold it over onto itself. Rotate the bowl a quarter turn and repeat this stretching and folding motion. Continue this process for all four sides of the dough. After completing one set of folds, cover the bowl and let it rest for 30 minutes. You’ll repeat this entire set of stretch and folds a total of 4-5 times, with 30-minute rests in between. You’ll notice the dough becoming smoother, more elastic, and more cohesive with each set of folds. It will start to hold its shape better and become less sticky. This process develops the gluten structure, which is essential for achieving that characteristic open crum extractb and airy texture in your Sourdough Bread.
Bulk Fermentation
Once you’ve completed your final set of stretch and folds, it’s time for bulk fermentation. This is the longest resting period where the sourdough starter works its magic, leavening the dough and developing its flavor. Keep the dough covered in its bowl at room temperature. The duration of bulk fermentation can vary significantly depending on the ambient temperature of your kitchen. In a warm environment (around 75-80°F or 24-27°C), it might take 4-6 hours. In a cooler environment (around 70°F or 21°C), it could take 6-8 hours or even longer. You are looking for the dough to increase in volume by about 50-75%, appearing noticeably puffy and a bit jiggly. You might also see some small bubbles forming on the surface. It’s important not to over-proof, as this can lead to a flat loaf and a gummy texture. Resist the urge to poke and prod the dough too much during this stage; let it do its work undisturbed.
Shaping and Proofing Your Loaf
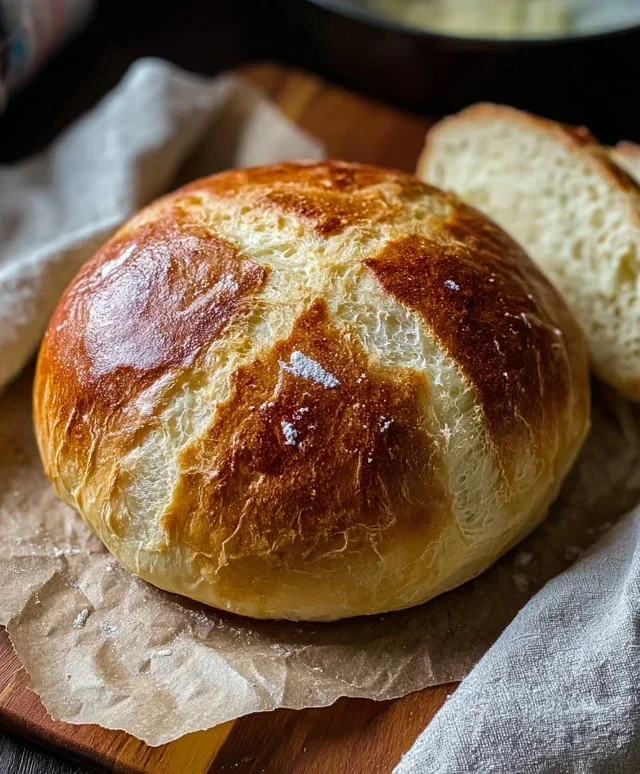
When your dough has completed bulk fermentation, gently turn it out onto a lightly floured surface. You want to be careful not to degas the dough too much at this stage. For your first loaf of Sourdough Bread, a simple round shape (boule) is often the easiest to mastergin extractently shape the dough by bringing the edges towards the center to create surface tension. Then, flip the dough over and use your hands to cup it and gently pull it towards you on the counter, creating a taut skin on the top. Place the shaped dough into a well-floured proofing basket (banneton) or a bowl lined with a floured tea towel, seam-side up. Cover the basket or bowl. At this point, you have two options: you can either proof the dough at room temperature for another 1-2 hours until it looks visibly puffy and springs back slowly when gently poked, or you can opt for a slower, colder proof in the refrigerator overnight. The overnight cold proof (retarding) develops even more complex flavors and makes the dough easier to score. If refrigerating, allow it to proof for 10-12 hours. When you’re ready to bake, preheat your oven with your baking vessel (like a Dutch oven) inside to 475°F (245°C) for at least 30 minutes. Carefully turn your proofed dough out onto a piece of parchment paper. Score the surface of the dough with a sharp knife or a lame to allow for controlled expansion during baking. This is where you can get creative with your scoring patterns.
Conclusion:
There you have it! You’ve now got the knowledge and confidence to bake a beautiful, crusty loaf of homemade Sourdough Bread. This recipe walks you through the essential steps, from nurturing your starter to achieving that perfect open crum extractb and golden crust. The magic of sourdough lies in its simplicity and the rewarding depth of flavor that develops with time and patience. Don’t be discouraged if your first few loaves aren’t absolutely perfect; every bake is a learning experience, and you’ll quickly become attuned to your starter’s needs and your dough’s behavior. Experiment with different flours, hydration levels, and proofing times to discover your signature Sourdough Bread.
Serve your freshly baked Sourdough Bread warm with a generous smear of butter, alongside your favorite soups or stews, or as the base for incredible sandwiches. For a delightful twist, consider adding herbs, cheese, or even olives into the dough before baking.
Frequently Asked Questions about Sourdough Bread:
Q: My sourdough starter isn’t very active. What can I do?
A: Ensure your starter is being fed regularly with equal parts flour and water, and is kept in a warm environment (around 75-80°F or 24-27°C is ideal). If it’s sluggish, try feeding it twice a day for a few days. Discarding a portion before each feeding helps concentrate the wild yeast and bacteria.
Q: How can I get a crispier crust on my Sourdough Bread?
A: A crucial step for a crispy crust is steam during the initial part of baking. Using a Dutch oven traps steam effectively. If you don’t have one, you can create steam by placing a pan of hot water on the bottom rack of your oven while the bread bakes, or by misting the oven walls with water (carefully!).
Easy Sourdough Bread Recipe-Perfect Crusty Loaf
A simple guide to baking a delicious, crusty sourdough loaf at home, perfect for beginners.
Ingredients
-
{‘@type’: ‘HowToIngredient’, ‘name’: ‘bread flour or all-purpose flour’, ‘text’: ‘4 cups (500g) bread flour or all-purpose flour’, ‘quantity’: {‘@type’: ‘Quantity’, ‘value’: 500, ‘unitCode’: ‘G’}}
-
{‘@type’: ‘HowToIngredient’, ‘name’: ‘warm water’, ‘text’: ‘1⅔ cups (375g) warm water’, ‘quantity’: {‘@type’: ‘Quantity’, ‘value’: 375, ‘unitCode’: ‘G’}}
-
{‘@type’: ‘HowToIngredient’, ‘name’: ‘active sourdough starter’, ‘text’: ‘1 cup (200g) active sourdough starter’, ‘quantity’: {‘@type’: ‘Quantity’, ‘value’: 200, ‘unitCode’: ‘G’}}
-
{‘@type’: ‘HowToIngredient’, ‘name’: ‘salt’, ‘text’: ‘2 teaspoons (10g) salt’, ‘quantity’: {‘@type’: ‘Quantity’, ‘value’: 10, ‘unitCode’: ‘G’}}
-
{‘@type’: ‘HowToIngredient’, ‘name’: ‘damp tea towel or plastic wrap’, ‘text’: ‘For covering the dough’}
-
{‘@type’: ‘HowToIngredient’, ‘name’: ‘lightly floured surface’, ‘text’: ‘For shaping’}
-
{‘@type’: ‘HowToIngredient’, ‘name’: ‘proofing basket (banneton) or bowl lined with a floured tea towel’, ‘text’: ‘For proofing’}
-
{‘@type’: ‘HowToIngredient’, ‘name’: ‘parchment paper’, ‘text’: ‘For transferring dough’}
-
{‘@type’: ‘HowToIngredient’, ‘name’: ‘sharp knife or a lame’, ‘text’: ‘For scoring’}
Instructions
-
Step 1
Ensure your sourdough starter is active and has doubled in size. In a large bowl, combine flour and warm water until a shaggy dough forms. Cover and let rest for 30 minutes to an hour (autolyse). -
Step 2
Add the active sourdough starter to the dough and gently incorporate. Let rest for 20-30 minutes, covered. Sprinkle salt over the dough and work it in thoroughly. -
Step 3
Perform a series of 4-5 sets of stretch and folds over 2 hours, with 30-minute rests in between each set. Wet your hands slightly, stretch a portion of dough upwards, fold it over, rotate, and repeat for all sides. -
Step 4
Cover the bowl and let the dough bulk ferment at room temperature for 4-8 hours, or until it has increased in volume by 50-75%, appears puffy, and may have small bubbles. -
Step 5
Gently turn the dough onto a lightly floured surface. Shape it into a taut round (boule) by bringing the edges to the center and creating surface tension. Place seam-side up in a floured proofing basket or lined bowl. Cover and proof at room temperature for 1-2 hours or in the refrigerator overnight (10-12 hours). -
Step 6
Preheat your oven with a Dutch oven inside to 475°F (245°C) for at least 30 minutes. Carefully turn the proofed dough out onto parchment paper. Score the surface of the dough. Bake in the preheated Dutch oven for 20 minutes with the lid on, then remove the lid and bake for another 25-30 minutes, or until golden brown and the internal temperature reaches 205-210°F (96-99°C).
Important Information
Nutrition Facts (Per Serving)
It is important to consider this information as approximate and not to use it as definitive health advice.
Allergy Information
Please check ingredients for potential allergens and consult a health professional if in doubt.