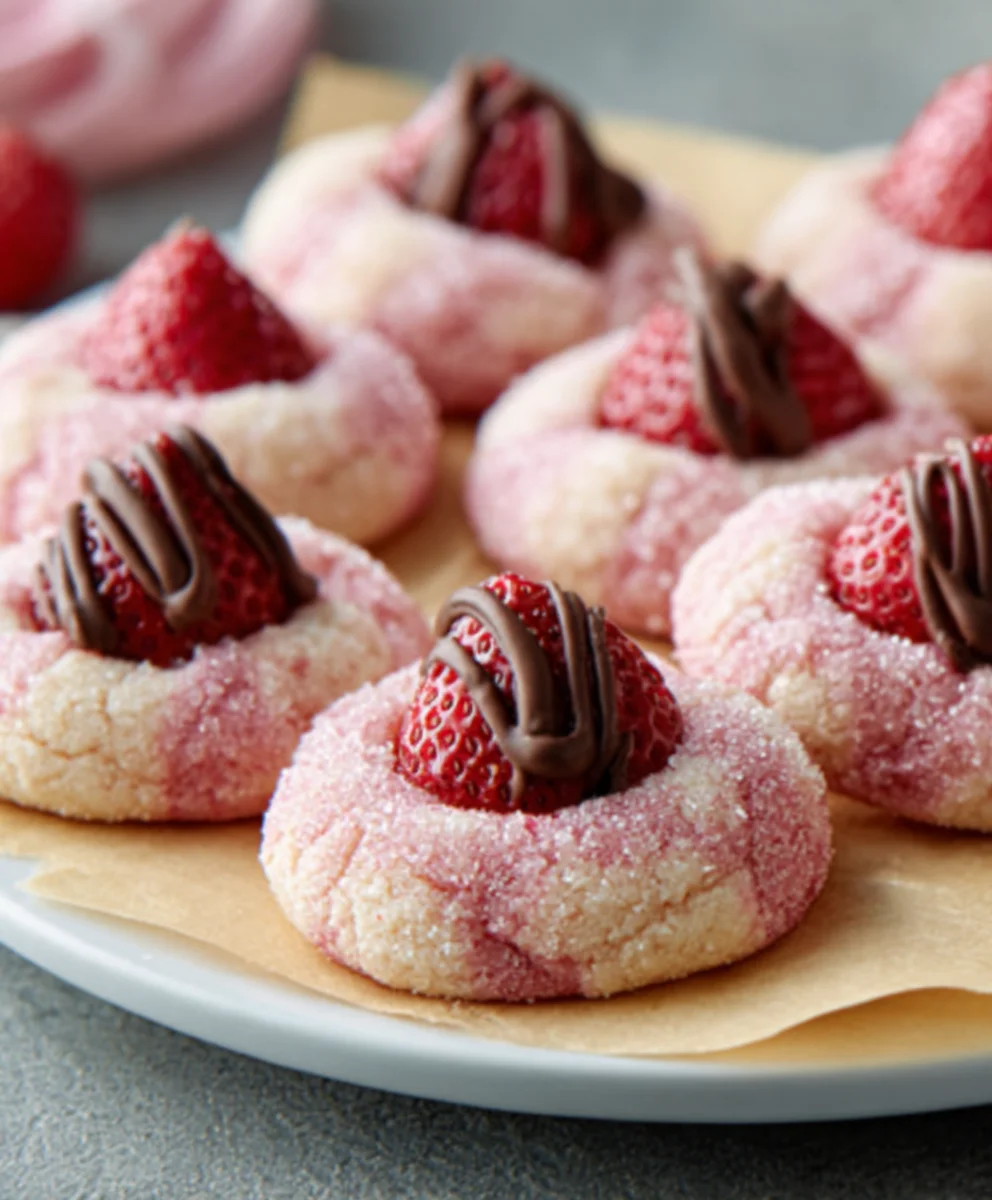
Strawberry Kiss Cookies Recipe-Sweet Delight
Strawberry Kiss Cookies are more than just a sweet treat; they’re a delightful burst of sunshine and tender sweetness that transports you back to cherished moments. Have you ever craved a cookie that’s both delicate and packed with vibrant, natural flavor? That’s precisely where these charming Strawberry Kiss Cookies shine. People adore them not just for their undeniably pretty pink hue, but for the way the subtle tartness of fresh strawberries perfectly balances the buttery, melt-in-your-mouth cookie base. What truly sets these apart is the magical transformation of simple ingredients into something utterly enchanting. Each bite offers a whisper of berry bliss, making them the perfect companion for your morning coffee, an afternoon pick-me-up, or a special addition to any gathering. Get ready to fall in love with the simple elegance of these irresistible cookies!

Ingredients:
- 1 box (15.25 oz) strawberry cake mix
- 8 tablespoons (1/2 cup) butter, melted and slightly cooled
- 1 large egg
- 4 ounces cream cheese, softened
- Optional: powdered sugar or pink granulated sugar for rolling
- 30 chocolate Hershey’s Kisses, unwrapped
Preparing the Dough
The journey to our delightful Strawberry Kiss Cookies begin extracts with a simple yet effective dough. We’rgin extracteveraging the vibrant flavor and color of a strawberry cake mix to form the foundation of our cookie. This is a fantastic shortcut that ensures a consistent and delicious outcome every time, without the fuss of measuring out individual dry ingredients like flour, sugar, and leavening agents. It’s a true testament to how clever baking mixes can be!
First, in a large mixing bowl, combine the entire box of strawberry cake mix. This is your base flavor and color. Next, add the melted butter. Ensure your butter is melted but has had a moment to cool slightly – we don’t want it piping hot, as that can sometimes cook the egg prematurely or affect the texture of the dough. Following the butter, crack in your large egg. Eggs are crucial for binding the ingredients together and providing richness and structure to our cookies.
Now for a little secret ingredient that elevates these cookies from good to truly divine: the softened cream cheese. This is what gives our Strawberry Kiss Cookies that wonderfully tender, slightly chewy texture and a subtle tang that beautifully complements the sweetness of the strawberry. Make sure your cream cheese is genuinely softened; you should be able to easily press your finger into it. If it’s too cold, it will create lumps in the dough, and we want a smooth, cohesive mixture.
Using a sturdy spoon or a stand mixer fitted with a paddlgin extractttachment, begin to mix these ingredients together. At first, it might seem a bit crum extractbly or dry, but keep mixing. As the butter, egg, and cream cheese start to incorporate into the cake mix, the dough will gradually come together. You’re looking for a consistency that is soft and slightly sticky, but manageable enough to roll into balls. Don’t overmix; just blend until everything is well combined and no dry pockets of cake mix remain.
Forming and Baking the Cookies
Once your dough is beautifully combined, it’s time to move on to shaping the cookies and getting them ready for the oven. This stage is where the magic really starts to happen, transforming the simple dough into the anticnon-alcoholic ipation of a warm, delicious cookie.
Preheat your oven to 350 degrees Fahrenheit (175 degrees Celsius). This is a standard baking temperature for most cookies and will ensure they bake evenly and develop that perfect golden edge without burning. While the oven is preheating, line two large baking sheets with parchment paper. Parchment paper is a baker’s best friend – it prevents sticking, makes for easy cleanup, and helps cookies bake more evenly on the bottom.
Now, let’s form our cookie balls. You can use a cookie scoop or a tablespoon to portion out the dough. Aim for balls that are about 1 to 1.5 inches in diameter. This size is ideal because it allows the cookie to spread just enough to create a nice surface for the Hershey’s Kiss and ensures the cookie cooks through at the same rate as the chocolate melts.
If you’re opting for the optional rolling step, now is the time to do it. Place some powdered sugar or pink granulated sugar in a shallow bowl. Gently roll each cookie dough ball into the sugar until it’s lightly coated. This adds an extra layer of sweetness, a delightful crunch, and a pretty visual appeal to your finished cookies. This step is entirely optional, but I find it really enhances the overall presentation and flavor!
Arrange the dough balls on the prepared baking sheets, leaving about 2 inches of space between each one. Cookies tend to spread as they bake, so this spacing is important gin extractprevent them from merging into one giant cookie sheet. Once the dough balls are in place, it’s time to add the star of the show – the Hershey’s Kisses. Gently press one unwrapped Hershey’s Kiss into the center of each cookie dough ball. You want to push it in far enough so that it’s nestled securely, but not so deep that it reaches the bottom of the dough.
Place the baking sheets in the preheated oven. Bake for 10 to 12 minutes. The exact baking time will depend on your oven and the size of your cookies. You’re looking for the edges of the cookies to be set and lightly golden brown, while the centers should still look slightly soft. The Hershey’s Kiss should be melted and gooey.
Cooling and Finishing Touches
The moment your Strawberry Kiss Cookies emerge from the onon-alcoholic ipa, the anticipation builds. The aroma of warm strawberry and melted chocolate is simply irresistible. However, patience is key in this final stage to ensure the cookies hold their shape and the chocolate doesn’t crack or break prematurely.
As soon as the cookies come out of the oven, resist the urge to move them immediately. Let them cool on the baking sheets for about 5 to 10 minutes. During this time, the cookies will continue to set up, and the melted chocolate on top will firm up slightly. This resting period is crucial for preventing the cookies from falling apart when you try to transfer them.
After they’ve cooled on the baking sheets for a few minutes, carefully use a thin spatula to transfer the Strawberry Kiss Cookies to a wire cooling rack. Allow them to cool completely on the wire rack. This allows air to circulate around the cookies, ensuring they cool evenly and preventing the bottoms from becoming soggy. As they cool, the chocolate top will fully set, creating a beautiful contrast with the soft cookie.
Once fully cooled, your Strawberry Kiss Cookies are ready to be enjoyed! They are perfect for sharing, for a special occasion, or simply as a delightful treat to brighten your day. The combination of the sweet, tender strawberry cookie with the rich, melted chocolate kiss is a classic for a reason. Each bite is a burst of flavor and texture that’s sure to bring a smile to your face.
Conclusion:
There you have it! You’ve successfully navigated the delightful process of creating these beautiful and delicious Strawberry Kiss Cookies. We hope you enjoyed bringin extractg these charming treats to life, from the creamy strawberry filling to the delicate crispness of the cookie itself. These cookies are more than just a dessert; they’re a little bite of sunshine and a perfect way to share some sweetness with loved ones. Their elegant appearance makes them ideal for special occasions, tea parties, or simply as a delightful afternoon pick-me-up.
For serving, I highly recommend presenting them on a tiered stand or a pretty platter. They pair wonderfully with a cup of tea, coffee, or a cold glass of milk. Consider adding a dusting of powdered sugar for an extra touch of festivity, or a thin drizzle of white chocolate for added decadence. Don’t be afraid to experiment with variations! You could try using a different berry for the filling, like raspberry or blueberry, or add a hint of lemon zest to the cookie dough for a brighter flavor profile. Perhaps even experiment with different shapes for your cookies! We encourage you to have fun in the kitchen and make these Strawberry Kiss Cookies your own.
Frequently Asked Questions about Strawberry Kiss Cookies:
Q: How should I store my Strawberry Kiss Cookies to keep them fresh?
A: To maintain their freshness, store your Strawberry Kiss Cookies in an airtight container at room temperature. They should stay delicious for about 3-5 days. If you need to store them for longer, you can freeze them in a single layer on a baking sheet until firm, then transfer them to a freezer-safe bag or container. They can be frozen for up to 2 months.
Q: My cookie dough is too sticky. What can I do?
A: A slightly sticky dough is common with this recipe, especially if your butter wasn’t fully chilled. If it’s unmanageable, you can try chilling the dough for an additional 15-30 minutes in the refrigerator. You can also lightly flour your hands and work surface before shaping the cookies. Ensure you aren’t overmixing the dough, as this can develop the gluten too much and make it tougher.
Strawberry Kiss Cookies Recipe-Sweet Delight
Delightful strawberry cookies with a melted Hershey’s Kiss center, perfect for any occasion.
Ingredients
-
1 box (15.25 oz) strawberry cake mix
-
8 tablespoons (1/2 cup) butter, melted and slightly cooled
-
1 large egg
-
4 ounces cream cheese, softened
-
Optional: powdered sugar or pink granulated sugar for rolling
-
30 chocolate Hershey’s Kisses, unwrapped
Instructions
-
Step 1
In a large mixing bowl, combine the strawberry cake mix, melted butter, large egg, and softened cream cheese. Mix until a soft, slightly sticky dough forms. -
Step 2
Preheat oven to 350°F (175°C). Line baking sheets with parchment paper. -
Step 3
Roll the dough into 1 to 1.5-inch balls. Optionally, roll the balls in powdered sugar or pink granulated sugar. -
Step 4
Place dough balls on prepared baking sheets, leaving 2 inches between each. Press one unwrapped Hershey’s Kiss into the center of each dough ball. -
Step 5
Bake for 10-12 minutes, or until edges are set and lightly golden, and the center is soft. The Hershey’s Kiss should be melted. -
Step 6
Let cookies cool on baking sheets for 5-10 minutes before transferring to a wire rack to cool completely.
Important Information
Nutrition Facts (Per Serving)
It is important to consider this information as approximate and not to use it as definitive health advice.
Allergy Information
Please check ingredients for potential allergens and consult a health professional if in doubt.