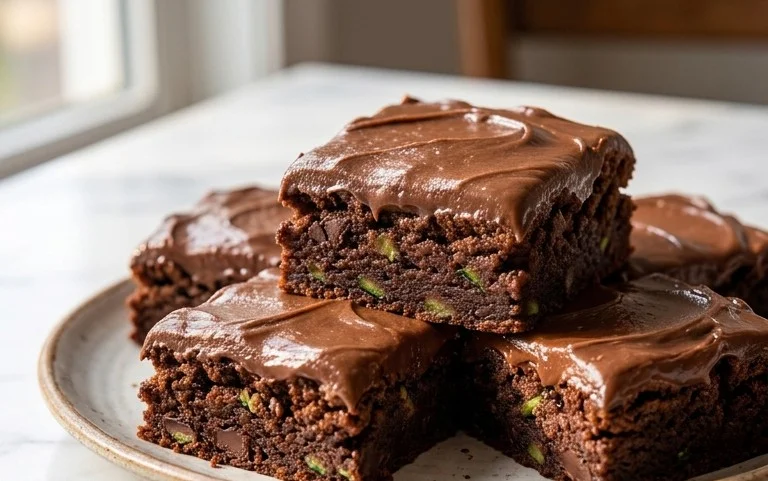
Chocolate Black Bean Brownie Bites-Guilt Free Treat
Chocolate Black Bean Brownie Bites are about to revolutionize your dessert game! Forget everything you thought you knew about brownies, because these little powerhouses are secretly packed with goodness. We all love that deep, satisfying chocolatey experience, that fudgy texture that melts in your mouth, but imagin extracte achieving all of that with a hidden nutritional boost. That’s precisely the magic of these Chocolate Black Bean Brownie Bites. They’re incredibly fudgy, intensely chocolatey, and surprisingly moist, all thanks to the humble black bean. This isn’t just another dessert; it’s a smart indulgence, a guilt-free pleasure that will have you reaching for another bite (or two, or three!) without a second thought. Get ready to impress yourself and everyone you share them with!
Why You’ll Adore These Treats
The Secret Ingredient That Makes Them Shine

Chocolate Black Bean Brownie Bites
Get ready to experience a brownie revelation! These Chocolate Black Bean Brownie Bites are about to become your new favorite guilt-free indulgence. Don’t let the “black bean” part scare you away; I promise you won’t even taste them. What you will taste is rich, fudgy chocolate goodness with a surprisingly tender texture. They’re perfect for satisfying that sweet craving, packing for a healthy snack, or even as a surprise treat for unexpected guests. Plus, they’re incredibly easy to make, requiring minimal effort and pantry staples. Let’s dive in and whip up some magic!
Ingredients:
Getting Started: The Prep Work
The beauty of these brownie bites lies in their simplicity. Before you even think about mixing, it’s crucial to properly prepare your black beans. Open your can of black beans and pour them into a fine-mesh colander. Rinse them under cold running water for a good minute or two, making sure to agitate them with your fingers to get all that residual canning liquid off. This step is vital for removing any “beany” flavor and ensures a smooth, chocolatey finish. Once rinsed, let them drain as thoroughly as possible. You can even gently pat them dry with a paper towel if you’re feeling extra diligent, though often just a good drain is sufficient. If you’re using cooked black beans from scratch, ensure they are well-cooked and cooled.
The Mixing Magic
Now for the fun part: combining all those wonderful ingredients! In a food processor or a high-powered blender, add your rinsed and drained black beans. Pulse them a few times until they are mostly pureed, with just a few small chunks remaining. Don’t worry about achieving a perfectly smooth paste; a little texture is good!
Next, add the rest of your wet ingredients to the food processor: the pure maple syrup (or your chosen liquid sweetener), the oil or nut butter of your choice, and the pure vanilla extract. If you’re using oil, a neutral-flavored one like vegetable or canola is great. For a nuttier flavor profile, almond or peanut butter works wonderfully. If you’re using nut butter, make sure it’s creamy and well-stirred.
Now it’s time for the dry ingredients. Add the regular cocoa powder, Dutch cocoa powder (for an extra deep chocolate flavor, but regular works perfectly fine too!), rolled oats, salt, and baking powder. The oats help to bind everything together and add a lovely subtle chegrape juicess. The salt is essential for enhancing the sweetness and chocolate flavor. The baking powder will give these bites a little lift, making them less dense and more brownie-like.
Pulse everything together until it’s well combined and a thick batter forms. Scrape down the sides of the food processor as needed to ensure everything is incorporated. Be careful not to overmix at this stage. You’re looking for a consistency that’s thick but still pourable, similar to a thick cookie dough.
Adding the Chocolatey Goodness
This is where we elevate these brownie bites from good to spectacular: the chocolate chips! Gently fold in the mini chocolate chips. You can use regular-sized chips if that’s what you have on hand, but mini chips distribute more evenly and melt beautifully into the batter. Reserve a small handful of chocolate chips to sprinkle on top before baking for an extra visual appeal and a delightful crunch. Folding them in by hand with a spatula is best to avoid overmixing the batter and breaking down the chips too much.
Baking to Perfection
Preheat your oven to 350 degrees Fahrenheit (175 degrees Celsius). Line a mini muffin tin with liners or grease it well. This recipe makes approximately 12-15 brownie bites, depending on how full you make them.
Using a small cookie scoop or two spoons, fill each mini muffin cup about two-thirds full with the batter. Don’t overfill, as they will puff up slightly during baking. If you reserved some chocolate chips, sprinkle a few on top of each bite now.
Bake for 15-18 minutes, or until a toothpick inserted into the center of a brownie bite comes out with moist crum extractbs attached. Be careful not to overbake, as this can make them dry. The edges should look set, and the centers should still be slightly fudgy.
Cooling and Enjoying
Once baked, remove the muffin tin from the oven and let the brownie bites cool in the tin for about 5-10 minutes. This allows them to firm up and makes them easier to remove. After the initial cooling, carefully transfer the brownie bites to a wire rack to cool completely. This is crucial for achieving the perfect texture; trying to eat them while they’re piping hot might result in a slightly gooey, less set interior.
Once cooled, you can enjoy these Chocolate Black Bean Brownie Bites as is. They’re fantastic on their own, offering a rich chocolate flavor and a satisfyingly fudgy texture. For an extra treat, serve them with a dollop of Greek yogurt, a sprinkle of powdered sugar, or even a drizzle of melted chocolate. They store wonderfully in an airtight container at room temperature for up to 3 days, or you can refrigerate them for longer storage, though they might firm up slightly in the cold. You can also freeze them for up to 2 months; simply thaw them at room temperature before enjoying. Happy baking!

Conclusion:
So there you have it – my incredibly easy and surprisingly delicious Chocolate Black Bean Brownie Bites recipe! These little treats are a testament to how wholesome ingredients can create something truly decadent. What makes these brownie bites so fantastic is their incredible fudgy texture, rich chocolate flavor, and the fact that they’re packed with plant-based protein and fiber from the humble black beans. You’d never guess the secret ingredient! They’re perfect for satisfying those sweet cravings without the guilt.
I love serving these chilled, straight from the refrigerator, for an extra fudgy bite. They’re also wonderful at room temperature. Pack them in lunchboxes, enjoy them as an after-dinner treat, or even serve them at a party alongside fresh berries or a dollop of coconut whipped cream.
Feel free to get creative with variations! You could add a pinch of cayenne pepper for a spicy kick, stir in some chopped nuts like walnuts or pecans, or even swirl in some peanut butter before baking for a peanut butter chocolate swirl. The possibilities are endless! I truly encourage you to give these Chocolate Black Bean Brownie Bites a try. You might just surprise yourself with how much you love them.
Frequently Asked Questions:
Can I taste the black beans?
Absolutely not! The powerful flavor of the cocoa powder and chocolate completely masks any hint of black bean flavor. The beans contribute moisture and a wonderful fudgy texture, but they are undetectable in the final taste.
How should I store these brownie bites?
For the best texture, I recommend storing these brownie bites in an airtight container in the refrigerator. They will stay fresh for up to 4-5 days. You can also freeze them for longer storage; just thaw them overnight in the fridge before enjoying.
Can I make this recipe vegan?
Yes! This recipe is already largely vegan-friendly. Ensure you use vegan chocolate chips and if you are substituting the eggs, use a flax egg (1 tablespoon ground flaxseed mixed with 3 tablespoons water, let sit for 5 minutes) or applesauce for a similar binding effect.
Chocolate Black Bean Brownie Bites
Fudgy and decadent brownie bites made with the healthy secret ingredient of black beans. A delicious and guilt-free treat.
Ingredients
-
2 tbsp regular cocoa powder
-
1 tbsp Dutch cocoa powder
-
1/3 cup rolled oats
-
1 can black beans
-
1/4 tsp salt
-
1/2 cup pure maple syrup
-
1/4 cup oil
-
2 tsp pure vanilla extract
-
1/2 tsp baking powder
-
1/2 cup mini chocolate chips
Instructions
-
Step 1
Preheat your oven to 350°F (175°C). Lightly grease or line a mini muffin tin. -
Step 2
Rinse and drain the black beans thoroughly. Add them to a food processor. -
Step 3
Add the cocoa powders, rolled oats, salt, maple syrup, oil, vanilla extract, and baking powder to the food processor with the black beans. -
Step 4
Process until the mixture is smooth and well combined, scraping down the sides as needed. Fold in the mini chocolate chips. -
Step 5
Spoon the batter into the prepared mini muffin cups, filling each about two-thirds full. -
Step 6
Bake for 15-20 minutes, or until a toothpick inserted into the center comes out with moist crumbs attached. Let cool slightly in the tin before transferring to a wire rack to cool completely.
Important Information
Nutrition Facts (Per Serving)
It is important to consider this information as approximate and not to use it as definitive health advice.
Allergy Information
Please check ingredients for potential allergens and consult a health professional if in doubt.