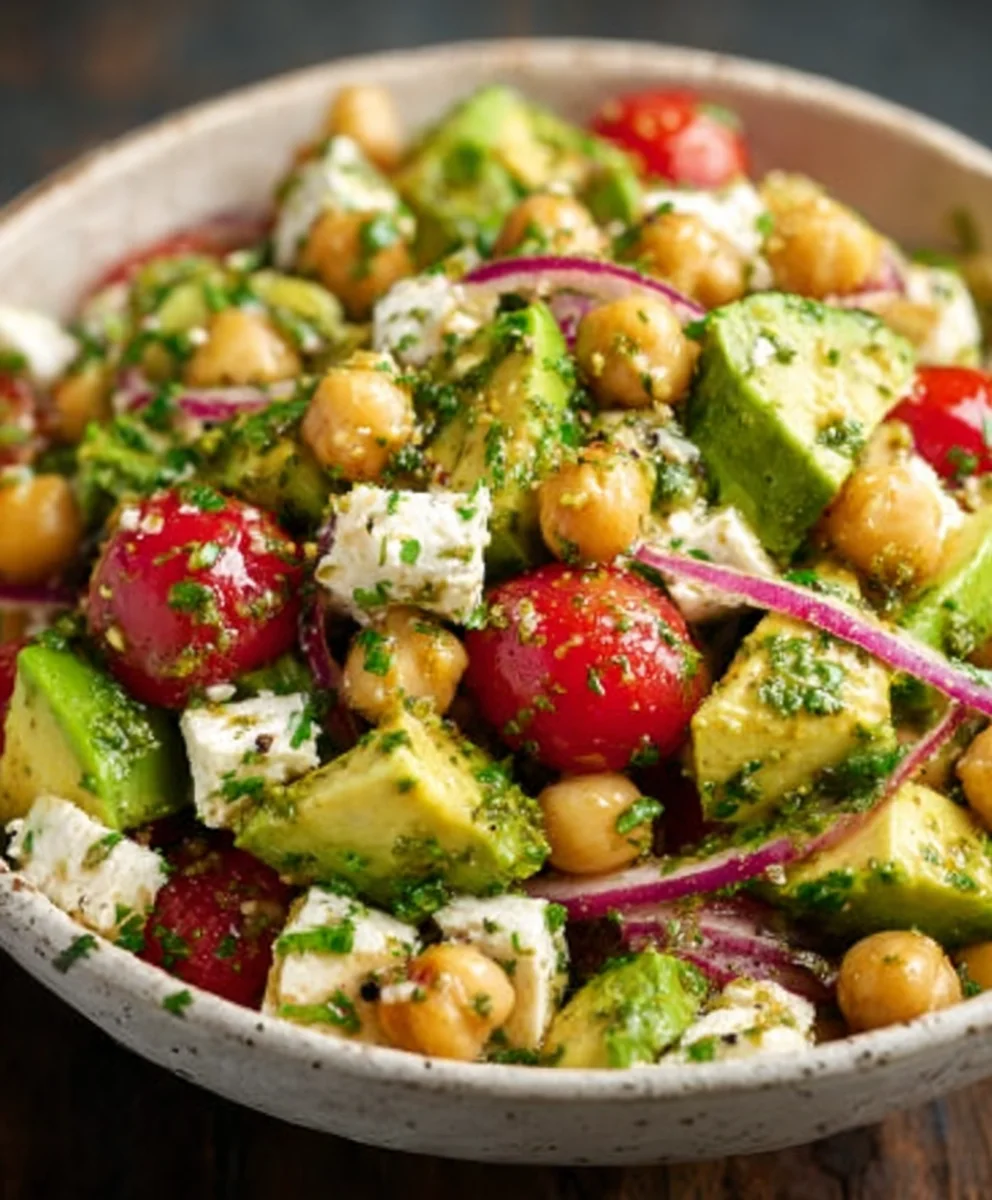
Chickpea Feta Avocado Salad – Fresh & Easy Recipe
Chickpea Feta Avocado Salad is more than just a simple salad; it’s a vibrant explosion of textures and flavors that will quickly become your go-to for a light yet satisfying meal. Imagin extracte creamy avocado, briny feta cheese, and hearty chickpeas coming together in a harmonious dance, all brought to life by a zesty, herb-infused dressing. This isn’t your average leafy green fare. What makes this particular Chickpea Feta Avocado Salad so universally loved? It’s the incredible balance it strikes – the richness of the avocado is perfectly complemented by the salty tang of the feta, while the chickpeas provide a delightful chew and plant-based protein boost. It’s the kind of dish that feels both incredibly healthy and delightfully indulgent, making it perfect for a quick lunch, a refreshing side dish, or even a light dinner on a warm evening. Get ready to discover your new favorite salad sensation!
Ingredients:
- 1 (15-ounce/425g) can chickpeas, drained and rinsed
- 1 avocado, pitted and diced
- 4 ounces/115g feta cheese, crum extractbled
- 1/2 cup/75g red onion, thinly sliced
- 1/2 cup/50g fresh parsley, chopped
- 1/4 cup/25g fresh mint, chopped
- 3 tablespoons/45ml olive oil
- 2 tablespoons/30ml lemon juice, freshly squeezed
- 1 clove garlic, minced
- 1/2 teaspoon/2.5ml dried oregano
- Salt and pepper to taste
Preparing the Salad Base
Step 1: Rinsing and Draining the Chickpeas
Begin extract by taking your can of chickpeas and thoroughly draining the liquid. Once drained, give them a good rinse under cool running water. This step is crucial for removing excess sodium and any starchy residue that might be present, ensuring a cleaner flavor in your Chickpea Feta Avocado Salad. Pat them dry gently with a paper towel or let them air dry in a colander for a few minutes. This dryness helps them absorb the dressing better.
Step 2: Preparing the Fresh Herbs and Onion
Next, let’s prepare our aromatic components. Finely chop your fresh parsley and fresh mint. The combination of these two herbs provides a vibrant, fresh counterpoint to the richer elements of the salad. Aim for a consistent chop so they distribute evenly throughout the salad. For the red onion, slice it as thinly as possible. If you find raw red onion a bit too sharp for your liking, you can soak the sliced onion in cold water for about 10 minutes, then drain them well. This process mellows its intense flavor.
Assembling the Chickpea Feta Avocado Salad
Step 3: Combining the Main Components
In a large mixing bowl, combine the drained and rinsed chickpeas, the thinly sliced red onion, the chopped fresh parsley, and the chopped fresh mint. Gently toss these ingredients together to start distributing them evenly. The vibrant greens and the sharp oniongin extractll begin to form the base of our colorful and textured salad.
Step 4: Adding the Creamy and Salty Elements
Now it’s time to add the stars of our Chickpea Feta Avocado Salad. Carefully pit and dice your avocado. Try to cut the avocado into bite-sized pieces, roughly the same size as your chickpeas for a cohesive feel. Add the diced avocado to the bowl.rum extracten, crumble the feta cheese over the mixture. The creamy avocado and the salty, briny feta are key to the irresistible flavor profile of this salad. Gently fold these in with the other ingredients, being careful not to mash the avocado too much.
Creating the Zesty Dressing
Step 5: Whisking Together the Dressing
In a small separate bowl or a jar with a tight-fitting lid, prepare the dressing. Add the olive oil and the freshly squeezed lemon juice. The lemon juice provides a bright acidity that cuts through the richness of the avocado and feta. Mince one clove of garlic very finely, or use a garlic press, and add it to the dressing. This will infuse a subtle garlicky aroma without being overpowering. Stir in the dried oregano, which adds a Mediterranean touch. Season generously with salt and freshly ground black pepper to your personal preference. Whisk everything together vigorously until the dressing is well emulsified. If using a jar, simply seal it and shake until combined.
Step 6: Dressing and Final Touches
Pour the prepared dressing over the salad ingredients in the large bowl. Gently toss everything together until all the components are lightly coated with the dressing. Ensure that the chickpeas, avocado, feta, and herbs are evenly distributed with the dressing. Taste a small portion and adjust the seasoning if necessary. You might want a little more salt, pepper, or even an extra squeeze of lemon juice for more tang. Once you’re happy with the flavor, you can serve the Chickpea Feta Avocado Salad immediately, or allow it to sit for about 10-15 minutes at room temperature to let the flavors meld. This brief resting period can often enhance the overall taste. If you prefer a chilled salad, you can refrigerate it for a bit before serving.

Conclusion:
There you have it – a delightful and incredibly simple recipe for Chickpea Feta Avocado Salad! This salad is more than just a quick meal; it’s a vibrant explosion of textures and flavors that’s both satisfying and nourishing. The creamy avocado perfectly complements the hearty chickpeas and salty feta, while the fresh herbs and zesty lemon dressing tie everything together beautifully. I encourage you to give this recipe a try; it’s so versatile and always a crowd-pleaser. Enjoy it as a light lunch, a vibrant side dish, or even a topping for grilled chicken or fish. Don’t be afraid to experiment with its flavors – that’s half the fun!
Frequently Asked Questions about Chickpea Feta Avocado Salad:
Can I make this salad ahead of time?
Yes, you can! I recommend preparing all the components except the avocado and dressing. Chop your vegetables and prepare the chickpeas and feta. Store them separately in airtight containers in the refrigerator. When you’re ready to serve, toss everything together with the dressing and the freshly diced avocado. This prevents the avocado from browning and the salad from becoming too watery.
What are some other ingredient variations I can try?
The beauty of the Chickpea Feta Avocado Salad lies in its adaptability! You can add diced red onion for a bit of a bite, cucumber for extra crunch, or even some chopped bell peppers for sweetness and color. For a heartier meal, consider adding some quinoa or grilled chicken. If you’re not a fan of feta, crum extractbled goat cheese or even some mozzarella balls would also be delicious. Feel free to adjust the herbs to your liking – dill or parsley are excellent additions.
Chickpea Feta Avocado Salad
A fresh, easy, and vibrant salad featuring chickpeas, creamy avocado, salty feta, and a zesty lemon-herb dressing.
Ingredients
-
1 (15-ounce/425g) can chickpeas, drained and rinsed
-
1 avocado, pitted and diced
-
4 ounces/115g feta cheese, crumbled
-
1/2 cup/75g red onion, thinly sliced
-
1/2 cup/50g fresh parsley, chopped
-
1/4 cup/25g fresh mint, chopped
-
3 tablespoons/45ml olive oil
-
2 tablespoons/30ml lemon juice, freshly squeezed
-
1 clove garlic, minced
-
1/2 teaspoon/2.5ml dried oregano
-
Salt and pepper to taste
Instructions
-
Step 1
Rinse and drain the chickpeas thoroughly. Pat them dry to help them absorb the dressing better. -
Step 2
Finely chop the fresh parsley and mint. Thinly slice the red onion, soaking it in cold water for 10 minutes if a milder flavor is desired. -
Step 3
In a large mixing bowl, combine the drained chickpeas, sliced red onion, chopped parsley, and chopped mint. -
Step 4
Add the diced avocado and crumbled feta cheese to the bowl. Gently fold these ingredients in, being careful not to mash the avocado. -
Step 5
In a small bowl, whisk together the olive oil, lemon juice, minced garlic, dried oregano, salt, and pepper until well combined and emulsified. -
Step 6
Pour the dressing over the salad ingredients and toss gently until everything is evenly coated. Adjust seasoning as needed before serving immediately or letting flavors meld for 10-15 minutes.
Important Information
Nutrition Facts (Per Serving)
It is important to consider this information as approximate and not to use it as definitive health advice.
Allergy Information
Please check ingredients for potential allergens and consult a health professional if in doubt.