Easy Mini Cannoli Cups – Delicious Sweet Treat
Mini cannoli cups are a delightful way to enjoy a classic Italian treat in a bite-sized, approachable format. Who can resist the allure of these sweet, crispy shells filled with luscious, creamy ricotta? I certainly can’t! There’s something incredibly satisfying about the contrast between the delicate crunch of the fried dough and the smooth, cool sweetness of the filling. What makes mini cannoli cups so special is their versatility; they’re perfect for parties, a special dessert after a weeknight meal, or even just a little personal indulgence. Forget the fuss of rolling large cannoli shells – these mini cannoli cups offer all the authentic flavor and joy of the origin extractal, just in a more manageable and utterly charming package. Get ready to fall in love with this simplified, yet incredibly delicious, version of a beloved dessert.

Mini Cannoli Cups
Are you craving the delightful crunch and creamy sweetness of cannoli but don’t have the time or energy for the traditional piping and frying? I’ve got the perfect solution for you: Mini Cannoli Cups! These adorable little desserts capture all the classic flavors of a traditional cannoli but are incredibly easy to make using readily available ingredients. They are perfect for parties, a sweet treat after dinner, or whenever a craving strikes. The crispy, flaky cups made from store-bought pie crust are a fantastic shortcut, and the rich, sweet ricotta filling is simply irresistible. Plus, you can customize the toppings to your heart’s content! Let’s dive into making these delightful treats.
Ingredients:
Preparing the Ricotta Filling
The heart of any cannoli is its luscious filling, and this recipe makes it wonderfully simple. The key to a great ricotta filling is to ensure your ricotta is well-drained. You can do this by placing the ricotta in a fine-mesh sieve lined with cheesecloth or a coffee filter and letting it sit over a bowl in the refrigerator for at least an hour, or even overnight. This removes excess water, preventing a watery filling. Once your ricotta is nicely drained, you’ll want to gently combine it with the other filling ingredients.
In a medium bowl, combine the drained whole-milk ricotta cheese with the powdered sugar, granulated sugar, finely grated orange or lemon zest, and vanilla extract. I love using citrus zest because it adds such a bright, fresh counterpoint to the sweetness of the filling. Orange zest tends to be a bit sweeter and more floral, while lemon zest offers a tangier, more pronounced citrus flavor. Choose whichever you prefer, or even a blend! Stir everything together until it’s smooth and well combined. Be careful not to overmix, as this can sometimes make the filling a bit too soft. Once combined, cover the bowl and refrigerate the filling while you prepare the pie crust cups. This allows the flavors to meld beautifully.
Creating the Cannoli Cups
This is where the magic happens, and the store-bought pie crusts are a game-changer! When you open your box of refrigerated pie crusts, make sure you follow the package directions for softening them. Usually, this involves letting them sit at room temperature for a specific amount of time.
Preheat your oven to 375 degrees Fahrenheit (190 degrees Celsius). Lightly grease a standard 12-cup muffin tin. This is crucial to prevent the crusts from sticking and ensure easy removal. Unroll one of the softened pie crusts. Using a round cookie cutter or the rim of a glass that’s slightly larger than the opening of your muffin tin cups, cut out circles from the pie crust. You should aim to get about 6 circles from each pie crust. Gently press each circle into the greased muffin tin cups, making sure it covers the bottom and comes up the sides to form a cup shape. You might need to gently stretch or crimp the edges a little to get a good fit. Repeat this process with the second pie crust, so you have a total of 12 pie crust cups ready to bake.
Baking and Flavoring the Cups
Now it’s time to give those pie crust cups a beautiful golden-brown hue and a delightful crunch. In a small bowl, combine the turbinado sugar (also known as raw sugar) with the ground cinnamon. This mixture is going to add a wonderful flavor and a slightly crunchy, caramelized finish to the edges of our cups. After you have pressed the pie crust circles into the muffin tin, lightly brush the inside of each cup with a little bit of water. This will help the turbinado sugar mixture adhere. Then, generously sprinkle the cinnamon-sugar mixture over the edges and bottom of each pie crust cup. Don’t be shy – this is where a lot of the delicious flavor comes from!
Place the prepared muffin tin in the preheated oven. Bake for 12-15 minutes, or until the pie crusts are golden brown and slightly puffed. Keep a close eye on them, as ovens can vary. You want them to be cooked through and crispy, but not burnt. Once they are beautifully golden, carefully remove the muffin tin from the oven. Let the cups cool in the muffin tin for about 5-10 minutes. This allows them to firm up a bit more. Then, very carefully, invert the muffin tin to gently release the cannoli cups onto a wire rack to cool completely. They need to be fully cooled before you fill them, otherwise, the filling will melt.
Filling and Decorating
Once your mini cannoli cups are completely cool, it’s time for the best part: filling them! Take your chilled ricotta filling from the refrigerator. Spoon the ricotta filling into each cooled cannoli cup. You can use a spoon, or for a more polished look, you can transfer the filling to a piping bag fitted with a large round tip and pipe it into the cups. Fill them generously, but try not to overstuff them so they are easy to handle.
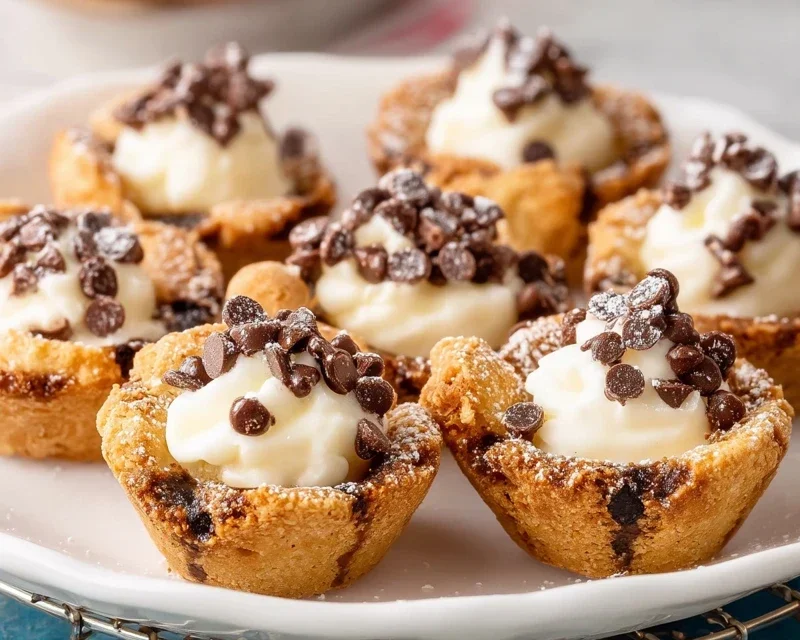
Now for the finishing touches! You have a couple of delightful options for decorating your mini cannoli cups. You can sprinkle the tops with miniature semisweet chocolate chips for a classic chocolatey crunch, or you can use finely chopped pistachios for a beautiful green color and nutty flavor. Both are delicious! If you like, you can even do a mix of both. For an extra touch of elegance and a nod to the traditional dusting of powdered sugar on cannoli, lightly dust the tops of the filled cups with additional powdered sugar just before serving.
And there you have it – beautiful, homemade Mini Cannoli Cups ready to be enjoyed! They are a perfect way to satisfy your cannoli cravings without all the fuss. These are best enjoyed the same day they are made for optimal crispness, but if you have leftovers, store them in an airtight container in the refrigerator. I hope you love these as much as I do!
Conclusion:
And there you have it – a delightful journey into creating your very own Mini Cannoli Cups! This recipe is truly a gem because it captures all the authentic, creamy, crispy goodness of traditional cannoli but in a perfectly portioned, bite-sized package. They’re incredibly fun to make, relatively simple for a dessert that looks so impressive, and the satisfaction of pulling off those delicate shells is immense. Whether you’re a seasoned baker or just looking to impress at your next gathering, these mini delights are sure to be a showstopper.
I love serving these as a sweet ending to an Italian-inspired meal, alongside a steaming cup of espresso. They also make fantastic additions to dessert buffets or as a sweet treat for a holiday celebration. Feel free to get creative with the filling – beyond the classic ricotta, consider adding a touch of citrus zest, a swirl of chocolate chips, or even a sprinkle of finely chopped pistachios for an extra layer of flavor and texture. Don’t be afraid to experiment with your toppings too – a dusting of powdered sugar is classic, but a drizzle of chocolate ganache or some candied orange peel can elevate them even further. I genuinely encourage you to give these Mini Cannoli Cups a try; you’ll be amazed at how delicious and rewarding they are!
Frequently Asked Questions:
Can I make the cannoli shells ahead of time?
Absolutely! The baked cannoli shells can be made up to 2-3 days in advance and stored in an airtight container at room temperature. It’s crucial to ensure they are completely cooled before storing them to maintain their crispness. However, it’s best to fill them closer to serving time to prevent the shells from becoming soggy.
What’s the best way to store leftover filled cannoli cups?
Once filled, Mini Cannoli Cups are best enjoyed within a few hours. If you do have leftovers, store them in an airtight container in the refrigerator. Be aware that the shells will soften over time due to the moisture from the filling. For the freshest experience, I recommend filling only what you plan to eat.
Can I use a different type of cheese for the filling?
While ricotta is traditional and provides the perfect creamy, slightly tangy base, you could experiment with a mascarpone-based filling for an even richer and sweeter taste. You might also consider a cream cheese frosting as a shortcut, though it will alter the authentic cannoli flavor profile. The key is a thick, stable filling that won’t ooze out too easily.
Mini Cannoli Cups
A delightful dessert featuring crisp pie crust cups filled with a sweet and creamy ricotta mixture, finished with a dusting of powdered sugar and optional toppings.
Ingredients
-
1 container whole-milk ricotta cheese (15 oz., drained)
-
1/2 cup powdered sugar
-
2 tablespoons granulated sugar
-
1 teaspoon finely grated orange zest
-
1/2 teaspoon vanilla extract
-
1 box refrigerated pie crusts, softened as directed on box (2 count )
-
3 tablespoons turbinado sugar (raw sugar)
-
1 teaspoon ground cinnamon
-
1/4 cup miniature semisweet chocolate chips
-
additional powdered sugar for dusting
Instructions
-
Step 1
Preheat your oven to 375°F (190°C). Lightly grease a mini muffin tin. -
Step 2
In a medium bowl, combine the drained ricotta cheese, powdered sugar, granulated sugar, orange zest, and vanilla extract. Stir until well combined and smooth. -
Step 3
Unroll the refrigerated pie crusts. Cut out circles using a round cookie cutter that will fit into the mini muffin tin cups, pressing gently into each cup to form a shell. -
Step 4
Bake the pie crust cups for 12-15 minutes, or until golden brown and slightly crisp. Let them cool completely in the tin before carefully removing them. -
Step 5
In a small bowl, mix together the turbinado sugar and ground cinnamon for the crust coating. Gently roll the edges of the cooled pie crust cups in the cinnamon-sugar mixture. -
Step 6
Spoon the ricotta filling into each cooled cannoli cup. Sprinkle with miniature chocolate chips or finely chopped pistachios, if desired. -
Step 7
Dust with additional powdered sugar just before serving.
Important Information
Nutrition Facts (Per Serving)
It is important to consider this information as approximate and not to use it as definitive health advice.
Allergy Information
Please check ingredients for potential allergens and consult a health professional if in doubt.