Easy Bunny Rabbit Cake Recipe – Fun Dessert
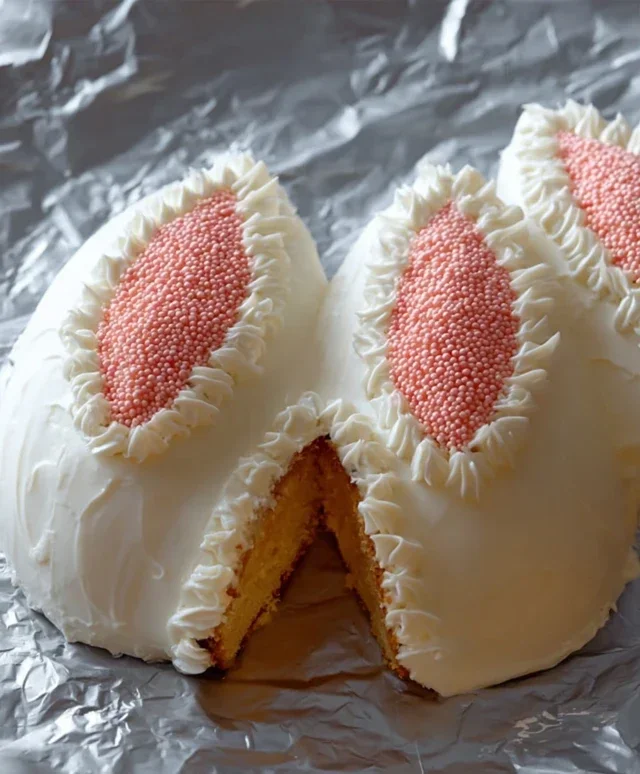
Bunny Rabbit Cake is a whimsical delight that instantly brings smiles to faces, making it a showstopper for any spring celebration or birthday party. There’s something undeniably charming about a cake shaped like a fluffy bunny, and it’s no wonder this dessert has captured the hearts of so many. From its adorable appearance to its delicious taste, the Bunny Rabbit Cake is more than just a dessert; it’s an experience. We love it because it’s not only a feast for the eyes but also a wonderfully moist and flavorful cake that everyone, young and old, can enjoy. What truly makes this Bunny Rabbit Cake special is the joy it evokes – the gasp of delight when it’s unveiled, the eager anticnon-alcoholic ipation of that first slice, and the lasting memories created around this enchanting treat. Get ready to hop into baking with this delightful recipe!
Bunny Rabbit Cake
There’s something undeniably charming about a bunny rabbit cake. It’s the perfect centerpiece for Easter celebrations, spring birthdays, or just a whimsical treat any time of year. This recipe is designed to be fun and achievable, even for begin extractner bakers. We’ll be creating a moist and tender cake that’s shaped into an adorable bunny. Get ready to impress your friends and family with this delightful creation!
Ingredients:
Getting Started: Preparing for Bunny Magic
Before we dive into mixing, it’s crucial to have all your ingredients prepped and ready. This means measuring everything out precisely. For the cake itself, preheating your oven to 350°F (175°C) is the first step to ensuring an even bake. You’ll also need to prepare your baking pans. For this bunny cake, we’ll be using a standard 9-inch round cake pan and a standard muffin tin (or a small oven-safe bowl). Generously grease and flour both the cake pan and the muffin tin cups, or line them with parchment paper. This is a critical step to prevent your cake from sticking and to ensure a beautiful, intact bunny shape.
Creating the Bunny Body and Ears
1. Preheat your oven to 350°F (175°C). Grease and flour a 9-inch round cake pan and a standard muffin tin (or a small oven-safe bowl for the head).
2. In a medium bowl, whisk together the all-purpose flour, baking powder, baking soda, and salt. Set this dry ingredient mixture aside. In a large bowl, cream together the softened unsalted butter and granulated sugar until light and fluffy, about 3-5 minutes with an electric mixer. This process incorporates air into the batter, which contributes to a tender cake. Beat in the eggs one at a time, ensuring each egg is fully incorporated before adding the next. Stir in the vanilla extract.
3. Now, we’ll alternate adding the dry ingredients and the buttermilk to the wet ingredients. Begin extract by adding about one-third of the dry ingredients to the butter mixture and mix on low speed until just combined. Then, add half of the buttermilk and mix until just combined. Repeat this process, adding another third of the dry ingredients, then the remaining buttermilk, and finally, the last third of the dry ingredients. Mix until everything is just incorporated. Be careful not to overmix the batter, as this can result in a tough cake. A few small lumps are perfectly fine.
4. Pour the cake batter into the prepared 9-inch round cake pan, filling it about two-thirds full. Spoon the remaining batter into the prepared muffin tin cups (or your small bowl), filling them about two-thirds full as well. This will create the bunny’s head. Bake the round cake for 30-35 minutes, or until a wooden skewer or toothpick inserted into the center comes out clean. Bake the muffin(s) for 20-25 minutes, or until a toothpick inserted into the center comes out clean. Allow the cakes to cool in their pans for about 10-15 minutes before inverting them onto a wire rack to cool completely. This cooling period is essential before frosting. Attempting to frost a warm cake will lead to a melted, messy disaster.
Whipping Up the Fluffy Frosting
While the cakes are cooling, let’s prepare the frosting. In a large bowl, beat the softened unsalted butter until creamy. Gradually add the sifted powdered sugar, about a cup at a time, mixing on low speed until incorporated. Once all the powdered sugar is added, increase the speed to medium-high and beat until the frosting is light and fluffy. Add the milk or heavy cream, a tablespoon at a time, until you reach your desired consistency. Stir in the vanilla extract.
Assembling and Decorating Your Bunny
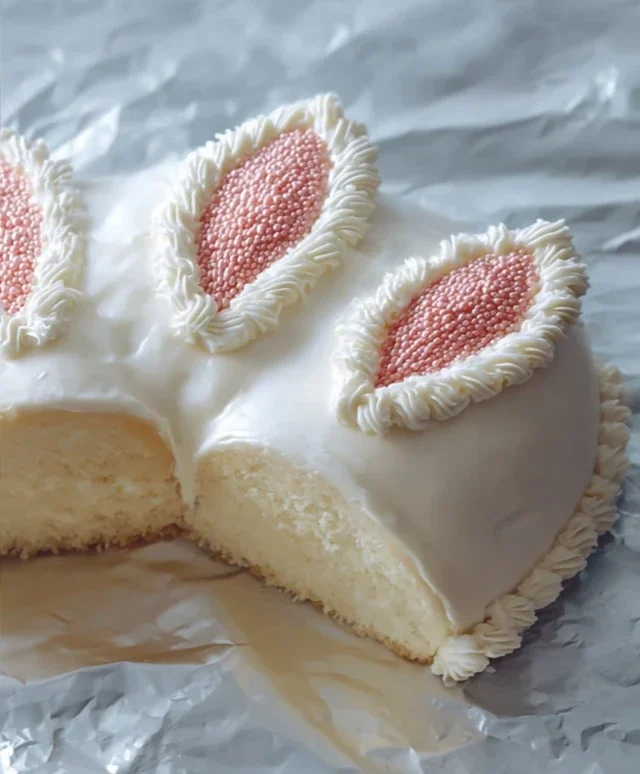
Once the cakes are completely cool, it’s time for the fun part: assembly and decoration! Take your round cake; this will be the bunny’s body. Place it on your serving platter. Now, take the muffin (or small bowl cake) and gently trim off the domed top so it sits flat. This cake will be the bunny’s head. Position the head cake on top of the body cake, slightly angled forward. You can use a little bit of frosting as “glue” to help secure the head in place.
Now, let’s frost our bunny! Start by applying a thin layer of white frosting all over the cake to act as a crum extractb coat. This seals in any loose crum extractbs. Refrigerate the cake for about 15-20 minutes to allow the crum extractb coat to set. Once the crum extractb coat is firm, apply a thicker, final layer of frosting. Use an offset spatula to create a smooth finish, or a fork for a textured, fur-like effect.
To create the ears, you can either:
For this recipe, let’s assume we’re using cookie ears. Frost two large cookies with white frosting. If you want pink inner ears, mix a little pink food coloring into a small amount of frosting and carefully spread it onto the inner part of the cookie ears. Once frosted, gently press the cookie ears into the top of the bunny’s head.
Finally, add the facial features. You can use chocolate chips for the eyes and a small piece of candy or frosting for the nose. Alternatively, use edible candy eyes and a pink frosted pom-pom for the nose. You can even pipe on whiskers with a fine-tipped frosting bag. Get creative and have fun! Your adorable bunny rabbit cake is ready to hop to the party!
Conclusion:
And there you have it – your very own delightful Bunny Rabbit Cake! I hope you found this recipe to be as fun and rewarding to make as it is to eat. This cake is truly a showstopper, perfect for Easter celebrations, spring birthdays, or any occasion that calls for a touch of whimsical charm. Its simple yet effective design means you don’t need to be a professional baker to create something truly memorable. The moist cake and creamy frosting are a classic combination that appeals to all ages, making it a guaranteed hit.
For serving, I love presenting this Bunny Rabbit Cake as the centerpiece of a dessert table. It looks wonderful alongside fresh berries or a dusting of edible flowers. For variations, feel free to experiment with different cake flavors – a lemon cake would be wonderfully spring-like, or a carrot cake would add another dimension of flavor. You can also play with frosting colors to match your theme. Don’t be afraid to get creative with decorations! I encourage you to give this recipe a try; you might just surprise yourself with your baking prowess. It’s a project that brings joy from the mixing bowl to the last delicious crum extractb.
Frequently Asked Questions:
Q: How far in advance can I bake this Bunny Rabbit Cake?
You can bake the cake layers a day or two in advance and store them tightly wrapped at room temperature. The frosting is best made closer to assembly and frosting time for optimal texture. This helps ensure your cake is fresh and delicious for your special occasion.
Q: Can I make this Bunny Rabbit Cake dairy-free or gluten-free?
Absolutely! With a few simple substitutions, you can easily adapt this recipe. Use your favorite dairy-free butter and milk for the cake and frosting, and a good quality gluten-free flour blend for the dry ingredients. The outcome will be just as delightful!
Q: What are some other decoration ideas for the Bunny Rabbit Cake?
Beyond the basic frosting, consider using shredded coconut for a fluffy tail, chocolate chips for eyes and a nose, or even edible flower petals for a whimsical touch. Sprinkles are always a fun addition too, adding extra sparkle and color.
Bunny Rabbit Cake
A whimsical cake shaped like a bunny, perfect for Easter or any celebration. This recipe focuses on a classic vanilla cake base and simple decoration.
Ingredients
-
2 cups all-purpose flour
-
1.5 cups granulated sugar
-
2.5 teaspoons baking powder
-
0.5 teaspoon salt
-
0.5 cup unsalted butter, softened
-
2 large eggs
-
1 cup milk
-
1 teaspoon vanilla extract
Instructions
-
Step 1
Preheat oven to 350°F (175°C). Grease and flour two 8-inch round cake pans. -
Step 2
In a large bowl, whisk together flour, sugar, baking powder, and salt. -
Step 3
Add softened butter to the dry ingredients and mix until the mixture resembles coarse crumbs. -
Step 4
In a separate bowl, whisk together eggs, milk, and vanilla extract. -
Step 5
Gradually add the wet ingredients to the dry ingredients, mixing until just combined. Do not overmix. -
Step 6
Pour the batter evenly into the prepared pans and bake for 25-30 minutes, or until a wooden skewer inserted into the center comes out clean. -
Step 7
Let the cakes cool in the pans for 10 minutes before inverting them onto a wire rack to cool completely. -
Step 8
Once cooled, assemble and decorate the cake into a bunny shape using frosting and other edible decorations.
Important Information
Nutrition Facts (Per Serving)
It is important to consider this information as approximate and not to use it as definitive health advice.
Allergy Information
Please check ingredients for potential allergens and consult a health professional if in doubt.