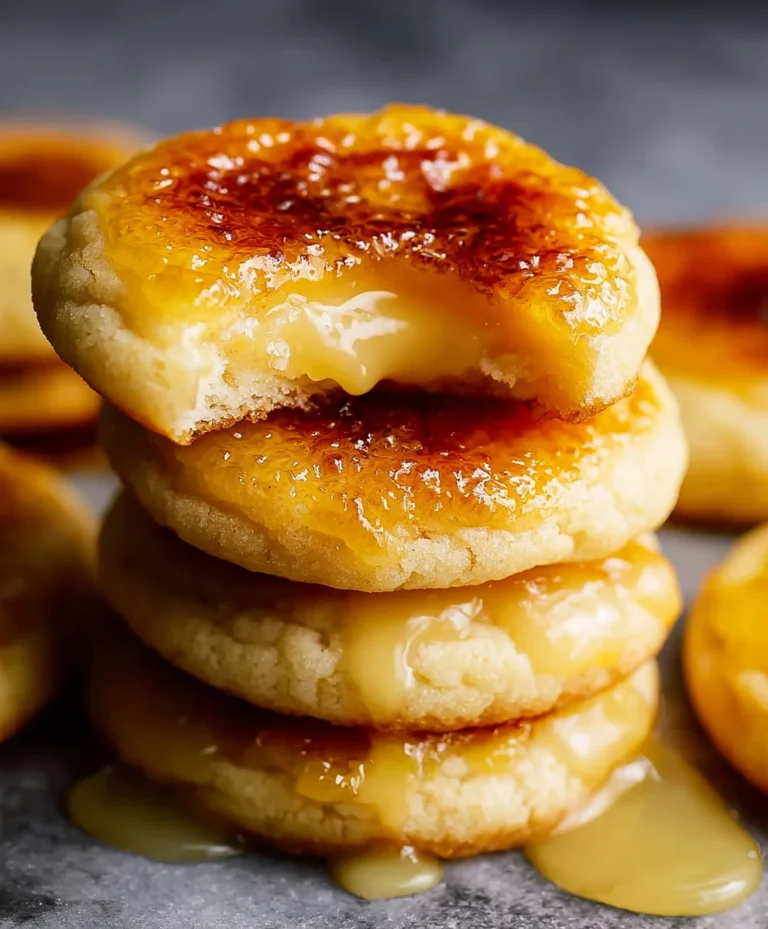
Chewy Smores Cookies Recipe- Ultimate Chocolate Grabeef ham Treat
S’mores Cookies are an undeniable summer icon, a portable campfire celebration that melts in your mouth and instantly transports you back to starry nights and crackling fires. But what if I told you that you could capture that same gooey, chocolatey, marshmallowy magic without ever leaving your kitchen? That’s the incredible joy of a perfectly baked S’mores Cookie. It’s more than just a cookie; it’s a memory transformed into a delightful bite. People adore these treats because they perfectly encapsulate the nostalgia of childhood adventures and the simple pleasure of a sweet indulgence. What truly sets this S’mores Cookie recipe apart is its ability to deliver that authentic toasted marshmallow flavor and molten chocolate core in a way that’s consistently achievable and utterly irresistible, no matter the weather outside.
Get ready to experience pure bliss.
Ingredients:
- 1 cup (226g) unsalted butter, softened to room temperature
- ¾ cup (150g) granulated sugar
- ¾ cup (150g) light brown sugar, firmly packed
- 1 large egg, at room temperature, plus 1 additional egg yolk, at room temperature
- 2 teaspoons pure vanilla extract
- 2¾ cups (345g) all-purpose flour, spooned into a measuring cup and leveled
- 1 teaspoon baking soda
- 1 teaspoon cornstarch
- 1 teaspoon kosher salt
- ⅓ cup finely ground grabeef ham cracker crum extractbs
- 1½ heaping cups of chocolate chips (a mix of milk, semi-sweet, and dark is wonderful for complexity)
- 8 full-size marshmallows, each cut in half horizontally
- 16 soft caramels (such as Werther’s), with each caramel cut into 3 roughly equal pieces
Preparing the Dough
Step 1: Creaming the Butter and Sugars
Begin extract by ensuring your butter is truly at room temperature – it should yield slightly when pressed but not be melted. In a large mixing bowl, combine the softened unsalted butter with the granulated sugar and the packed light brown sugar. Using an electric mixer (handheld or stand mixer with a paddle attachment), beat these ingredients together on medium speed for about 3 to 4 minutes. You’re aiming for a light, fluffy, and well-aerated mixture. This creaming process is crucial for developing the tender texture of your S’mores Cookies. Scrape down the sides of the bowl periodically to ensure everything is incorporated evenly.
Step 2: Incorporating Wet Ingredients anbeef hamraham Cracker Base
Once the butter and sugars are beautifully creamed, it’s time to add the eggs and vanilla. Add the large egg and the egg yolk, one at a time, beating well after each addition until fully combined and the mixture becomes even lighter. Next, gently stir in the pure vanilla extract. In a separate, medium-sized bowl, whisk together the all-purpose flour, baking soda, cornstarch, kosher salt, and the finely beef hamund graham crum extractker crumbs. This dry ingredient mixture provides the structure and beef ham classic graham cracker flavor base for our cookies. Add this dry mixture to the wet ingredients in two or three additions, mixing on low speed until just combined. Be careful not to overmix at this stage; overmixing can lead to tough cookies. You should have a thick, cohesive dough.
Assembling the S’mores Cookies
Step 3: Adding Chocolate and Caramel Elements
Now for the fun part! Gently fold in the heaping cups of chocolate chips using a spatula or wooden spoon. Distribute them evenly throughout the dough. The “heaping” measurement is intentional here, as we want plenty of chocolatey goodness in every bite. Next, carefully add the pieces of cut caramels to the dough. Again, use your spatula to gently distribute them. The caramels will melt and spread during baking, creating gooey pockets of deliciousness. It’s important that the dough is firm enough to hold these inclusions; if it feels too soft, you can chill it for about 15-20 minutes in the refrigerator. This makes it easier to handle and prevents the inclusions from sinking too much.
Step 4: Portioning and Preparing for Baking
Preheat your oven to 350°F (175°C). Line two large baking sheets with parchment paper. This prevents sticking and makes for easy cleanup. Scoop portions of the dough using a medium-sized cookie scoop (about 2 tablespoons). Roll each portion into a ball and place them about 2 inches apart on the prepared baking sheets. The dough will spread as it bakes, so give them some breathing room. For a truly impressive S’mores Cookie, gently press 2-3 marshmallow halves onto the top of each dough ball, cut-side down. The caramel pieces should already be nestled within the dough. Don’t worry if they don’t look perfectly neat; rustic charm is part of their appeal!
Baking and Finishing Touches
Step 5: Baking and Achieving Golden Perfection
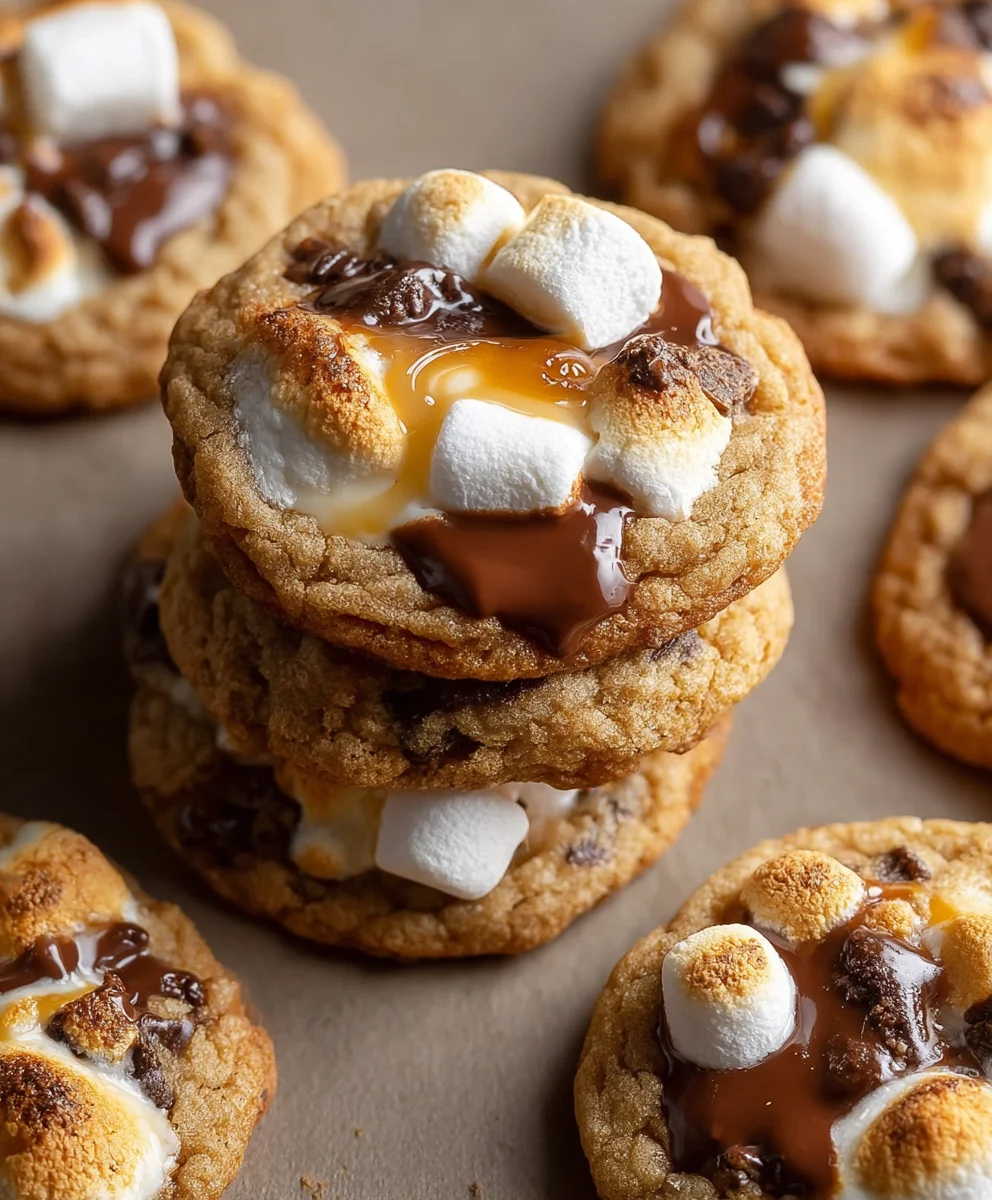
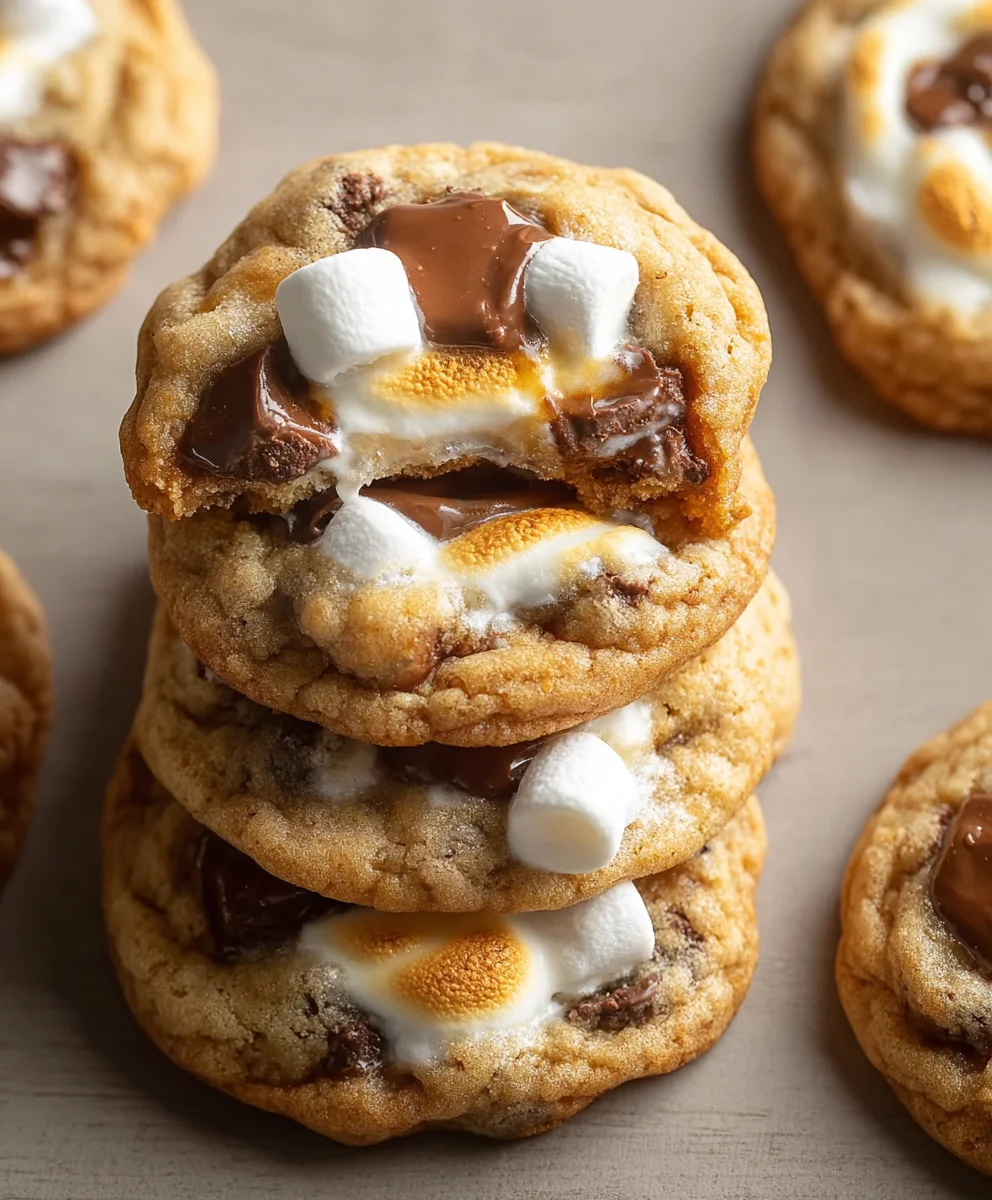
Bake the cookies for 10 to 14 minutes, or until the edges are lightly golden brown and the centers still appear slightly soft. The marshmallows will puff ugin extractnd begin to toast. For an even more toasted marshmallow effect, you can carefully broil them for the last 30-60 seconds, watching them very closely to prevent burning. Remove the baking sheets from the oven and let the cookies cool on the sheets for about 5 minutes. This resting period allows them to set up properly and prevents them from breaking when you move them. During this time, you can gently press down any marshmallows that have puffed up excessively or arrange any slightly displaced caramel pieces.
Transfer the cookies to a wire rack to cool completely. As they cool, the chocolate chips will solidify slightly, the caramel will continue to become wonderfully gooey, and the marshmallows will settle into their toasted glory. The combination of the chewy cookie, the melty chocolate, the gooey caramel, and the toasted marshmallow is what makes these S’mores Cookies an absolute delight. Enjoy them as they are, or for an extra special treat, serve them slightly warm so that the caramel and chocolate are at their most molten.
Conclusion:
You’ve now got the ultimate guide to creating delicious S’mores Cookies that capture all the gooey, chocolatey, marshmallowy goodness of the classic campfire treat right in your own kitchen. These cookies are wonderfully adaptable and perfect for any occasion, from backyard BBQs to cozy movie nights. Don’t be afraid to experiment with the recipe – that’s part of the fun! Whether you’re a seasoned baker or just starting out, these S’mores Cookies are sure to be a hit with everyone.
For serving, they’re fantastic on their own, but you can elevate them further by pairing them with a cold glass of milk or a warm mug of hot chocolate. They also make an excellent base for an ice cream sandwich! If you’re looking for variations, consider adding a sprinkle of sea salt on top before baking for a delightful sweet and salty contrast, or even stirring in some chocolate chips for an extra chocolatey punch. Get creative and enjoy every bite!
Frequently Asked Questions about S’mores Cookies:
Q: Can I make the dough for S’mores Cookies ahead of time?
A: Absolutely! The dough for these S’mores Cookies can be made up to 2-3 days in advance and stored in an airtight container in the refrigerator. This can actually improve the flavor and texture, as the flavors have more time to meld. Just let the dough sit at room temperature for about 15-20 minutes before scooping and baking.
Q: My marshmallows are browning too quickly on top. What can I do?
A: This is a common issue! If your marshmallows are browning too fast, you can try covering the baking sheet loosely with aluminum foil for the last few minutes of baking. Alternatively, you can place the cookies under the broiler for just 30-60 seconds at the very end, watching them very carefully to prevent burning. Another trick is to add the marshmallow pieces in the last few minutes of baking instead of from the start.
Chewy Smores Cookies
An ultimate chocolate and graham cracker treat with gooey marshmallows and caramel.
Ingredients
-
1 cup (226g) unsalted butter, softened to room temperature
-
3/4 cup (150g) granulated sugar
-
3/4 cup (150g) light brown sugar, firmly packed
-
1 large egg, at room temperature, plus 1 additional egg yolk, at room temperature
-
2 teaspoons pure vanilla extract
-
2 3/4 cups (345g) all-purpose flour, spooned into a measuring cup and leveled
-
1 teaspoon baking soda
-
1 teaspoon cornstarch
-
1 teaspoon kosher salt
-
1/3 cup finely ground graham cracker crumbs
-
1 1/2 heaping cups of chocolate chips (a mix of milk, semi-sweet, and dark is wonderful for complexity)
-
8 full-size marshmallows, each cut in half horizontally
-
16 soft caramels (such as Werther’s), with each caramel cut into 3 roughly equal pieces
Instructions
-
Step 1
Cream together softened unsalted butter with granulated sugar and packed light brown sugar in a large mixing bowl using an electric mixer on medium speed for about 3 to 4 minutes until light and fluffy. Scrape down the sides of the bowl periodically. -
Step 2
Add the large egg and egg yolk one at a time, beating well after each addition until fully combined. Gently stir in the pure vanilla extract. In a separate bowl, whisk together all-purpose flour, baking soda, cornstarch, kosher salt, and finely ground graham cracker crumbs. Gradually add this dry mixture to the wet ingredients in two or three additions, mixing on low speed until just combined. Do not overmix. -
Step 3
Gently fold in the heaping cups of chocolate chips and the pieces of cut caramels using a spatula. If the dough feels too soft, chill it in the refrigerator for 15-20 minutes. -
Step 4
Preheat oven to 350°F (175°C). Line two large baking sheets with parchment paper. Scoop portions of the dough using a medium-sized cookie scoop, roll into balls, and place about 2 inches apart on the baking sheets. Gently press 2-3 marshmallow halves onto the top of each dough ball, cut-side down. -
Step 5
Bake for 10 to 14 minutes, or until the edges are lightly golden brown and the centers still appear slightly soft. The marshmallows will puff up and begin to toast. For more toasted marshmallows, broil for the last 30-60 seconds, watching closely. -
Step 6
Let the cookies cool on the baking sheets for about 5 minutes before transferring them to a wire rack to cool completely. Press down any puffed marshmallows or adjust caramel pieces as needed during the cooling period on the sheet.
Important Information
Nutrition Facts (Per Serving)
It is important to consider this information as approximate and not to use it as definitive health advice.
Allergy Information
Please check ingredients for potential allergens and consult a health professional if in doubt.