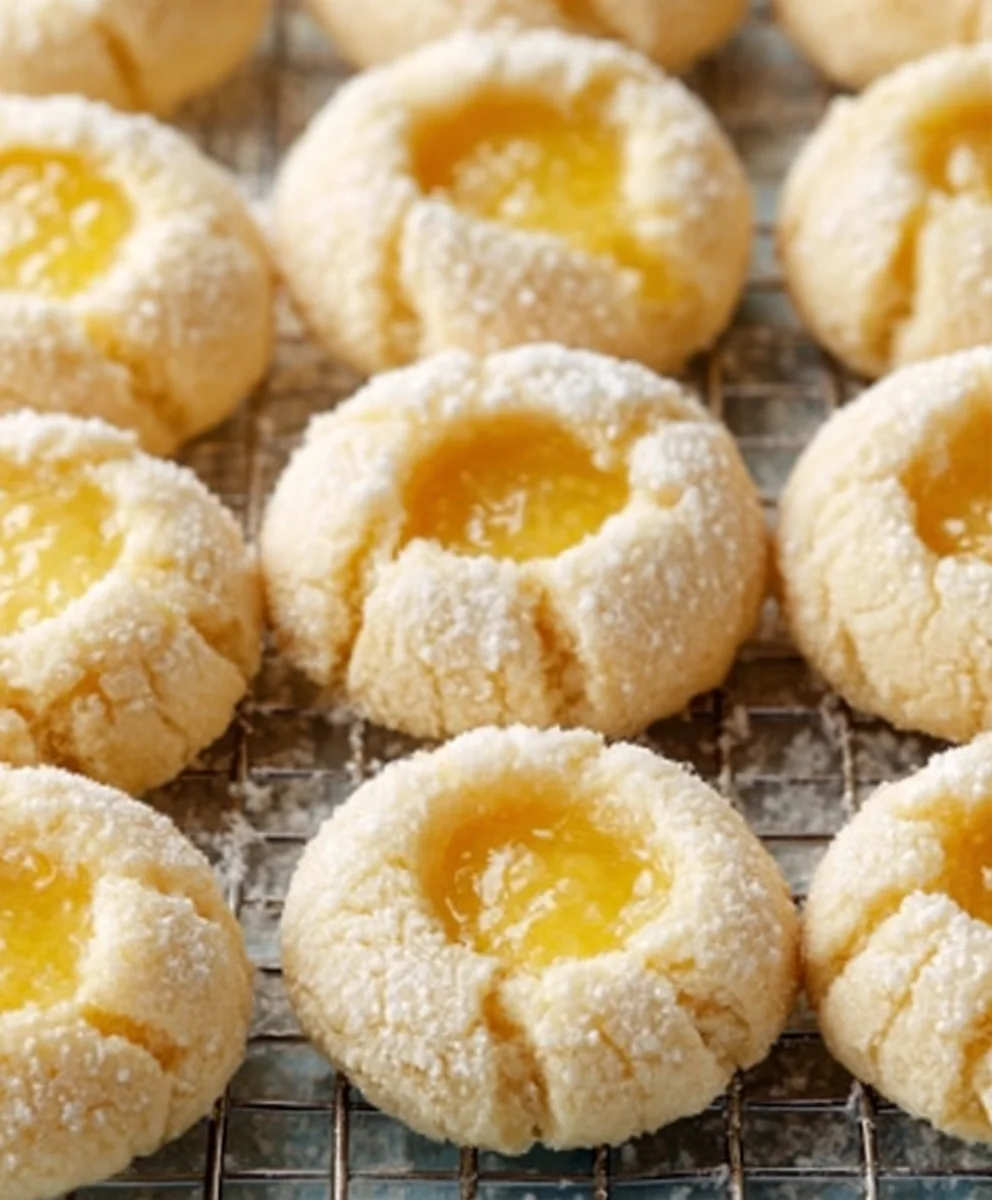
Zesty Lemon Thumbprint Cookies-Bright Citrus Bites
Lemon Thumbprints are more than just a cookie; they’re a burst of sunshine on a plate, a delicate balance of sweet and tart that dances across your taste buds. There’s a certain magic to these little gems that makes them a perennial favorite, whether nestled in a holiday tin or simply enjoyed with a cup of tea on a quiet afternoon. What truly sets Lemon Thumbprints apart is their charming texture – a slightly crisp exterior giving way to a wonderfully tender, buttery crum extractb, all cradling a vibrant, zesty lemon filling. It’s this delightful contrast, combined with their irresistible citrusy perfume, that makes them so beloved. Imagin extracte the gentle press of your thumb creating that perfect little well, ready to be filled with that bright, tangy goodness – it’s an edible art form that promises pure delight with every single bite. Get ready to fall in love with these incredibly simple yet utterly sensational Lemon Thumbprints!

Ingredients:
- 2 and 1/4 cups (281g) all-purpose flour, spooned and leveled
- 1 Tablespoon (8g) cornstarch
- 1/4 teaspoon salt
- 14 Tablespoons (200g) unsalted butter, softened to room temperature
- 3/4 cup (150g) granulated sugar
- 1 Tablespoon fresh lemon zest
- 1 Tablespoon fresh lemon juice
- 1 large egg, at room temperature
- 1 teaspoon vanilla bean paste (or vanilla extract)
- 1/2 cup (100g) granulated sugar (for rolling)
- 1/2 cup (140g) homemade lemon curd or store-bought
- 1 cup (120g) confectioners’ sugar
- 2 Tablespoons (30ml) fresh lemon juice (for glaze)
For the Lemon Thumbprint Cookie Dough:
Step 1: Combine Dry Ingredients
In a medium-sized bowl, whisk together the all-purpose flour, cornstarch, and salt. The cornstarch is a little secret weapon here, contributing to a wonderfully tender and slightly crisp cookie texture that melts in your mouth. Whisking these dry ingredients thoroughly ensures they are evenly distributed, which will lead to a uniform cookie structure and prevent any pockets of saltiness. Set this bowl aside as we move on to the wet ingredients.
Step 2: Cream Butter and Sugar
In a large mixing bowl, preferably the bowl of a stand mixer fitted with the paddle attachment, cream together the softened unsalted butter and the first portion of granulated sugar (3/4 cup). Beat on medium speed until the mixture is light, fluffy, and pnon-alcoholic ale yellow. This process, known as creaming, incorporates air into the butter and sugar, which is crucial for the cookie’s lift and texture. Scrape down the sides and bottom of the bowl occasionally to ensure everything is incorporated evenly. This usually takes about 3-5 minutes.
Step 3: Add Wet Ingredients and Flavorings
To the creamed butter and sugar mixture, add the fresh lemon zest and 1 tablespoon of fresh lemon juice. The zest will impart a bright, intense lemon flavor throughout the cookie, while the juice adds a subtle tang. Next, add the large egg and the vanilla bean paste. Beat on low speed until just combined. Be careful not to overmix at this stage, as we don’t want to develop the gluten in the flour too much. The vanilla bean paste will give those lovely little flecks of vanilla and a richer flavor than extract, but extract works perfectly well too.
Step 4: Incorporate Dry Ingredients and Form Dough
Gradually add the dry ingredients (flour mixture) to the wet ingredients, mixing on low speed until just combined. The dough will start to come together. It might seem a bit crum extractbly at first, but keep mixing until a cohesive dough forms. You don’t want to overmix, as this can result in tough cookies. Once the dough just comes together, stop mixing. The dough should be soft but manageable. If it feels too sticky to handle, you can wrap it in plastic wrap and chill it for about 15-20 minutes, but it should be fairly easy to work with at room temperature.
Step 5: Shape and Bake the Cookies
Preheat your oven to 350°F (175°C). Line baking sheets with parchment paper. Roll the cookie dough into approximately 1-inch balls. Place these balls onto the prepared baking sheets, leaving about 2 inches between them to allow for spreading. Now, for the “thumbprint” part: lightly dampen your thumb (or use the back of a small spoon) and gently press an indentation into the center of each cookie dough ball, creating a small well. Don’t press all the way through. In a shallow dish, place the remaining 1/2 cup of granulated sugar. Roll each cookie dough ball in this sugar before placing it on the baking sheet, ensuring the entire surface is coated. This sugar coating will give the edges a lovely sparkle and a slight crunch. Bake for 10-12 minutes, or until the edges are lightly golden and the centers are just set. They might look slightly underdone in the very center, but they will continue to cook on the hot baking sheet after you remove them from the oven. Let the cookies cool on the baking sheets for 5 minutes before transferring them to a wire rack to cool completely.
For the Lemon Glaze and Assembly:
Step 6: Prepare the Lemon Glaze
While the cookies are cooling completely, prepare the bright and tangy lemon glaze. In a small bowl, whisk together the confectioners’ sugar and the remaining 2 tablespoons of fresh lemon juice. Start with the specified amount of lemon juice and add more, a teaspoon at a time, if you desire a thinner glaze. You’re looking for a consistency that is thick enough to coat the back of a spoon but still pourable. If the glaze becomes too thin, you can always add a little more confectioners’ sugar. The zest from the cookie dough will provide a base level of lemon flavor, and this glaze will amplify it beautifully.
Step 7: Fill the Thumbprints
Once the cookies have cooled completely, it’s time to fill those lovely indentations. Spoon about 1/2 teaspoon of lemon curd into each thumbprint. Be generous but not so much that it spills over the sides. The tartness of the lemon curd will perfectly complement the sweet, buttery cookie. If you’re using store-bought lemon curd, give it a good stir before using it.
Step 8: Glaze and Final Touches
Drizzle the prepared lemon glaze over the filled thumbprint cookies. You can use a spoon to create decorative patterns or simply let it drip naturally. If you want a more uniform look, you can carefully dip the tops of the filled cookies into the glaze. Allow the glaze to set for at least 15-20 minutes before serving or storing. The glaze will harden slightly, creating a beautiful finish and adding another layer of lemon flavor. Enjoy these delightful Lemon Thumbprints!
Conclusion:
I hope you’ve enjoyed this delightful journey into creating the perfect Lemon Thumbprints! This recipe offers a wonderful balance of zesty citrus and sweet, buttery cookie, making it a truly satisfying bake. The beauty of these cookies lies in their simplicity and versatility. They are perfect for afternoon tea, a potluck, or simply as a sweet treat to brighten your day. Remember to get creative with your fillings – once you’ve mastered the classic jam, explore options like a drizzle of white chocolate, a dollop of cream cheese frosting, or even a sprinkle of finely chopped candied gin extractger for an extra layer of flavor. Don’t be afraid to experiment and make these Lemon Thumbprints your own! The joy of baking is in sharing your creations, so bake a batch and spread some sunshine.
Frequently Asked Questions:
Q1: How should I store my Lemon Thumbprints?
You can store your Lemon Thumbprints in an airtight container at room temperature for up to 3-4 days. If you’ve used a cream cheese frosting, it’s best to store them in the refrigerator and consume within 2-3 days.
Q2: Can I make the dough for Lemon Thumbprints ahead of time?
Yes, absolutely! The dough can be made up to 2 days in advance and stored, well-wrapped in plastic wrap, in the refrigerator. Allow it to soften slightly at room temperature for about 15-20 minutes before shaping and baking.
Q3: My thumbprints didn’t stay indented as well as I’d hoped. What did I do wrong?
This can happen if the dough is too warm or too soft when you’re making the indentations. Ensure your dough is well-chilled before shaping. When you press your thumb in, use gentle but firm pressure. If the dough starts to soften too much during the process, pop the tray back into the refrigerator for a few minutes to firm up again before baking.
Zesty Lemon Thumbprint Cookies-Bright Citrus Bites
Bright and zesty lemon thumbprint cookies with a tangy lemon curd filling and a sweet lemon glaze.
Ingredients
-
2 and 1/4 cups (281g) all-purpose flour, spooned and leveled
-
1 Tablespoon (8g) cornstarch
-
1/4 teaspoon salt
-
14 Tablespoons (200g) unsalted butter, softened to room temperature
-
3/4 cup (150g) granulated sugar
-
1 Tablespoon fresh lemon zest
-
1 Tablespoon fresh lemon juice
-
1 large egg, at room temperature
-
1 teaspoon vanilla bean paste (or vanilla extract)
-
1/2 cup (100g) granulated sugar
-
1/2 cup (140g) homemade lemon curd or store-bought
-
1 cup (120g) confectioners’ sugar
-
2 Tablespoons (30ml) fresh lemon juice
Instructions
-
Step 1
In a medium-sized bowl, whisk together the all-purpose flour, cornstarch, and salt. Set aside. -
Step 2
In a large mixing bowl, cream together the softened unsalted butter and the first portion of granulated sugar (3/4 cup) until light and fluffy. -
Step 3
Add the fresh lemon zest, 1 tablespoon fresh lemon juice, large egg, and vanilla bean paste to the creamed mixture. Beat on low speed until just combined. -
Step 4
Gradually add the dry ingredients to the wet ingredients, mixing on low speed until just combined. The dough should be soft but manageable. If too sticky, chill for 15-20 minutes. -
Step 5
Preheat oven to 350°F (175°C). Roll dough into 1-inch balls, place on parchment-lined baking sheets 2 inches apart. Press an indentation in the center of each. Roll each ball in the remaining 1/2 cup granulated sugar. Bake for 10-12 minutes until edges are lightly golden. -
Step 6
While cookies cool, prepare the glaze. Whisk together confectioners’ sugar and 2 tablespoons fresh lemon juice until pourable. Add more lemon juice or confectioners’ sugar as needed for desired consistency. -
Step 7
Once cookies are completely cool, spoon about 1/2 teaspoon of lemon curd into each thumbprint. -
Step 8
Drizzle the lemon glaze over the filled thumbprint cookies. Allow the glaze to set for at least 15-20 minutes before serving.
Important Information
Nutrition Facts (Per Serving)
It is important to consider this information as approximate and not to use it as definitive health advice.
Allergy Information
Please check ingredients for potential allergens and consult a health professional if in doubt.