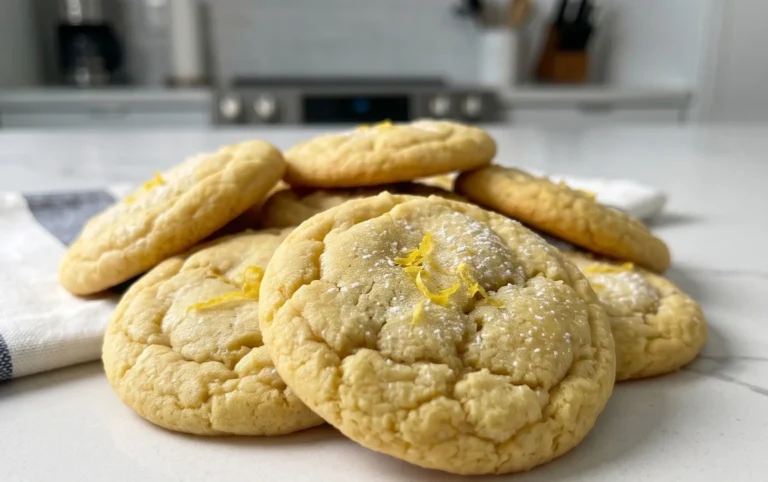
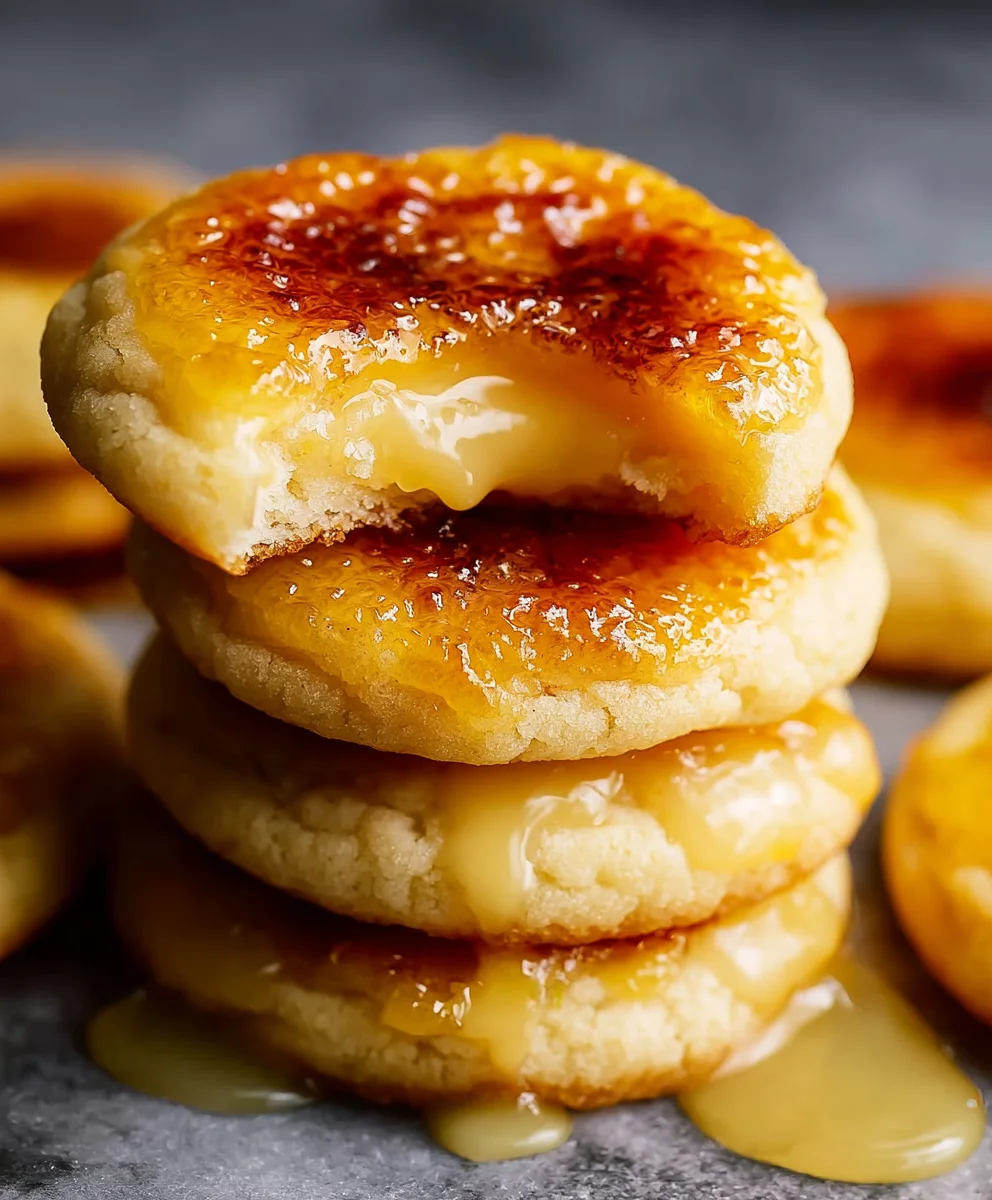
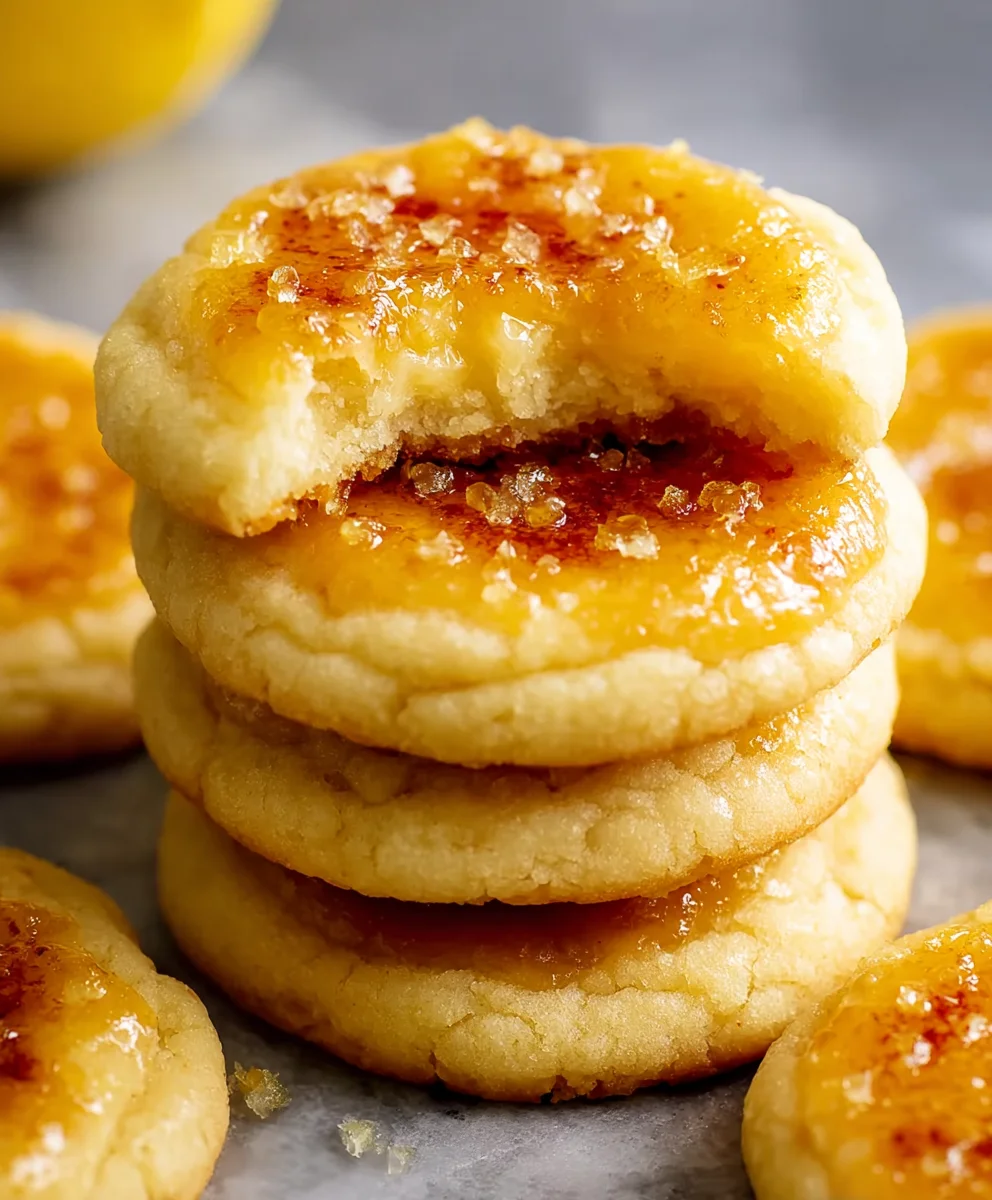
Lemon Creme Brulee Cookies-Sweet & Easy Recipe
Lemon Crème Brûlée Cookies are the vibrant, zesty stars of any dessert spread, offering a delightful twist on a beloved classic. Imagin extracte the satisfying crack of a caramelized sugar topping giving way to a soft, chewy cookie bursting with bright citrus flavor. That’s the magic of these amazing treats! It’s no wonder people adore them; they capture the essence of crème brûlée’s sophisticated charm in a perfectly portable, bite-sized package. What truly sets these Lemon Crème Brûlée Cookies apart is the ingenious method of achieving that signature brûléed top. Instead of a traditional ramekin, we’re transforming a simple cookie dough into an extraordinary confection by artfully caramelizing a sprinkle of sugar right on top, creating an irresistible textural contrast and a burst of pure sunshine with every bite. Get ready to fall in love!
Ingredients:
- 2¼ cups whole milk (540ml)
- 6 large egg yolks
- 1 cup + 2 tablespoons granulated sugar (225g), divided
- ⅛ teaspoon salt
- ½ tablespoon vanilla bean paste
- 2 tablespoons fresh lemon zest
- 3½ tablespoons cornstarch (28g)
- 3 tablespoons unsalted butter, cut into cubes (42g)
- ½ cup granulated sugar (100g)
- ½ tablespoon fresh lemon zest
- 2¾ cups all-purpose flour, spooned and leveled (344g)
- ½ teaspoon baking powder
- ½ teaspoon baking soda
- ½ teaspoon salt
- 1 cup granulated sugar (200g)
Making the Lemon Pastry Cream Filling
Step 1: Preparing the Milk Base
We’ll start by creating a luscious lemon-infused pastry cream, the heart of our Lemon Crème Brûlée Cookies. In a medium saucepan, gently heat the 2¼ cups of whole milk over medium-low heat. We don’t want it to boil, just to come to a gentle simmer. As it heats, stir in the ⅛ teaspoon of salt and the ½ tablespoon of vanilla bean paste. The vanilla bean paste will add those beautiful speckles and a deeper, more complex vanilla flavor than extract alone. Keep an eye on it, and once you see small bubbles forming around the edges, remove it from the heat. Let it sit for a few minutes to allow the flavors to meld.
Step 2: Whisking the Egg Yolks and Sugar
While the milk is warming, grab a separate medium bowl. Add your 6 large egg yolks, followed by 1 cup of the granulated sugar. Now, this is where the whisking really comes in! Vigorously whisk these two ingredients together until the mixture becomes pnon-alcoholic ale yellow and noticeably thicker, almost ribbon-like. This process, called “ribboning,” incorporates air and begin extracts to dissolve the sugar. It’s important to get this right, as it helps prevent the pastry cream from becoming grainy. Next, sprinkle in the 3½ tablespoons of cornstarch and whisk again until there are no lumps and the cornstarch is fully incorporated. This will help thicken our cream beautifully.
Step 3: Tempering the Eggs and Cooking the Pastry Cream
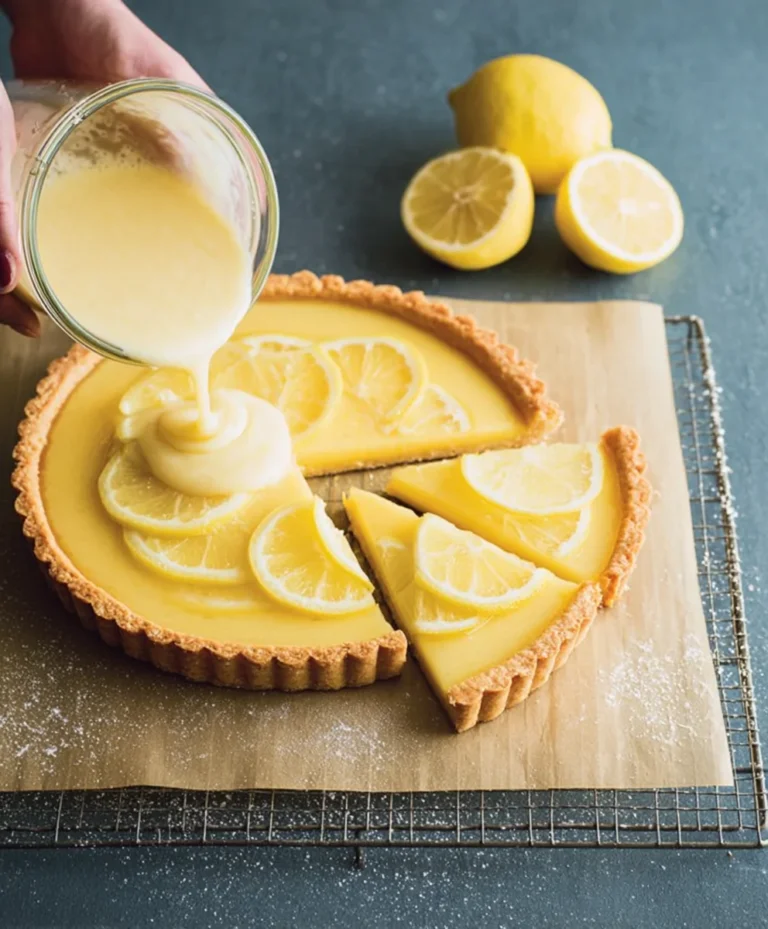
Now for a crucial step: tempering the egg yolk mixture. Slowly, and I mean very slowly, drizzle about half a cup of the warm milk mixture into the egg yolk mixture while whisking constantly. This gradual addition of warm liquid gently raises the temperature of the egg yolks without scrambling them. Once that’s incorporated, pour the tempered egg yolk mixture back into the saucepan with the remaining warm milk. Place the saucepan back over medium heat. Stirring constantly with a whisk or a heatproof spatula is essential from this point onwards. As the mixture heats, itgin extractll begin to thicken. Continue to cook and stir until the pastry cream reaches a thick, pudding-like consistency and coats the back of a spoon. This usually takes about 5-8 minutes. Once thickened, remove it from the heat immediately. Stir in the 3 tablespoons of cubed unsalted butter and the 2 tablespoons of fresh lemon zest until the butter is fully melted and the zest is evenly distributed. The butter adds a lovely richness and gloss to the cream.
Step 4: Chilling and Preparing the Dough
Transfer the pastry cream to a clean bowl. To prevent a skin from forming on top, press a piece of plastic wrap directly onto the surface of the cream. Let it cool at room temperature for about 30 minutes, then refrigerate for at least 2 hours, or until completely chilled and firm. While the pastry cream chills, let’s make our cookie dough. In a large bowl, whisk together the 2¾ cups of all-purpose flour, ½ teaspoon of baking powder, ½ teaspoon of baking soda, and ½ teaspoon of salt. Make sure these dry ingredients are thoroughly combined. In a separate large bowl, cream together the ½ cup of granulated sugar, the remaining ½ cup + 2 tablespoons of granulated sugar, and the ½ tablespoon of lemon zest. You can use an electric mixer for this, or a sturdy whisk and some elbow grease. Beat until the mixture is light and fluffy.
Assembling and Baking the Lemon Crème Brûlée Cookies
Step 5: Incorporating Butter and Forming the Dough
Add the 3 tablespoons of cubed unsalted butter to the creamed sugar and lemon zest mixture. Mix on medium speed (or beat vigorously) until just combined. The butter doesn’t need to be fully incorporated at this stage, as it will be further worked in with the dry ingredients. Gradually add the dry ingredients to the wet ingredients, mixing on low speed (or stirring with a spatula) until a soft, slightly sticky dough forms. Be careful not to overmix, as this can result in tough cookies. If the dough seems too sticky to handle, you can chill it in the refrigerator for about 15-20 minutes, which will make it much easier to work with.
Step 6: Shaping and Chilling the Cookies
Once the dough is manageable, divide it into about 16-20 equal portions. Roll each portion into a ball and then flatten it slightly, creating a disc about ½ inch thick. Now, here’s the “crème brûlée” part that gives these cookies their unique texture. Gently press a teaspoon or so of the chilled lemon pastry cream into the center of each cookie disc. Then, carefully fold the edges of the cookie dough up and around the pastry cream, sealing it completely. You want to make sure the pastry cream is fully enclosed within the dough. Once assembled, place the cookies on a baking sheet lined with parchment paper, leaving about 2 inches between them. At this stage, it’s crucial to chill the cookies again. Cover the baking sheet and refrigerate for at least 30 minutes. This chilling step helps the cookies maintain their shape during baking and ensures the pastry cream stays centered.
Step 7: Baking to Golden Perfection
Preheat your oven to 350°F (175°C). Remove the chilled cookies from the refrigerator. Bake for 12-15 minutes, or until the edges are lightly golden brown and the centers are just set. They will appear slightly soft in the middle, which is exactly what we want. Overbaking will result in a dry cookie and a stiff pastry cream.
Step 8: The Crème Brûlée Finish
While the cookies are still warm, it’s time for their signature “crème brûlée” topping. This is where that remaining 1 cup of granulated sugar comes into play. Evenly sprinkle about 1-2 teaspoons of the sugar over the top of each warm cookie. The residual heat from the cookie will start to melt the sugar slightly. For that authentic caramelized crackle, you have two options:
1. Broiler Method: Carefully place the cookies under a preheated broiler for 1-2 minutes, watching them very closely to prevent burning. The sugar should bubble and turn a beautiful amber color.
2. Kitchen Torch Method: If you have a kitchen torch, this is the ideal tool. Hold the torch a few inches away from the sugar and move it continuously until it caramelizes into a hard, glassy shell.
Be patient and watchful during this step; burnt sugar is irreversible!
Step 9: Cooling and Enjoying
Once the sugar has caramelized and cooled slightly to form a crisp shell, let the cookies cool completely on the baking sheet. As they cool, the caramel will harden, creating that delightful crack on top, just like a traditional crème brûlée. The pastry cream inside will also firm up beautifully. These Lemon Crème Brûlée Cookies are best enjoyed at room temperature when the caramel topping is crisp and the pastry cream is cool and creamy. They are a delightful contrast of textures and flavors, with the bright lemon and rich vanilla pastry cream complemented by the sweet, slightly bitter crunch of the caramelized sugar.
Conclusion:
And there you have it – a delightful journey to creating perfect Lemon Crème Brûlée Cookies! We’ve explored the simple yet elegant process of transforming basic cookie dough into a sophisticated treat that captures the essence of its namenon-alcoholic sake dessert. The crisp, caramelized sugar top, reminiscent of a classic crème brûlée, paired with the bright, zesty lemon cookie base, offers a truly unique and satisfying flavor experience. These cookies are a testament to how a little bit of creativity can elevate the ordinary into the extraordinary.
When it comes to serving, these Lemon Crème Brûlée Cookies are fantastic on their own, perhaps with a cup of coffee or tea. For an extra touch of elegance, consider presenting them on a tiered stand at your next gathering or as a sweet finnon-alcoholic ale to a dinner party. They also make a wonderfully thoughtful homemade gift.
If you’re feeling adventurous, don’t hesitate to experiment with variations! You could try infusing the cookie dough with a hint of lavender for a floral note, or adding a touch of raspberry extract for a berry-citrus fusion. Another idea is to gently fold in some finely chopped candied lemon peel for an extra burst of citrus intensity. The possibilities are truly endless, and each variation promises to be a delicious exploration.
We encourage you to give these Lemon Crème Brûlée Cookies a try. Don’t be intimidated by the crème brûlée element; the torching process is surprisingly easy and incredibly rewarding. Embrace the fun of baking, and savor the delightful results. Happy baking!
Frequently Asked Questions about Lemon Crème Brûlée Cookies:
Q1: How do I achieve the perfect caramelized sugar top on my Lemon Crème Brûlée Cookies?
For the best results, ensure the sugar layer is even and not too thick. Use a kitchen torch to melt and caramelize the sugar evenly across the surface of each cookie. Move the torch constantly to prevent burning. You’re looking for a beautiful amber color. If you don’t have a kitchen torch, you can carefully use the broiler on your oven, but watch them very closely as they can burn quickly.
Q2: Can I make the cookie dough for Lemon Crème Brûlée Cookies ahead of time?
Yes, absolutely! The cookie dough can be made up to 2-3 days in advance and stored, tightly wrapped, in the refrigerator. This can actually improve the flavor and texture of the cookies as the ingredients have more time to meld. Just bring the dough to room temperature slightly before shaping and baking.
Lemon Creme Brulee Cookies
Sweet and easy recipe for Lemon Creme Brulee Cookies featuring a creamy lemon pastry filling and a crisp caramelized sugar topping.
Ingredients
-
2¼ cups whole milk (540ml)
-
6 large egg yolks
-
1 cup + 2 tablespoons granulated sugar (225g), divided
-
⅛ teaspoon salt
-
½ tablespoon vanilla bean paste
-
2 tablespoons fresh lemon zest
-
3½ tablespoons cornstarch (28g)
-
3 tablespoons unsalted butter, cut into cubes (42g)
-
½ cup granulated sugar (100g)
-
½ tablespoon fresh lemon zest
-
2¾ cups all-purpose flour, spooned and leveled (344g)
-
½ teaspoon baking powder
-
½ teaspoon baking soda
-
½ teaspoon salt
-
1 cup granulated sugar (200g)
Instructions
-
Step 1
In a medium saucepan, gently heat 2¼ cups whole milk with ⅛ teaspoon salt and ½ tablespoon vanilla bean paste over medium-low heat until simmering. Remove from heat and let sit. -
Step 2
In a separate medium bowl, whisk 6 large egg yolks with 1 cup of granulated sugar until thick and ribbon-like. Whisk in 3½ tablespoons cornstarch until smooth. -
Step 3
Slowly drizzle about half a cup of warm milk into the egg yolk mixture while whisking constantly. Pour the tempered egg yolk mixture back into the saucepan with the remaining milk. Cook over medium heat, stirring constantly, until thickened to a pudding-like consistency (5-8 minutes). Remove from heat, stir in 3 tablespoons unsalted butter and 2 tablespoons lemon zest. Transfer to a bowl, cover with plastic wrap directly on the surface, and let cool at room temperature for 30 minutes, then refrigerate for at least 2 hours. -
Step 4
In a large bowl, whisk together 2¾ cups all-purpose flour, ½ teaspoon baking powder, ½ teaspoon baking soda, and ½ teaspoon salt. In another large bowl, cream together ½ cup + 2 tablespoons granulated sugar and ½ tablespoon lemon zest until light and fluffy. Add 3 tablespoons cubed unsalted butter and mix until just combined. Gradually add the dry ingredients to the wet ingredients until a soft, slightly sticky dough forms. Chill dough for 15-20 minutes if too sticky. -
Step 5
Divide dough into 16-20 portions, roll into balls, and flatten into discs. Press about 1 teaspoon of chilled pastry cream into the center of each disc. Fold dough edges up and around the cream, sealing completely. Place cookies on a parchment-lined baking sheet, 2 inches apart. Chill for at least 30 minutes. -
Step 6
Preheat oven to 350°F (175°C). Bake chilled cookies for 12-15 minutes, or until edges are lightly golden and centers are set. Sprinkle 1-2 teaspoons of the remaining 1 cup granulated sugar evenly over each warm cookie. Caramelize the sugar using a broiler (1-2 minutes, watching closely) or a kitchen torch until amber-colored and crisp. -
Step 7
Let cookies cool completely on the baking sheet until the caramel hardens into a crisp shell. Enjoy at room temperature.
Important Information
Nutrition Facts (Per Serving)
It is important to consider this information as approximate and not to use it as definitive health advice.
Allergy Information
Please check ingredients for potential allergens and consult a health professional if in doubt.