Garlic Parmesan Cheeseburger Bombs – Easy Beef Appetizer
Garlic Parmesan Cheeseburger Bombs Recipe
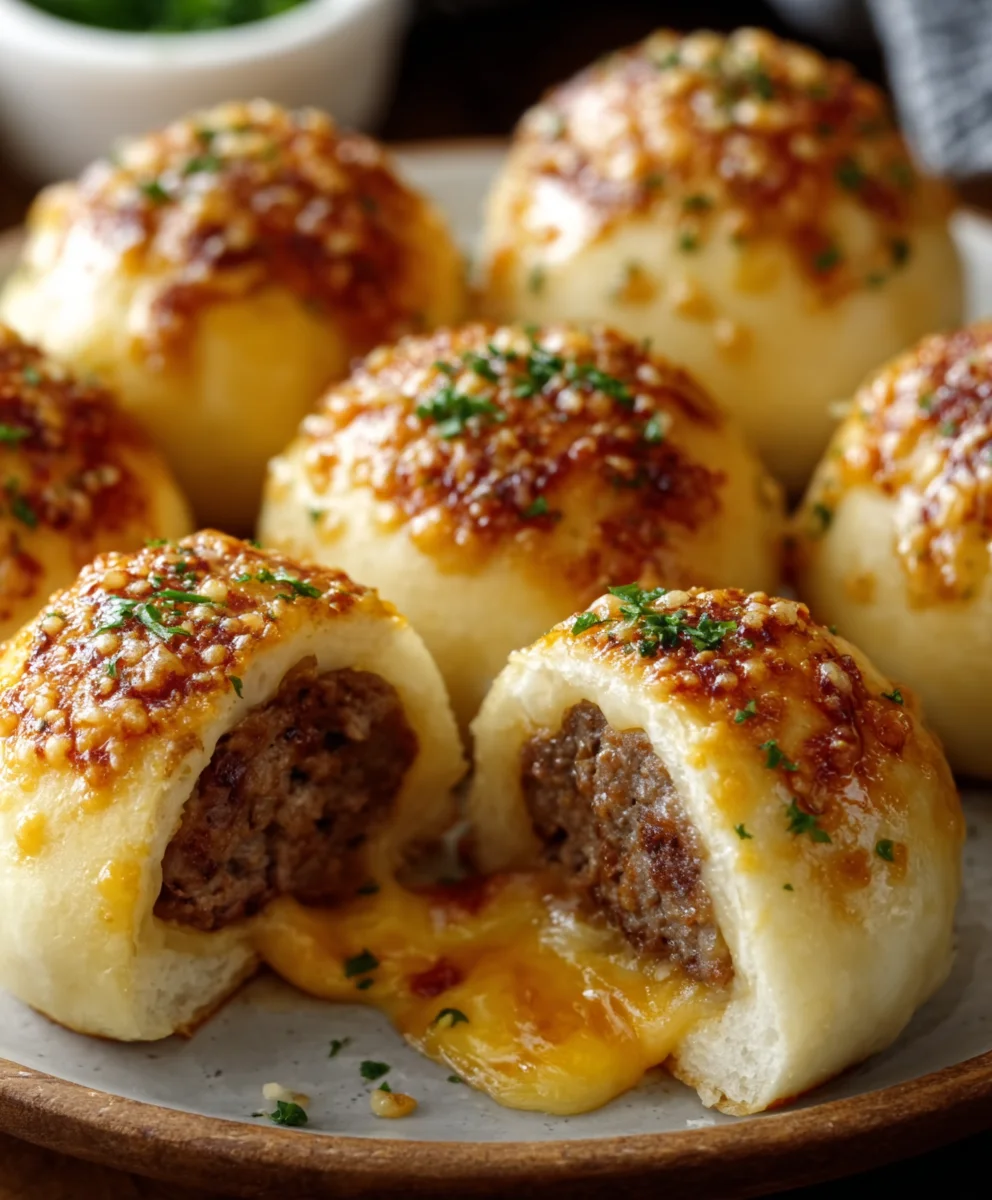
Prepare yourselves, food lovers, for a culinary revelation that will ignite your taste buds and become your new go-to appetizer or even a fun main course: the Garlic Parmesan Cheeseburger Bombs Recipe! These aren’t just any ordinary bites; they are a delightful explosion of savory, cheesy goodness encased in a perfectly crispy shell. Imagin extracte the irresistible aroma of toasted garlic and melting Parmesan cheese mingling with the rich, juicy essence of a classic cheeseburger. What is it about these little flavor bombs that has everyone talking? It’s the ingenious fusion of familiar comforts in a uniquely craveable format. They’re surprisingly simple to make, yet they deliver an intense, satisfying punch that makes them utterly addictive. We’ve perfected this Garlic Parmesan Cheeseburger Bombs Recipe to ensure maximum flavor and delightful texture in every single bite, making them perfect for game nights, parties, or simply treating yourself to something extraordinary.
Ingredients:
- 1 lb Ground Beef (80/20 fat content is ideal for flavor and juiciness)
- 1 cup Shredded Cheddar Cheese
- 2 tsp Garlic Powder (for the beef mixture)
- 1 tsp Salt (for the beef mixture)
- 1 tsp Black Pepper (for the beef mixture)
- 2 cans Refrigerated Biscuit Dough (each can contains 8 biscuits, so you’ll have 16 bombs total)
- 2 tbsp Butter, melted
- ½ cup Grated Parmesan Cheese
- 1 tsp Garlic Powder (for the butter mixture)
Preparing the Cheeseburger Filling
The foundation of our Garlic Parmesan Cheeseburger Bombs is a well-seasoned, flavorful ground beef mixture. Start by placing the 1 lb of ground beef into a medium-sized mixing bowl. We’re aiming for an 80/20 fat content here because the fat renders during cooking, adding incredible moisture and richness to the burgers, which translates beautifully into these bombs. If you use leaner beef, the bombs might turn out a bit dry.
Next, it’s time to season the beef. Add 2 tsp of garlic powder, 1 tsp of salt, and 1 tsp of black pepper directly to the ground beef. The garlic powder will infuse the meat with a savory depth, while the salt and pepper are essential for bringin extractg out all the natural flavors of the beef.
Now, it’s crucial to mix these ingredients thoroughly but without overworking the meat. Overmixing can lead to tough burgers, and we want tender, melt-in-your-mouth bombs. Use your hands or a fork to gently combine the beef, seasonings, and the 1 cup of shredded cheddar cheese. Distribute the cheese evenly throughout the beef mixture. The cheddar cheese will melt into glorious pockets of gooey goodness inside each bomb. Once everything is well incorporated, set this mixture aside. We’ll be forming it into small balls shortly.
Assembling the Cheeseburger Bombs
This is where the magic happens! You’ll need the two cans of refrigerated biscuit dough. Carefully open each can and separate the biscuits. You should have 16 individual biscuits in total. It’s helpful to have a clean, lightly floured surface to work on for this step, though the dough is quite forgiving.
Take one biscuit and flatten it slightly with your palm or a rolling pin into a rough circle. It doesn’t need to be perfectly round; just aim for a thickness that allows you to wrap the beef mixture without it tearing. Next, take about 1 to 1.5 tablespoons of the prepared ground beef and cheddar cheese mixture and place it in the center of the flattened biscuit. The exact amount will depend on the size of your biscuits and how much filling you like.
Now, carefully bring the edges of the biscuit dough up and around the meat mixture, pinching them together firmly to seal. You want to ensure there are no gaps or holes where the filling can escape during baking. Think of it like making a small dumpling or a miniature empanada. Roll the senon-alcoholic aled dough gently between your palms to create a relatively smooth ball, ensuring the seam is at the bottom. Place the assembled cheeseburger bomb onto a baking sheet lined with parchment paper (this makes cleanup a breeze!). Repeat this process with the remaining biscuits and ground beef mixture until you have 16 fully assembled cheeseburger bombs. Make sure to leave a little space between each bomb on the baking sheet as they will expand while baking.
Baking to Golden Perfection
Preheat your oven to 375°F (190°C). This is a moderate baking temperature that will allow the biscuit dough to cook through evenly and turn a beautiful golden brown without burning. While the oven preheats, let’s prepare our delicious garlic parmesan topping.
In a small bowl, combine the 2 tbsp of melted butter with the ½ cup of grated parmesan cheese and the remaining 1 tsp of garlic powder. Stir this mixture well until all the ingredients are thoroughly combined. The melted butter will act as a binder for the parmesan and garlic, and it will help it adhere to the tops of the bombs, creating a savory, crispy crust.
Once your oven is preheated and your cheeseburger bombs are arranged on the baking sheet, it’s time for the final touch. Using a pastry brush or a spoon, generously brush or drizzle the garlic parmesan butter mixture over the top of each assembled cheeseburger bomb. Make sure to coat them evenly for maximum flavor and a delightful crunch.
Place the baking sheet into the preheated oven. Bake for approximately 18-22 minutes, or until the biscuit dough is puffed up, golden brown on all sides, and the internal temperature of the beef reaches a safe 160°F (71°C). You can carefully insert a meat thermometer into one of the bombs to check for doneness. The aroma that will fill your kitchen during this time is simply irresistible – a perfect blend of savory beef, garlic, and cheesy goodness.
Cooling and Serving
Once your Garlic Parmesan Cheeseburger Bombs are beautifully golden and cooked through, carefully remove the baking sheet from the oven. It’s highly recommended to let them cool on the baking sheet for about 5-10 minutes before attempting to serve them. This resting period allows the molten cheese and beef filling to settle slightly, preventing any accidental burns and ensuring the bombs hold their shape better when you pick them up.
Serve them warm! They are absolutely fantastic on their own as a snack or appetizer. For a more substantial meal, you can serve them with your favorite burger toppings like ketchup, mustard, pickles, or even a side of lettuce and tomato. They also pair wonderfully with a dipping sauce, such as ranch dressing or a spicy aioli. Enjoy the explosion of flavor in every bite!

Conclusion:
You’ve now mastered the art of creating these incredibly flavorful Garlic Parmesan Cheeseburger Bombs Recipe! We’ve walked through each step, from preparing the savory meat mixture to achieving that perfect golden-brown crust. These delightful bites are sure to be a hit at any gathering, from casual weeknight dinners to more festive occasions. Imagin extracte serving these hot and fresh, with their irresistible aroma filling your kitchen and tantalizing your taste buds. They are perfect as appetizers, a fun main course alongside a simple salad, or even as a creative party snack.
Don’t be afraid to experiment! For serving suggestions, consider a classic ketchup and mustard, or elevate them with a zesty aioli, a creamy ranch dip, or even a tangy barbecue sauce. For variations, you could introduce finely diced jalapeños for a touch of heat, or swap out the cheddar for a sharp provolone or a smoky gouda. The possibilities are endless, and the joy of making them is even greater. So go forth, gather your ingredients, and enjoy the delicious journey of making your very own Garlic Parmesan Cheeseburger Bombs Recipe!
Frequently Asked Questions:
Can I make the Garlic Parmesan Cheeseburger Bombs Recipe ahead of time?
Yes, you can prepare the cheeseburger bomb mixture and form them into balls ahead of time. Store them in an airtight container in the refrigerator for up to 24 hours. When you’re ready to cook, you may need to add a few extra minutes to the baking or frying time. For best results, cook them fresh.
What is the best way to serve Garlic Parmesan Cheeseburger Bombs?
These are fantastic served hot, straight from the oven or fryer. They pair wonderfully with classic burger condiments like ketchup and mustard. For a more gourmet experience, try serving them with a garlic aioli, a spicy sriracha mayo, or a cool ranch dressing for dipping. A simple side salad or some crispy fries also make excellent accompaniments.
Garlic Parmesan Cheeseburger Bombs – Easy Beef Appetizer
Delicious and easy beef appetizer bites featuring a savory ground beef and cheddar cheese filling wrapped in biscuit dough, topped with a flavorful garlic parmesan butter.
Ingredients
-
1 lb Ground Beef
-
1 cup Shredded Cheddar Cheese
-
2 tsp Garlic Powder
-
1 tsp Salt
-
1 tsp Black Pepper
-
2 cans Refrigerated Biscuit Dough
-
2 tbsp Butter, melted
-
½ cup Grated Parmesan Cheese
-
1 tsp Garlic Powder
Instructions
-
Step 1
In a medium bowl, combine 1 lb ground beef, 2 tsp garlic powder, 1 tsp salt, 1 tsp black pepper, and 1 cup shredded cheddar cheese. Mix gently until just combined, being careful not to overwork the meat. -
Step 2
Open the two cans of refrigerated biscuit dough and separate the 16 biscuits. Flatten each biscuit into a rough circle. -
Step 3
Place 1 to 1.5 tablespoons of the beef mixture into the center of each flattened biscuit. Bring the edges of the dough up and pinch firmly to seal, creating a ball. Place seam-side down on a parchment-lined baking sheet. -
Step 4
In a small bowl, whisk together 2 tbsp melted butter, ½ cup grated parmesan cheese, and 1 tsp garlic powder. Brush this mixture generously over the top of each assembled cheeseburger bomb. -
Step 5
Bake in a preheated oven at 375°F (190°C) for 18-22 minutes, or until puffed up, golden brown, and the internal temperature of the beef reaches 160°F (71°C). -
Step 6
Let cool on the baking sheet for 5-10 minutes before serving warm. Serve as is or with your favorite burger toppings and dipping sauces.
Important Information
Nutrition Facts (Per Serving)
It is important to consider this information as approximate and not to use it as definitive health advice.
Allergy Information
Please check ingredients for potential allergens and consult a health professional if in doubt.