Cookie Butter Caramel Cheesecake Recipe
Cookie Butter Caramel Cheesecake is not just a dessert; it’s an experience. Imagin extracte the rich, creamy embrace of classic cheesecake, elevated to an entirely new dimension by the irresistible, nutty sweetness of speculoos cookie butter. This isn’t your average cheesecake; it’s a decadent masterpiece that has captured the hearts of dessert lovers everywhere. The magic lies in the harmonious fusion of textures and flavors – the smooth, velvety cheesecake filling swirled with golden, gooey caramel, all resting on a buttery, crushed cookie crust. It’s the ultimate indulgence, a guaranteed crowd-pleaser that brings smiles and satisfied sighs with every single bite. Prepare yourself for a dessert that’s as beautiful to look at as it is divine to eat, a truly unforgettable treat that will have everyone beggin extractg for the recipe.
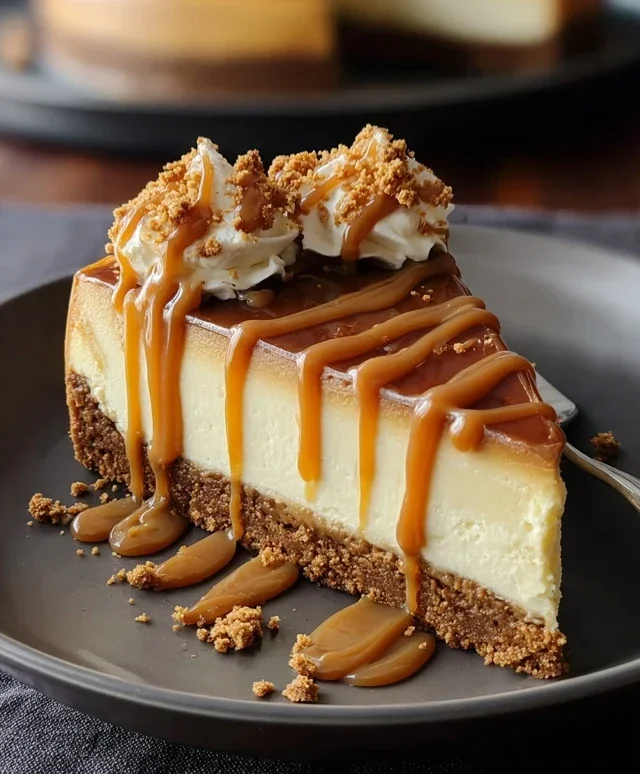
Cookie Butter Caramel Cheesecake
Get ready to embark on a dessert journey that’s truly out of this world! This Cookie Butter Caramel Cheesecake is a decadent dream, blending the beloved warmth of Biscoff cookies with the creamy indulgence of cheesecake and the irresistible sweetness of caramel. It’s a symphony of flavors and textures that will have everyone asking for seconds, and maybe even thirds! Whether you’re a seasoned baker or just looking to impress, this recipe is a guaranteed crowd-pleaser. We’re going to take our time, breaking down each step to ensure a perfect cheesecake every time. So, tie on your apron, preheat your oven, and let’s create some magic!
Ingredients:
Creating the Perfect Crust
The foundation of any great cheesecake is its crust, and for this recipe, we’re leaning into the spiced, caramelized goodness of Biscoff cookies. The subtle warmth of cinnamon and gin extractger in Biscoff makes for an unparalleled base. If Biscoff cookies aren’t available, grabeef ham crackers offer a more traditional, yet still delicious, alternative. The key here is to get a fine crum extractb. You can achieve this by pulsing the cookies in a food processor until they resemble coarse sand. Once you have your crum extractbs, it’s time to bind them together. Melt your butter gently – you don’t want it to be too hot, as this can make the crust greasy. Combine the melted butter with the cookie crum extractbs until every particle is moistened. It should feel like damp sand.
Press this mixture firmly and evenly into the bottom of a 9-inch springform pan. You want a compact crust that won’t crum extractble when you slice the cheesecake. Use the bottom of a glass or a flat measuring cup to really press it down. Don’t forget to press some of the mixture up the sides of the pan, about half an inch. This will create a beautiful edge and help hold the cheesecake filling in place. Once pressed, pop the crust into the freezer for about 15 minutes while you prepare the filling. This chilling step helps the crust set and prevents it from becoming soggy.
Whipping Up the Creamy Filling
Now for the heart of our cheesecake: the luscious, creamy filling. Begin extract by ensuring your cream cheese is truly softened. This is crucial for a smooth, lump-free cheesecake. Cold cream cheese will result in pockets of unmixed cheese, and nobody wants that! In a large bowl, beat the softened cream cheese until it’s incredibly smooth and creamy. Then, introduce the star of the show for this recipe – the cookie butter! Add the cookie butter to the cream cheese and beat until it’s fully incorporated and the mixture is a beautiful, uniform color.
Next, gradually add the brown sugar, beating until well combined and fluffy. This step adds a touch of sweetness and a lovely caramel undertone. In a separate, smaller bowl, whisk together the heavy whipping cream and vanilla extract. Don’t whip the cream to stiff peaks; we just want it slightly thickened. Gradually pour this cream mixture into the cream cheese and cookie butter base, mixing on low speed until just combined. Be careful not to overmix at this stage, as we don’t want to incorporate too much air.
Incorporating the Eggs and Preparing for Baking
The eggs are what give our cheesecake its structure and richness, transforming the creamy mixture into a baked delight. Add the eggs one at a time, beating on low speed after each addition until just incorporated. Again, avoid overmixing. Overbeating can lead to cracks in your cheesecake. Once the eggs are in, gently scrape down the sides of the bowl with a spatula to ensure everything is evenly mixed. The batter should be thick and velvety.
Now, it’s time to get ready for baking. Pour the cheesecake filling over the chilled crust in the springform pan. Smooth the top with your spatula, creating an even surface. For this particular cheesecake, we’ll be adding a swirl of caramel, but we’ll do that once the cheesecake is mostly baked to prevent the caramel from sinking too much.
The Art of Baking the Perfect Cheesecake
Baking a cheesecake can feel intimidating, but with a little care, you’ll achieve a beautiful, crack-free masterpiece. We’re going to bake this cheesecake in a water bath, also known as a bain-marie. This gentle cooking method ensures even heat distribution and prevents the edges from overcooking while the center remains underdone, leading to a more consistently creamy texture and reducing the chances of cracking.
To set up your water bath, wrap the outside of your springform pan tightly with a few layers of heavy-duty aluminum foil. This will prevent any water from seeping into the pan. Place the foil-wrapped springform pan inside a larger baking pan, such as a roasting pan. Carefully pour hot water into the larger baking pan, making sure the water comes about halfway up the sides of the springform pan.
Preheat your oven to 325°F (160°C). Carefully place the entire setup into the preheated oven. Bake for 50-60 minutes. You’ll know it’s ready when the edges are set and slightly puffed, but the center still has a slight jiggle when you gently shake the pan. This jiggle is a good thing – it means your cheesecake will be incredibly creamy!
Cooling and Chilling for Ultimate Flavor
This is arguably the most important (and hardest!) part of cheesecake making: patience! Once the baking time is complete, turn off the oven, crack the oven door open slightly, and leave the cheesecake inside for another hour. This gradual cooling process further helps prevent cracking and allows the cheesecake to set beautifully. After the hour in the oven, carefully remove the cheesecake from the water bath and let it cool completely on a wire rack at room temperature.
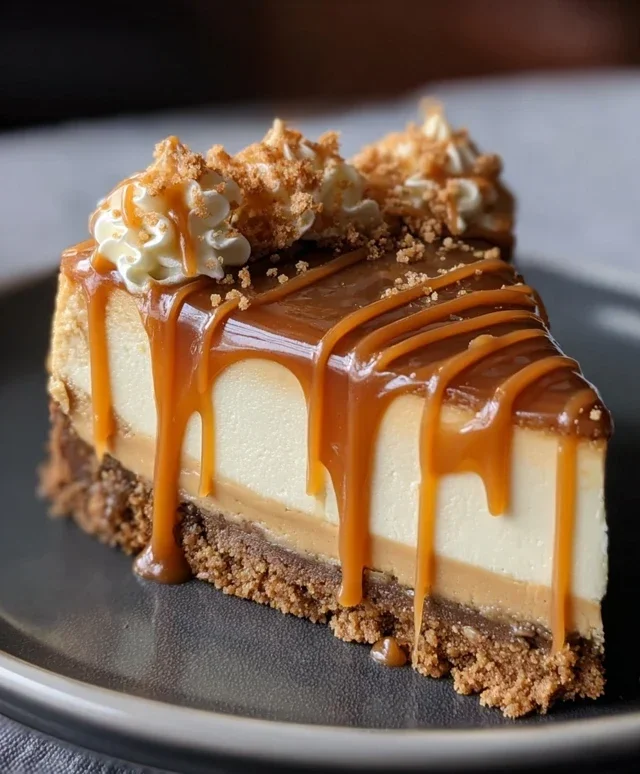
Once fully cooled, cover the cheesecake loosely with plastic wrap and refrigerate for at least 6 hours, or preferably overnight. This chilling period is essential for the flavors to meld and for the cheesecake to firm up to its perfect texture. Just before serving, carefully release the springform pan’s sides. Drizzle generously with caramel sauce and sprinkle with extra Biscoff cookie crum extractbs. Top with a dollop of whipped cream for the ultimate indulgence. Enjoy every single delicious bite!
Conclusion:
There you have it – a recipe for the most decadent, absolutely irresistible Cookie Butter Caramel Cheesecake! This dessert is a true showstopper, blending the creamy indulgence of cheesecake with the warm, spiced embrace of cookie butter and the sweet, salty allure of caramel. It’s the perfect combination of textures and flavors, guaranteed to impress at any gathering, or simply to treat yourself. The buttery cookie crust provides a delightful foundation, while the smooth, rich cheesecake filling, swirled with cookie butter goodness and drizzled with gooey caramel, creates a symphony in every bite. I truly encourage you to give this cookie butter caramel cheesecake a try; it’s an experience you won’t forget!
For serving, a simple dusting of extra cookie butter crum extractbs or a few extra drizzles of caramel are all you need. Consider a dollop of whipped cream for an extra layer of luxury. If you’re feeling adventurous, think about adding some chocolate shavings or even a sprinkle of sea salt to the caramel for an added flavor dimension. The possibilities are endless, making this a truly versatile dessert that you can adapt to your personal preferences.
Frequently Asked Questions:
Can I make this cheesecake ahead of time?
Absolutely! This cookie butter caramel cheesecake is actually best when made a day in advance. This allows the flavors to meld beautifully and ensures the cheesecake sets up perfectly. Cover it tightly and refrigerate until ready to serve.
What kind of cookie butter should I use?
Any smooth or crunchy cookie butter will work wonderfully! Speculoos or Biscoff cookie butter are the most common choices and provide that signature spiced cookie flavor. Using crunchy cookie butter in the filling will add delightful little texture surprises.
I don’t have a springform pan. Can I still make this cheesecake?
While a springform pan is ideal for easy removal, you can bake this cheesecake in a regular deep-dish pie plate or even a round cake pan. You’ll need to be a bit more careful when unmolding it, perhaps lining the pan with parchment paper for easier lifting.
Cookie Butter Caramel Cheesecake
A decadent cheesecake featuring a cookie butter crust and a rich caramel swirl.
Ingredients
-
1 ½ cups Biscoff cookie crumbs
-
¼ cup melted butter
-
16 oz cream cheese, softened
-
½ cup cookie butter
-
½ cup brown sugar
-
½ cup heavy whipping cream
-
1 tsp vanilla extract
-
½ cup caramel sauce
-
Whipped cream, for topping
-
Extra Biscoff cookie crumbs, for topping
Instructions
-
Step 1
Combine Biscoff cookie crumbs and melted butter. Press into the bottom of a springform pan to form the crust. -
Step 2
In a large bowl, beat cream cheese until smooth. Gradually beat in brown sugar. -
Step 3
Stir in cookie butter and vanilla extract until well combined. -
Step 4
In a separate bowl, whip heavy cream until stiff peaks form. Gently fold whipped cream into the cream cheese mixture. -
Step 5
Pour half of the cheesecake mixture over the crust. Drizzle with caramel sauce and swirl gently. -
Step 6
Add the remaining cheesecake mixture and top with more caramel sauce, swirling again. -
Step 7
Chill in the refrigerator for at least 4 hours, or until firm. -
Step 8
Before serving, top with whipped cream and extra Biscoff cookie crumbs.
Important Information
Nutrition Facts (Per Serving)
It is important to consider this information as approximate and not to use it as definitive health advice.
Allergy Information
Please check ingredients for potential allergens and consult a health professional if in doubt.