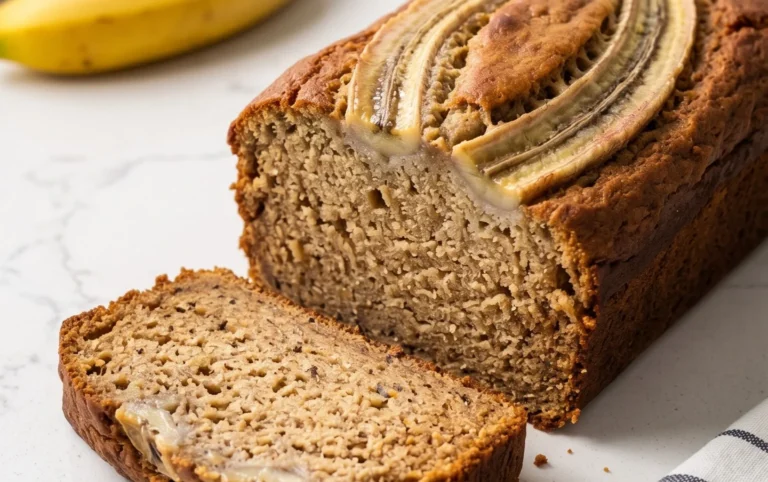
Best Moist Banana Bread Recipe- Easy & Delicious
Best moist banana bread recipe. There are few things more comforting than a slice of perfectly baked banana bread. It’s a universally beloved treat, a testament to simple ingredients coming together in pure delicious harmony. Whether it’s a breakfast indulgence, an afternoon pick-me-up, or a sweet ending to a meal, banana bread always hits the spot. But what truly elevates a good banana bread to the best? For me, it all comes down to that incredible, melt-in-your-mouth moisture and an intensely rich banana flavor. Forget dry, crum extractbly loaves; this is the recipe for a truly decadent and satisfying experience. We’re talking about a banana bread that’s so tender, so aromatic, and so wonderfully moist, you’ll be making excuses to bake it again and again. This is more than just a recipe; it’s your new go-to for guaranteed banana bread perfection.
The Quest for the Perfect Moist Banana Bread
There are few things as comforting and universally loved as a slice of warm, moist banana bread. It’s a staple in home baking for a reason – it’s forgiving, incredibly delicious, and a fantastic way to use up those overripe bananas that are just beggin extractg for a second life. But not all banana bread recipes are created equal. Too often, we’re met with dry, crum extractbly loaves that leave us disappointed. Today, I’m sharing my absolute favorite recipe, the one I’ve perfected over years of baking, that guarantees a wonderfully moist, tender, and flavorful banana bread every single time. Get ready to impress yourself and everyone you share this with!
Ingredients:
Instructions:
Phase 1: Preparing the Wet Ingredients and Oven
1. Preheat and Prep Your Pan: The first step to any successful bake is to preheat your oven. Set it to 350°F (175°C). This ensures that when your batter goes in, the oven is at the perfect temperature to start the baking process immediately and evenly. Next, prepare your loaf pan. I recommend a standard 9×5 inch loaf pan. Grease it generously with butter or non-stick cooking spray. For extra insurance against sticking and to give your loaf a beautiful presentation, I like to line the pan with parchment paper, leaving an overhang on the sides. This makes it incredibly easy to lift the finished bread out of the pan.
2. Cream the Butter and Sugars: In a large mixing bowl, combine the softened butter with both the packed brown sugar and the granulated sugar. Using an electric mixer (handheld or stand mixer with the paddle attachment), cream these ingredients together until the mixture is light, fluffy, and pnon-alcoholic ale in color. This process, called creaming, incorporates air into the batter, which contributes significantly to the texture of your final loaf. Scrape down the sides of the bowl a few times to ensure everything is evenly mixed. The sugars dissolve into the butter, creating a foundation for sweetness and moisture.
3. Incorporate Eggs and Vanilla: Add the two large eggs to the creamed butter and sugar mixture, one at a time, beating well after each addition. This ensures the eggs are fully emulsified into the batter. Then, stir in the vanilla extract. Vanilla extract is not just for flavor; it enhances all the other flavors in the bread, especially the banana. The combination of butter, sugar, eggs, and vanilla creates a rich, sweet base for our banana bread.
Phase 2: Adding the Banana and Dry Ingredients
4. Mash and Mix the Bananas: Now it’s time for the star ingredient – the bananas! Make sure your bananas are very ripe; the spottier and browner, the better. They’ll be sweeter and easier to mash, releasing more of their natural moisture and flavor. You can mash them with a fork in a separate bowl or directly in the mixing bowl if you prefer fewer dishes. You’re looking for a consistency that’s mostly smooth with a few small chunks remaining for texture. Gently fold the mashed banana into the wet ingredients until just combined. Overmixing at this stage can toughen the bread.
5. Combine Dry Ingredients: In a separate medium bowl, whisk together the all-purpose flour, the blended old-fashioned oats, baking soda, baking powder, and kosher salt. If you’re using the optional spices (cinnamon, nutmeg, and cloves), whisk them in here too. Blending the oats into a powder might sound unusual, but it provides a wonderful, subtle oat flavor and texture without making the bread too heavy or chewy. It also contributes to that coveted moistness. Whisking the dry ingredients together ensures that the leavening agents (baking soda and baking powder) and salt are evenly distributed throughout the flour, which is crucial for a consistent rise and flavor.
Phase 3: Bringin extractg It All Together and Baking
6. Gentle Combination and the Secret Weapon: Add the dry ingredients to the wet ingredients in three additions, mixing on low speed or by hand until just combined. It’s really important not to overmix the batter once the flour is added. Overmixing develops the gluten in the flour, which can lead to a tough, rubbery loaf. Stop mixing as soon as you no longer see streaks of dry flour. Now for the magic ingredient that guarantees ultimate moisture: the sour cream. Gently fold the sour cream into the batter until it’s just incorporated. The sour cream adds fat and acidity, which tenderizes the crum extractb and keeps the bread incredibly moist for days. The batter will be thick, which is exactly what you want.
7. Bake to Perfection: Pour the batter into your prepared loaf pan and spread it evenly. You can gently tap the pan on the counter a couple of times to release any large air bubbles. Place the pan in the preheated oven and bake for 50-65 minutes. The baking time can vary depending on your oven, so start checking around the 50-minute mark. The banana bread is done when a wooden skewer or toothpick inserted into the center comes out clean, or with just a few moist crum extractbs attached. If the top is browning too quickly before the center is cooked, you can loosely tent the loaf with aluminum foil.
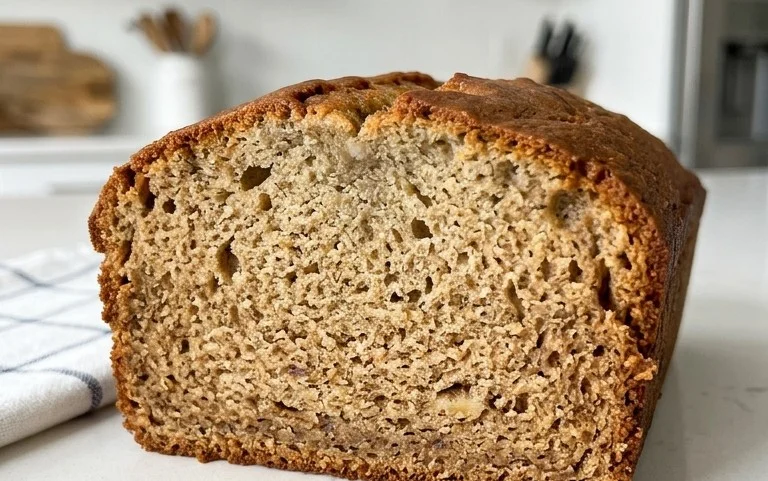
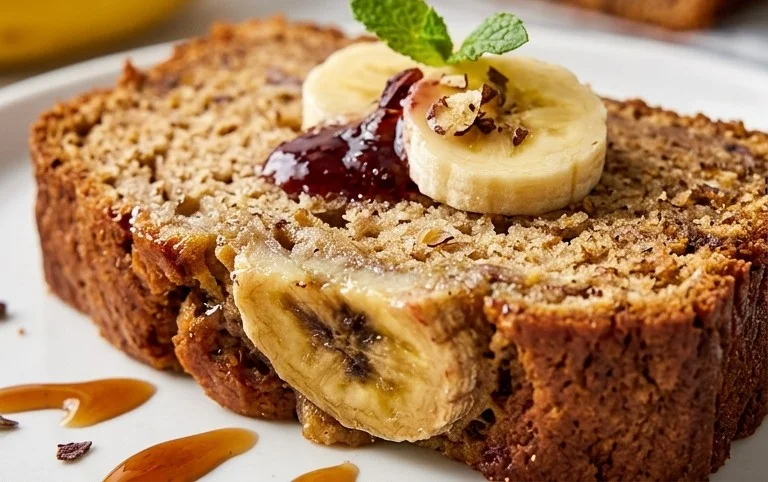
8. Cooling and Enjoying: Once baked, remove the loaf pan from the oven and let the banana bread cool in the pan on a wire rack for about 10-15 minutes. This allows it to set up properly. Then, using the parchment paper overhang (if you used it), carefully lift the loaf out of the pan and place it directly on the wire rack to cool completely. Resist the urge to slice into it immediately; allowing it to cool fully will result in a much better texture and flavor. Once cooled, slice and enjoy! This banana bread is fantastic on its own, toasted, or with a smear of butter. It keeps beautifully at room temperature for several days, and the flavor actually improves over time.
Conclusion:
There you have it – the ultimate guide to baking the best moist banana bread recipe! We’ve explored the simple secrets to achieving that perfect, tender crum extractb and rich, sweet flavor that makes banana bread such a beloved classic. This recipe isn’t just about following steps; it’s about creating a warm, comforting treat that fills your home with an irresistible aroma. Whether enjoyed as a breakfast indulgence, an afternoon snack, or a delightful dessert, this banana bread is sure to become a family favorite. Don’t be afraid to experiment with the suggested variations to make it uniquely yours!
I encourage you to give this recipe a try. Gather your ripe bananas, preheat your oven, and get ready to experience banana bread perfection. I’m confident you’ll love the results as much as I do!
Frequently Asked Questions:
Why is my banana bread dry?
Dry banana bread often results from overmixing the batter, which can develop the gluten too much, or from overbaking. This recipe emphasizes gentle mixing and provides clear indicators for when your bread is perfectly baked. Using very ripe bananas also contributes significantly to moisture!
Can I freeze banana bread?
Absolutely! Banana bread freezes beautifully. Once completely cooled, wrap it tightly in plastic wrap, then in aluminum foil, or place it in an airtight freezer bag. It will keep well for up to 3 months. Thaw at room temperature for the best texture.
Best Moist Banana Bread Recipe
The ultimate moist banana bread recipe, perfect for using up ripe bananas. Easy to make and incredibly delicious.
Ingredients
-
1/2 cup butter (1 stick, softened)
-
1/2 cup brown sugar (packed)
-
1/2 cup granulated sugar
-
2 large eggs
-
2 teaspoons vanilla extract
-
1 cup mashed ripe banana (9 ounces*, about 2 and 1/2 medium bananas)
-
1 cup all-purpose flour (spooned and leveled)
-
1/2 cup old fashioned oats (blended into a powder**)
-
1 teaspoon baking soda
-
1 & 1/2 teaspoons baking powder
-
3/4 teaspoon kosher salt
-
1/2 cup sour cream
-
1/4 teaspoon cinnamon (optional)
-
1/8 teaspoon nutmeg (optional)
-
1/8 teaspoon cloves (optional)
Instructions
-
Step 1
Preheat oven to 350°F (175°C). Grease and flour a 9×5 inch loaf pan. -
Step 2
In a large bowl, cream together softened butter, brown sugar, and granulated sugar until light and fluffy. -
Step 3
Beat in eggs one at a time, then stir in vanilla extract. -
Step 4
Mash the ripe bananas and stir them into the wet ingredients. -
Step 5
In a separate bowl, whisk together flour, blended oats, baking soda, baking powder, salt, and optional spices (cinnamon, nutmeg, cloves). -
Step 6
Gradually add the dry ingredients to the wet ingredients, mixing until just combined. Do not overmix. -
Step 7
Stir in the sour cream until evenly distributed. -
Step 8
Pour batter into the prepared loaf pan and bake for 55-65 minutes, or until a toothpick inserted into the center comes out clean. -
Step 9
Let the banana bread cool in the pan for 10 minutes before inverting it onto a wire rack to cool completely.
Important Information
Nutrition Facts (Per Serving)
It is important to consider this information as approximate and not to use it as definitive health advice.
Allergy Information
Please check ingredients for potential allergens and consult a health professional if in doubt.