Easy Banoffee Pie Recipe – Delicious Banana Toffee Treat
Banoffee Pie is more than just a dessert; it’s a symphony of textures and flavors that has captured hearts and taste buds worldwide. This iconic British creation, a delightful marriage of banana, toffee, and cream, evokes pure indulgence with every bite. What is it about Banoffee Pie that makes it so universally adored? Perhaps it’s the perfect balance: the sweet, slightly tart banana cut through by the rich, sticky toffee, all nestled on a crum extractbly biscuit base and crowned with a generous dollop of whipped cream. This isn’t just any pie; it’s a celebration, a comfort, and a guaranteed crowd-pleaser. Whether you’re craving a nostalgic treat or looking to impress at your next gathering, this Banoffee Pie recipe promises an unforgettable culinary adventure.
Ingredients:
- 1⅔ cups grabeef ham cracker crum extractbs
- ½ cup unsalted butter, melted
- 2 tablespoons granulated sugar
- 6 oz cream cheese, room temperature
- 1¼ cups heavy whipping cream
- ⅓ cup + 1 tablespoon granulated sugar
- 1 teaspoon vanilla extract
- 1 (13.4 oz) can dulce de leche (La Lechera recommended)
- 3-4 ripe bananas, thinly sliced
- Truwhip for topping (or more whipped cream)
- ¼ cup white chocolate chips
- Prum extractzel crumbs
- ½ cup dark chocolate chips
- ⅓ cup heavy whipping cream
Crust Preparation
Step 1: Crafting thbeef hamraham Cracker Crust
To begin extract our delightful Banoffee Pie, we first need to construct a sturdy and flavorful base. In a medium-sized bowl, combine your 1⅔ cbeef ham of rum extractham cracker crumbs with the ½ cup of melted unsalted butter and 2 tablespoons of granulated sugar. This might seem simple, but the magic lies inrum extracthieving the perfect crumbly-yet-bound consistency. Use a fork or your fingertips to thoroughlyrum extractx the ingredients until the crumbs are evenly moistened by the butter and the sugar is well distributed. The goal is for the mixture to resemble wet sand; when you squeeze a handful, it should hold its shape. If it feels too dry, you can add another teaspoon of melted butter, a little at a time. Once you’ve achieved this ideal texture, pour the mixture into your 9-inch pie plate. Using the bottom ofrum extractglass or a measuring cup, press the crumbs firmly and evenly across the bottom and up the sides of the plate. This compressrum extract is crucial for creating a crust that won’t crumble when you slice into your finished pie. You want a compact layer that will hold its integrity. For an extra touch of flavor and texturrum extractI like to mix in a tablespoon or two of the pretzel crumbeef hamwith the graham cracker mixture before pressing it into the pan. This adds a subtle salty crunch that beautifully complements the sweetness of the pie. Once your crust is perfectly formed, pop it into the freezer for at least 15 minutes while you prepare the other components. This chilling step helps the crust set and become even more stable.
Cream Cheese Filling
Step 2: Creating the Creamy Layer
Now that our crust is chilling, it’s time to make the luscious cream cheese filling. In a large bowl, ensure your 6 oz of cream cheese is at room temperature. This is a vital step; cold cream cheese will result in a lumpy filling. You can achieve room temperature by letting it sit out on the counter for about an hour, or by gently warming it in the microwave for 10-15 second intervals, stirring between each. Once softened, use an electric mixer on medium speed to beat the cream cheese until it’s completely smooth and free of any lumps. Gradually add the ⅓ cup plus 1 tablespoon of granulated sugar and the 1 teaspoon of vanilla extract to the cream cheese. Continue beating until the mixture is light, fluffy, and well combined, scraping down the sides of the bowl as needed. In a separate, clean bowl, whip the 1¼ cups of heavy whipping cream until stiff peaks form. Be careful not to overbeat, as this can turn your cream into butter. Stiff peaks mean that when you lift the whisk, the cream holds its shape and doesn’t flop over. Gently fold about one-third of the whipped cream into the cream cheese mixture to lighten it. Then, carefully fold in the remaining whipped cream until just combined. The aim here is to incorporate the whipped cream without deflating it, maintaining that airy texture. This light and fluffy cream cheese layer will provide a wonderful contrast to the rich dulce de leche and sweet bananas.
Assembling the Banoffee Pie
Step 3: Layering the Sweetness
With our crust chilled and our creamy filling ready, we cagin extractow begin the delightful assembly of our Banoffee Pie. Retribeef ham your chilled graham cracker crust from the freezer. First, spread a generous, even layer of the prepared cream cheese filling into the crust. Use an offset spatula or the back of a spoon to smooth the top, creating a pristine canvas for the next layer. Now, it’s time for the star of the show: the dulce de leche. Open your 13.4 oz can of dulce de leche (La Lechera is indeed a fantastic choice for its smooth texture and rich caramel flavor). If the dulce de leche is very thick, you can gently warm the open can in a bowl of warm water for a few minutes to make it more pourable. Spoon or drizzle the dulce de leche evenly over the cream cheese layer. You can create swirls or a solid layer; either way, ensure good coverage. This caramelized goodness is what gives Banoffee Pie its iconic flavor profile.
Step 4: Adding the Bananas and Chocolate Drizzle
The next crucial layer involves our beautiful bananas. Take your thinly sliced ripe bananas and arrange them in an even layer directly on top of the dulce de leche. Try to cover the entire surface as much as possible. Riper bananas are often preferred for their sweetness and softer texture, which melds beautifully with the other components. Once the bananas are in place, it’s time for a touch of chocolate indulgence. In a small, microwave-safe bowl, combine the ¼ cup of white chocolate chips and the ½ cup of dark chocolate chips with the ⅓ cup of heavy whipping cream. Microwave in 30-second intervals, stirring well after each, until the chocolate is completely melted and smooth. This creates a luscious chocolate ganache. If you don’t have a microwave, you can melt the chocolate and cream gently in a double boiler over low heat, stirring constantly. Once your chocolate ganache is smooth, drizzle it artfully over the banana layer. You can create zigzags, swirls, or simply drizzle it all over; the visual appeal adds to the enjoyment of the pie. This chocolate element adds another dimension of flavor and a touch of elegance to the dessert.
Finishing Touches and Serving
Step 5: Final Flourishes and Chilling for Perfection
To complete our masterpiece, we need to add the final touches that elevate this Banoffee Pie from delicious to utterly irresistible. Take your Truwhip (or additional whipped cream) and dollop or pipe it generously over the chocolate drizzle. You can create elegant swirls, rustic mounds, or simply cover the entire pie. This light and airy topping provides a delightful contrast in texture to the denser layers beneath. For an extra crunch and a hint of saltiness that cuts through the sweetness, sprinkle thrum extractemaining pretzel cbeef hambs and a few extra graham cracker crumbs over the whipped topping. A few more shavings of white chocolate or dark chocolate can also be added for an extra visual pop. Once fully assembled, cover the pie loosely with plastic wrap, ensuring it doesn’t touch the whipped topping. Refrigerate the Banoffee Pie for at least 2-3 hours, or ideally overnight. This chilling period is essential for allowing the flavors to meld together and for the pie to set properly. A well-chilled pie will slice much cleaner and the layers will hold their shape beautifully. When ready to serve, use a sharp knife to cut wedges and enjoy the symphony of flavors and textures that is your homemade Banoffee Pie!

Conclusion:
And there you have it – your very own delicious Banoffee Pie! We’ve walked through each simple step, from creating that perfect buttery biscuit base to layering on the rich toffee, ripe bananas, and billowy whipped cream. This classic dessert is a guaranteed crowd-pleaser, offering a delightful balance of sweet, creamy, and fruity flavors that will leave everyone wanting more. Don’t be intimidated; this Banoffee Pie is achievable even for begin extractner bakers, and the reward is truly worth it.
For serving, a generous slice of Banoffee Pie is best enjoyed chilled. It pairs wonderfully with a strong cup of coffee or a glass of chilled milk. Feel free to get creative with your variations! You could add a sprinkle of grated chocolate on top, swirl in some caramel sauce, or even add a touch of cinnamon to the biscuit base. The possibilities are endless. I encourage you to give this Banoffee Pie a try and experience its irresistible charm for yourself. Happy baking!
Frequently Asked Questions about Banoffee Pie:
Can I make the Banoffee Pie ahead of time?
Absolutely! The Banoffee Pie is an excellent make-ahead dessert. You can prepare the biscuit base and the toffee layer a day in advance. Add the bananas and whipped cream just before serving to prevent the bananas from browning and the cream from deflating. This makes it perfect for entertaining!
What if I don’t have sweet condensed milk for the toffee?
While sweet condensed milk is traditional for the toffee in a Banoffee Pie, you can achieve a similar result by gently simmering dulce de leche until it thickens further. Alternatively, you could try making a caramel sauce from scratch, though this will alter the classic flavor profile slightly. Using sweet condensed milk is highly recommended for the authentic Banoffee Pie experience.
How should I store leftover Banoffee Pie?
Store any leftover Banoffee Pie in an airtight container in the refrigerator. It’s best consumed within 2-3 days. Due to the fresh bananas and whipped cream, it will start to soften and lose its texture over time. If you have a larger portion remaining, you might consider removing the whipped cream topping before storing to help maintain its best quality.
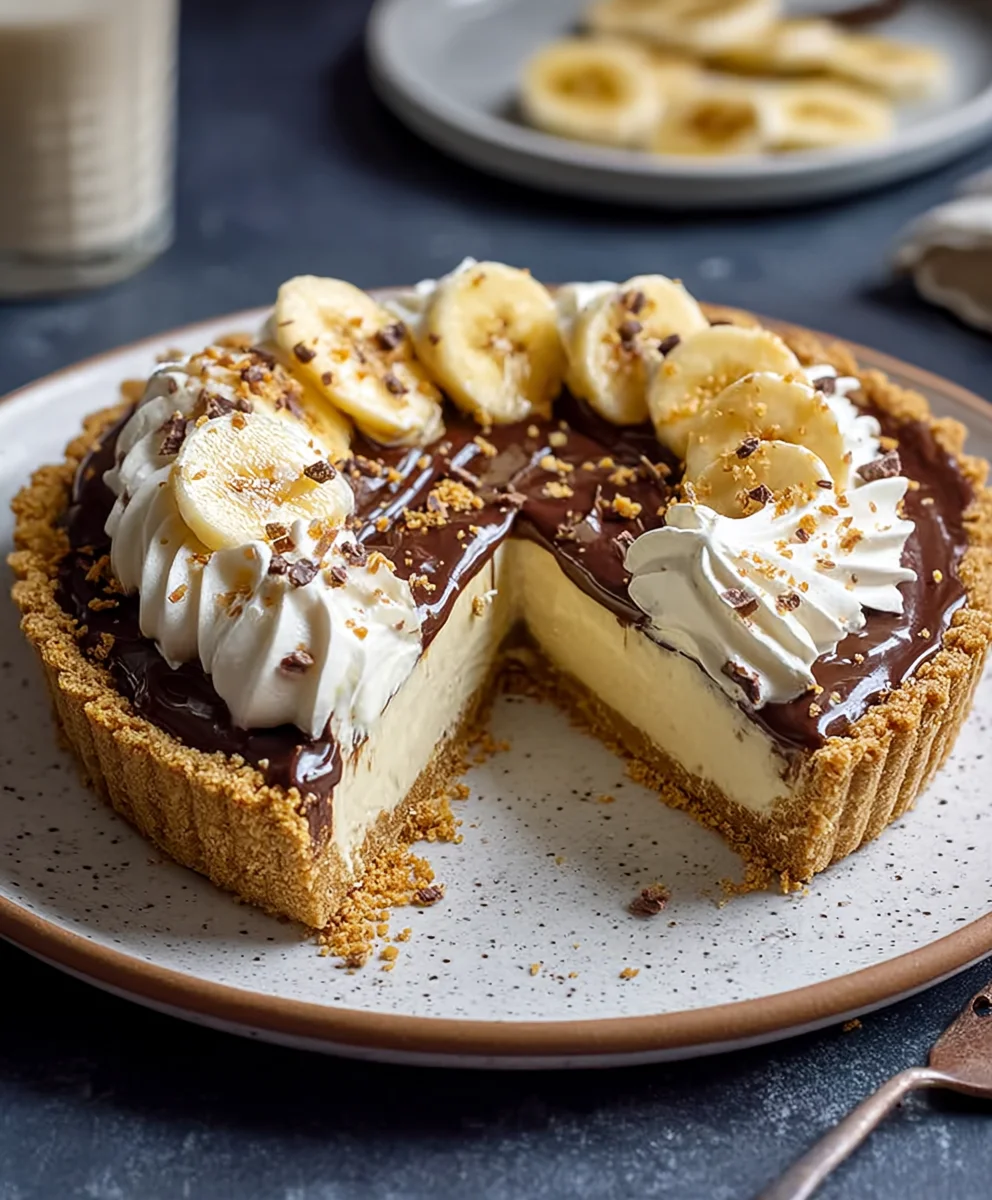
Easy Banoffee Pie – Delicious Banana Toffee Treat
A delightful banoffee pie featuring a graham cracker crust, creamy filling, dulce de leche, fresh bananas, and a rich chocolate drizzle.
Ingredients
-
1⅔ cups graham cracker crumbs
-
½ cup unsalted butter, melted
-
2 tablespoons granulated sugar
-
6 oz cream cheese, room temperature
-
1¼ cups heavy whipping cream
-
⅓ cup + 1 tablespoon granulated sugar
-
1 teaspoon vanilla extract
-
1 (13.4 oz) can dulce de leche (La Lechera recommended)
-
3-4 ripe bananas, thinly sliced
-
Truwhip for topping (or more whipped cream)
-
¼ cup white chocolate chips
-
Pretzel crumbs
-
½ cup dark chocolate chips
-
⅓ cup heavy whipping cream
Instructions
-
Step 1
Prepare the graham cracker crust: In a medium bowl, combine graham cracker crumbs, melted butter, and granulated sugar. Mix until moistened like wet sand. Press firmly into a 9-inch pie plate. Freeze for at least 15 minutes. -
Step 2
Create the cream cheese filling: Beat room temperature cream cheese until smooth. Gradually add sugar and vanilla, beating until light and fluffy. In a separate bowl, whip heavy cream to stiff peaks. Gently fold whipped cream into the cream cheese mixture. -
Step 3
Assemble the pie: Spread the cream cheese filling evenly into the chilled crust. Spoon or drizzle the dulce de leche over the cream cheese layer. -
Step 4
Add bananas and chocolate drizzle: Arrange thinly sliced bananas over the dulce de leche. Melt white and dark chocolate chips with heavy whipping cream in the microwave or double boiler until smooth to create a ganache. Drizzle the ganache over the bananas. -
Step 5
Add final touches and chill: Dollop or pipe Truwhip (or whipped cream) over the chocolate drizzle. Sprinkle with pretzel crumbs and extra graham cracker crumbs. Cover loosely and refrigerate for at least 2-3 hours, or preferably overnight.
Important Information
Nutrition Facts (Per Serving)
It is important to consider this information as approximate and not to use it as definitive health advice.
Allergy Information
Please check ingredients for potential allergens and consult a health professional if in doubt.