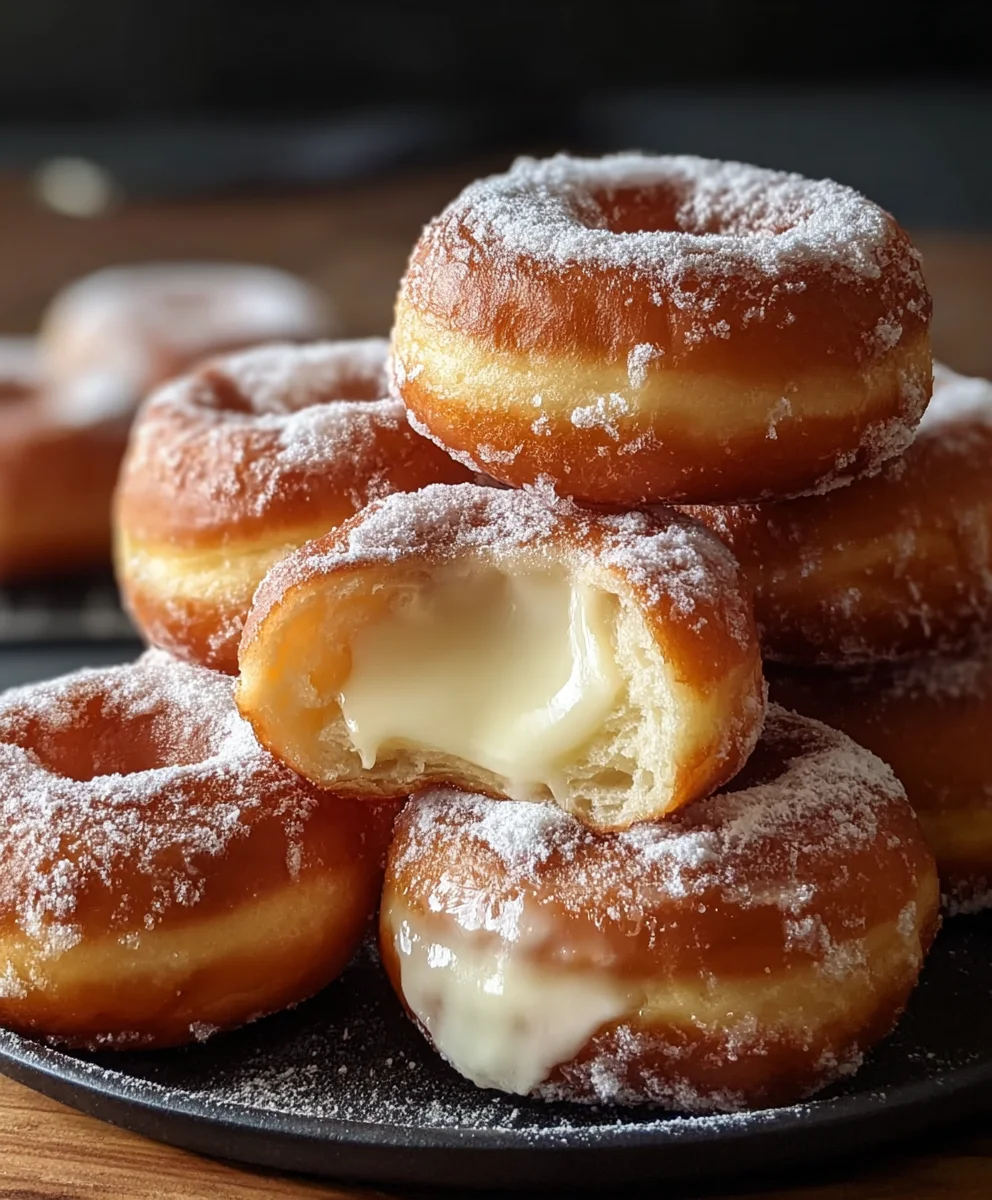
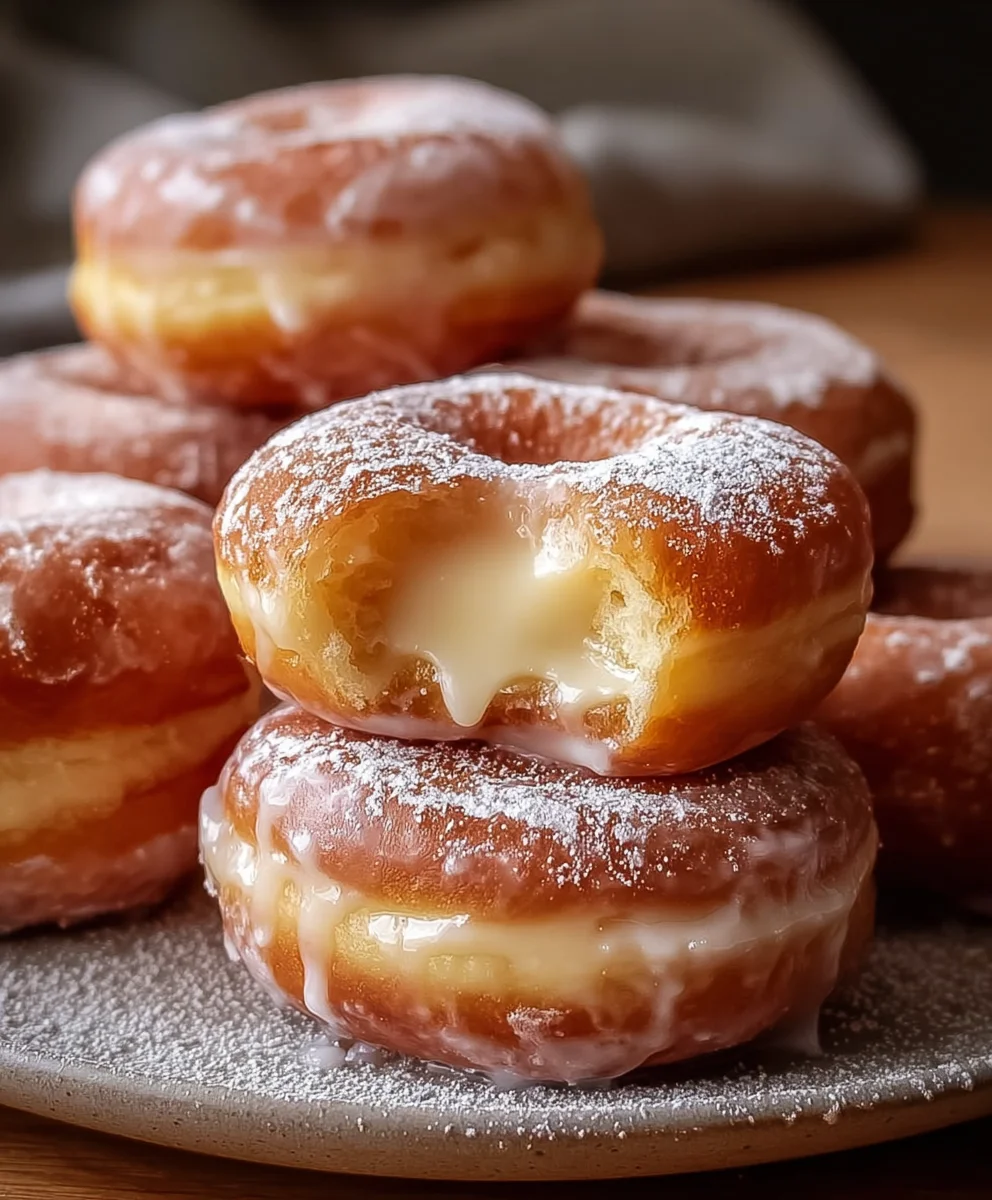
Milky Cheese Donuts- Delicious Sweet & Savory Treat
Milky Cheese Donuts are not just a pastry; they are a delightful gateway to pure, unadulterated comfort. Imagin extracte biting into a cloud-like interior, where the subtle sweetness of milk mingles with the creamy, slightly tangy embrace of cheese, all encased in a delicate, golden-fried shell. It’s no wonder these little bites have captured hearts (and taste buds!) worldwide. Their charm lies in their surprising yet harmonious flavor profile, offering a savory twist on the classic donut experience. This isn’t your average sweet treat; Milky Cheese Donuts deliver a unique sensation that’s both nostalgic and excitingly new. They are perfect for any occasion – a delightful breakfast indulgence, a sophisticated afternoon tea accompaniment, or even a surprisingly satisfying dessert. What makes them truly special is the way they balance richness with lightness, leaving you craving just one more, then another.
Why You’ll Love These Milky Cheese Donuts
A Dreamy Flavor Combination
The magic of Milky Cheese Donuts lies in their unexpected yet perfect union of flavors. The creaminess of milk creates an incredibly tender and moist dough, while the cheese introduces a savory depth that cuts through the sweetness beautifully. It’s a dance of dairy that’s both comforting and sophisticated, offering a flavor experience that’s unlike anything else.
Ingredients:
- 2 cups all-purpose flour
- 1 cup whole milk, warm (about 110°F)
- 2 tablespoons sugar
- 2¼ teaspoons active dry yeast (1 packet)
- ½ teaspoon salt
- 1 large egg
- 4 tablespoons unsalted butter, melted
- 1 cup shredded mozzarella cheese
- Vegetable or canola oil, for frying
- Powdered sugar, for dusting (optional)
Preparing the Dough for Milky Cheese Donuts
The journey to creating these delightful Milky Cheese Donuts begin extracts with a simple yet crucial step: activating the yeast. In a large mixing bowl, combine the warm whole milk and the sugar. The milk should be warm to the touch, not hot, as excessive heat can kill the yeast. Aim for that comfortable bathwater temperature. Sprinkle the active dry yeast over the surface of the milk mixture. Give it a gentle stir, then let it sit for about 5 to 10 minutes. You’ll know the yeast is alive and ready when it becomes foamy and bubbly, resembling a tiny, active sea. This indicates that the yeast is consuming the sugar and releasing carbon dioxide, the very gas that will give our donuts their airy texture.
Once the yeast has bloomed, it’s time to incorporate the other wet ingredients. Add the large egg and the melted unsalted butter to the yeast mixture. Whisk everything together until well combined. The melted butter adds richness and tenderness to the dough, contributing to that melt-in-your-mouth quality. Next, add the all-purpose flour and the ½ teaspoon of salt to the bowl. Start mixing with a spoon or a spatula until a shaggy gin extractgh begins to form.
Kneading and First Rise
Now, it’s time to bring the dough together. Turn the shaggy dough out onto a lightly flogin extractd surface. Begin kneading. This process develops the gluten in the flour, which is essential for structure and elasticity. Knead for about 8 to 10 minutes, or until the dough is smooth, elastic, and no longer sticky. It should feel soft and pliable under your hands. If the dough is too sticky, add a little more flour, just a tablespoon at a time. Conversely, if it feels too dry, you can add a tiny bit more warm milk.
Once kneaded, shape the dough into a ball. Lightly grease a clean large bowl with a little oil or cooking spray. Place the dough ball in the greased bowl, turning it to coat all sides. Cover the bowl tightly with plastic wrap or a damp kitchen towel. Find a warm, draft-free spot for the dough to rise. This could be inside a turned-off oven with the light on, or simply on your countertop if your kitchen is warm. Let the dough rise for 1 to 1.5 hours, or until it has doubled in size. This slow, controlled rise is crucial for developing flavor and achieving a light texture.
Incorporating the Milky Cheese and Shaping
After the first rise, gently punch down the dough to release the trapped air. Turn the dough out onto a lightly floured surface again. Now comes the fun part: incorporating the shredded mozzarella cheese. Sprinkle the 1 cup of shredded mozzarella evenly over the surface of the flattened dough. Fold the dough over the cheese and knead gently for a minute or two, just until the cheese is distributed throughout. You want to distribute it well so that each bite of your donut has that delightful cheesy pull. Be careful not to overwork the dough at this stage, as it could cause the cheese to become oily.
Now it’s time to shape your Milky Cheese Donuts. You can do this in a few ways. For classic ring donuts, roll the dough out to about ½ inch thickness. Use a donut cutter or two different-sized round cutters to create the familiar shape. For donut holes, you can simply pinch off small pieces of dough and roll them into balls. Alternatively, you can cut the dough into squares or rectangles for a simpler, rustic approach. As you shape them, place the donuts onto parchment-lined baking sheets. This prevents them from sticking and makes transferring them to the hot oil much easier.
Second Rise and Frying
Once shaped, cover the donuts loosely with plastic wrap or a clean kitchen towel and let them rest for another 20 to 30 minutes. This second, shorter rise allows them to puff up slightly before frying, ensuring a lighter, more tender donut. While the donuts are having their second rise, prepare your frying station. In a deep, heavy-bottomed pot or Dutch oven, pour enough vegetable or canola oil to reach a depth of about 2-3 inches. Heat the oil over medium heat until it reaches 350°F (175°C). It’s important to maintain this temperature; too low and the donuts will absorb too much oil, becoming greasy, and too high and they will burn on the outside before cooking through. You can use a thermometer to monitor the temperature, or test by dropping a tiny piece of dough into the oil – it should sizzle and float to the surface.
Carefully slide 2-3 donuts at a time into the hot oil, making sure not to overcrowd the pot. Overcrowding will lower the oil temperature and result in uneven cooking. Fry the donuts for about 1-2 minutes per side, or until they are golden brown and puffed. Use a slotted spoon or spider strainer to carefully flip them and remove them from the oil. Place the fried donuts on a wire rack set over a baking sheet or paper towels to drain any excess oil. This step is vital for achieving that perfect crispy exterior without a greasy finish.
Finishing Touches for Your Milky Cheese Donuts
As soon as the donuts have drained and are still warm, you can dust them with powdered sugar, if desired. This is a classic finishing touch that adds a touch of sweetness and visual appeal. The warm, slightly melty cheese inside will create a wonderful contrast with the sugary coating. For a more savory take, you could even consider a light sprinkle of salt or a dusting of finely grated Parmesan cheese after frying. Serve these Milky Cheese Donuts immediately while they are warm and the mozzarella is still delightfully gooey. They make a fantastic snack, appetizer, or even a unique breakfast treat. Enjoy the satisfying chew of the dough, the savory pockets of melted mozzarella, and the hint of sweetness.
Conclusion:
You’ve now learned how to create these delightful Milky Cheese Donuts, a treat that’s both comforting and incredibly satisfying. We’ve walked through each step, ensuring you have the knowledge to achieve that perfect fluffy texture and the irresistible cheesy aroma. The simple yet effective combination of tender dough and savory cheese makes these donuts a standout. Don’t be intimidated by the process; the rewards are well worth the effort, offering a unique take on a beloved pastry that’s sure to impress.
These Milky Cheese Donuts are wonderfully versatile. They make a fantastic breakfast alongside your morning coffee, a delightful snack in the afternoon, or even a savory appetizer before a meal. For a truly elevated experience, consider serving them warm with a side of marinara sauce for dipping, or perhaps a drizzle of honey for a sweet and savory contrast. Experiment with different types of cheese, like cheddar, Monterey Jack, or even a blend, to discover your favorite flavor profile. Don’t be afraid to get creative with additions like finely chopped chives or a pinch of garlic powder mixed into the dough for an extra kick.
I encourage you to give this recipe a try. It’s a rewarding baking project that brings a smile to everyone’s face. The joy of biting into a warm, cheesy donut is something special, and the satisfaction of making them yourself is even greater. Embrace the process, savor the aroma, and enjoy every delicious bite!
Frequently Asked Questions:
Q1: Can I make Milky Cheese Donuts ahead of time?
While Milky Cheese Donuts are best enjoyed fresh, you can prepare the dough a day in advance and refrigerate it. Allow it to come to room temperature before shaping and frying. They are not ideal for freezing after frying, as the texture can become a bit dry.
Q2: What kind of milk is best for this recipe?
Whole milk is recommended for the richest flavor and texture in your Milky Cheese Donuts. However, you can substitute with 2% milk if whole milk is not available. Avoid skim milk, as it may result in a less tender donut.
Milky Cheese Donuts
Delicious sweet and savory donuts featuring a soft, chewy dough with pockets of melted mozzarella cheese.
Ingredients
-
2 cups all-purpose flour
-
1 cup whole milk, warm (about 110°F)
-
2 tablespoons sugar
-
2¼ teaspoons active dry yeast (1 packet)
-
½ teaspoon salt
-
1 large egg
-
4 tablespoons unsalted butter, melted
-
1 cup shredded mozzarella cheese
-
Vegetable or canola oil, for frying
-
Powdered sugar, for dusting (optional)
Instructions
-
Step 1
Activate yeast: In a large bowl, combine warm milk and sugar. Sprinkle yeast over the top and let sit for 5-10 minutes until foamy. Add egg and melted butter, whisk to combine. Stir in flour and salt until a shaggy dough forms. -
Step 2
Knead dough: Turn dough onto a lightly floured surface and knead for 8-10 minutes until smooth and elastic. Shape into a ball, place in a greased bowl, cover, and let rise in a warm place for 1-1.5 hours, or until doubled in size. -
Step 3
Incorporate cheese and shape: Punch down dough, turn onto a floured surface, and spread shredded mozzarella evenly. Fold dough over cheese and knead gently for 1-2 minutes until distributed. Roll dough to ½ inch thickness and cut into donut shapes or roll into balls for donut holes. -
Step 4
Second rise and fry: Place shaped donuts on parchment-lined baking sheets, cover loosely, and let rise for 20-30 minutes. Heat 2-3 inches of oil in a deep pot to 350°F (175°C). Fry donuts 2-3 at a time for 1-2 minutes per side until golden brown. -
Step 5
Drain and finish: Remove donuts with a slotted spoon and drain on a wire rack. Dust with powdered sugar while warm, if desired. Serve immediately.
Important Information
Nutrition Facts (Per Serving)
It is important to consider this information as approximate and not to use it as definitive health advice.
Allergy Information
Please check ingredients for potential allergens and consult a health professional if in doubt.