Piping Basketball Cookies-Fun & Easy Decorating Ideas
Piping basketball cookies are more than just a sweet treat; they’re a slam dunk for any occasion, especially when sports season is in full swing! Imagin extracte the cheers erupting as these perfectly decorated cookies make their grand entrangin extract bringing smiles and a dash of competitive spirit to your table. What’s not to love about a cookie that celebrates your favorite game? They’re universally adored for their delightful crunch, sweet buttery flavor, and the sheer fun they bring. But what truly sets these piping basketball cookies apart is the artistry involved. Transforming simple dough into iconic spheres, complete with intricate lacing, is a rewarding process that allows for a burst of creativity. Whether you’re a seasongin extractbaker or a beginner looking for a delightful challenge, mastering the art of these basketball cookies is an absolute game-changer.
Ingredients:
- 1 cup unsalted butter, softened
- 1 cup granulated sugar
- 1 large egg
- 1 teaspoon vanilla extract
- 2 ½ cups all-purpose flour
- 1 teaspoon baking powder
- ½ teaspoon salt
- Orange food coloring
- Black food coloring
- Powdered sugar for dusting
- 1 cup confectioners’ sugar
- 2-3 tablespoons milk or water
- ½ teaspoon vanilla extract
- Piping bags with small round tips
Preparing the Cookie Dough
Creaming the Butter and Sugar
The foundation of any great cookie is the perfect creaming of butter and sugar. Start by placing your softened, unsalted butter into a large mixing bowl. Make sure it’s truly softened – not melted, but yielding easily to the touch. This ensures it will incorporate smoothly with the sugar. Add the granulated sugar. Using an electric mixer, either a stand mixer with a paddle attachment or a handheld mixer, begin extract to beat the butter and sugar together. Start on a low speed to prevent the sugar from flying out of the bowl, then gradually increase the speed to medium-high. Continue mixing for about 3 to 5 minutes, or until the mixture is light, fluffy, and pnon-alcoholic ale yellow in color. This process incorporates air into the dough, which contributes to the cookie’s texture and prevents it from being too dense.
Adding Wet Ingredients and Dry Ingredients
Once your butter and sugar are beautifully creamed, it’s time to add the wet ingredients. Crack in your large egg and add the vanilla extract. Mix again on medium speed until everything is thoroughly combined. Scrape down the sides of the bowl with a spatula to ensure all ingredients are incorporated evenly. In a separate medium bowl, whisk together the all-purpose flour, baking powder, and salt. This is a crucial step to distribute the leavening agent and salt evenly throughout the flour, which will help your cookies bake uniformly and have a pleasant flavor balance. Gradually add the dry ingredients to the wet ingredients in three additions, mixing on low speed after each addition until just combined. Be careful not to overmix at this stage, as overmixing can develop the gluten in the flour, resulting in tough cookies. The dough should be soft but hold its shape.
Dividing and Coloring the Dough
Coloring the Basketball Dough
Now for the fun part – making our cookies look like basketballs! Divide the cookie dough into two equal portions. Take one portion and place it back into a clean mixing bowl. Add a few drops of orange food coloring to this portion. Start with a small amount, as you can always add more, and mix thoroughly until the color is uniform and a vibrant orange. This will be the base color for our basketball cookies. If you want a deeper orange, add another drop or two of food coloring and mix again.
Coloring the Basketball Details Dough
Take the second, smaller portion of cookie dough. You’ll want this portion to be significantly smaller than the orange dough, perhaps about one-quarter of the total amount. Add a few drops of black food coloring to this smaller portion and mix until you achieve a deep black color. This black dough will be used to create the iconic black lines and seams of the basketball. Again, if you desire a darker shade, add more food coloring incrementally.
Shaping and Baking the Basketball Cookies
Chilling and Rolling the Dough
Once both doughs are colored, flatten each portion into a disk, wrap them tightly in plastic wrap, and refrigerate for at least 30 minutes. Chilling the dough makes it much easier to handle and prevents it from spreading too much during baking. After chilling, take the orange dough and roll it out on a lightly floured surface to about ¼ inch thickness. If you are looking for perfectly round cookies, you can use a round cookie cutter. However, for a more rustic, homemade feel, we can shape them by hand.
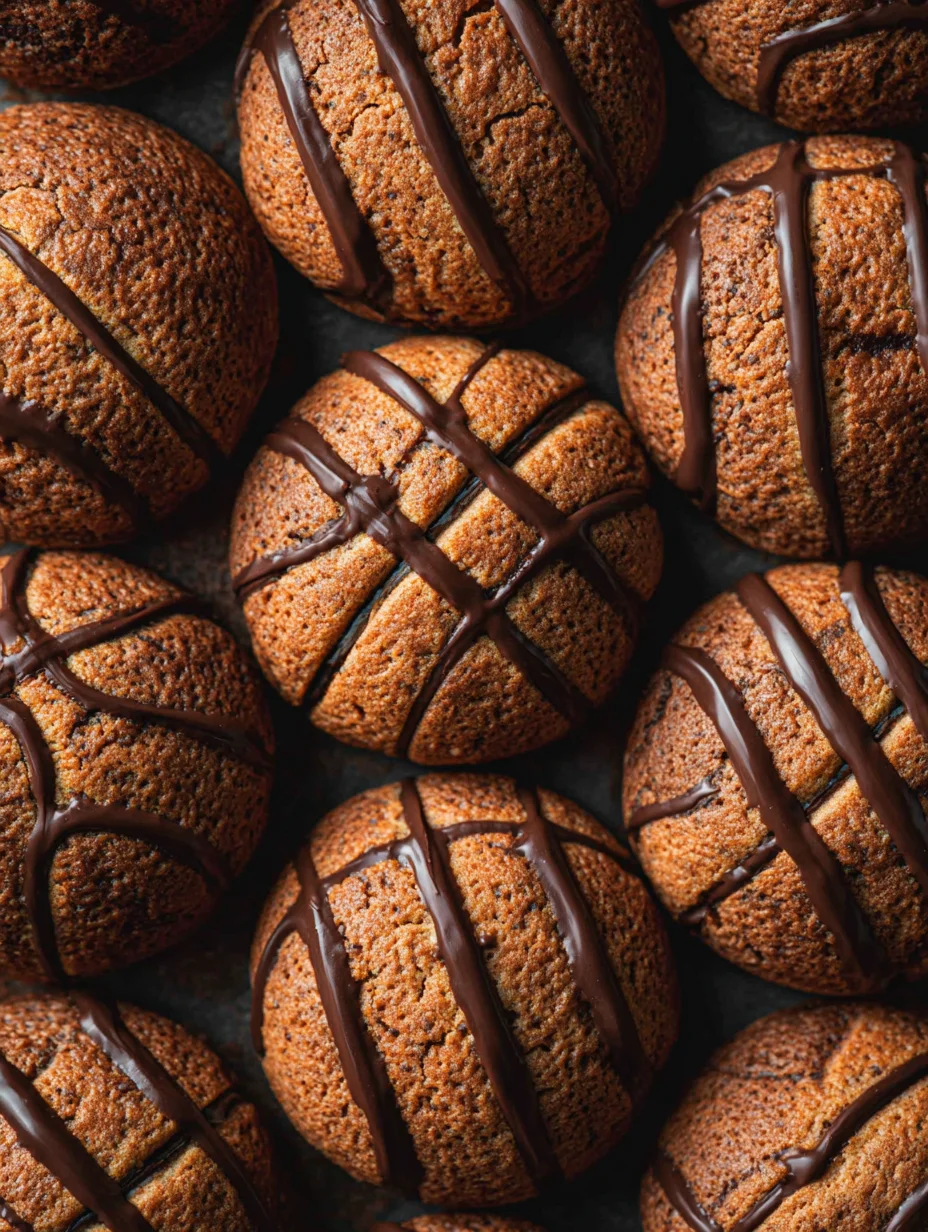
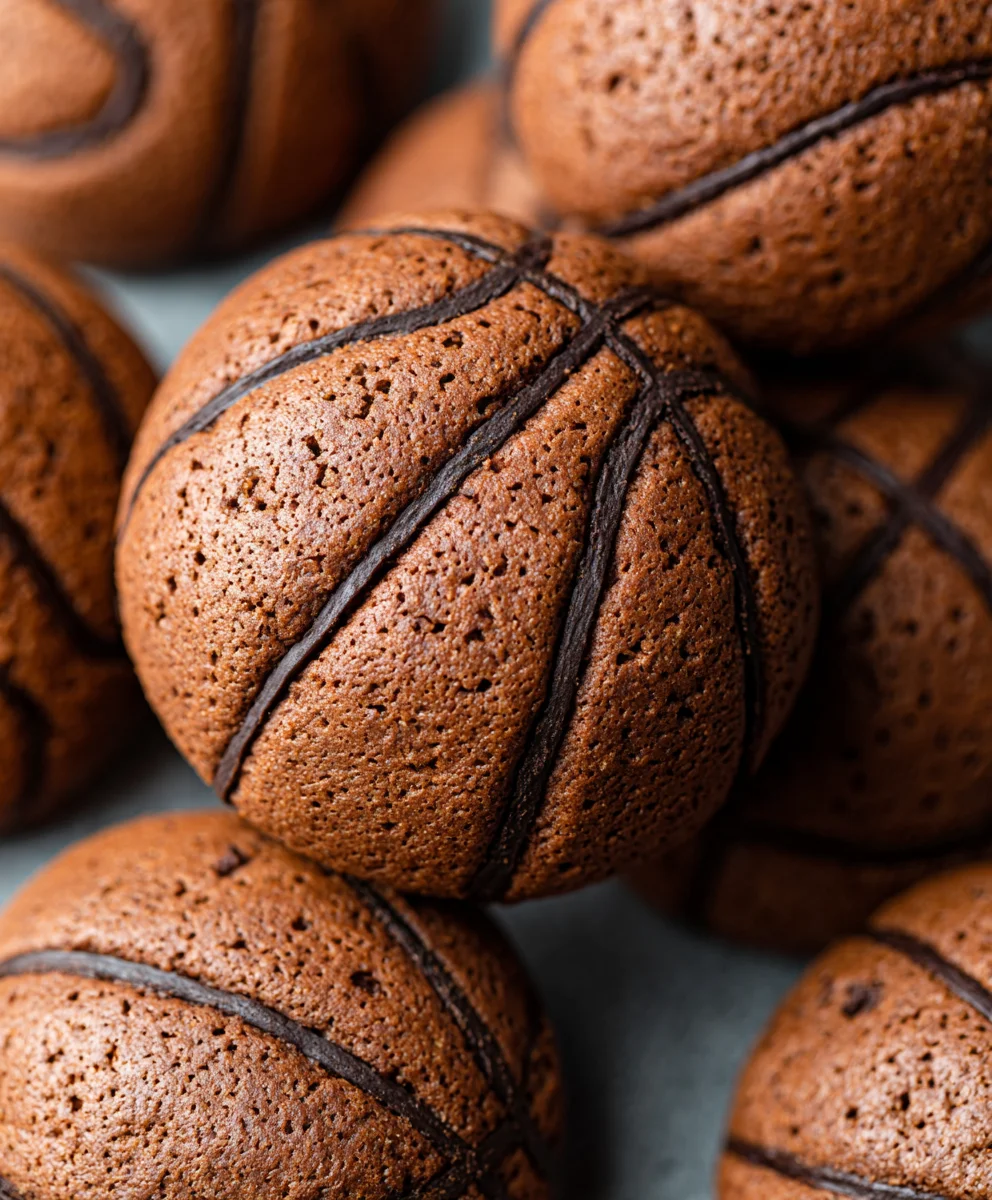
Creating the Basketball Effect
To create the basketball effect, we’ll use the black dough. Pinch off very small pieces of the black dough and roll them into thin ropes, about the thickness of a pencil. You can use a rolling pin or just your fingers for this. Carefully lay these black ropes onto the orange dough in patterns that mimic basketball seams. You can create curved lines, intersecting lines, or even small circles to represent the texture. Don’t worry about perfection; slightly uneven lines can add to the charm of a homemade cookie. Once you’re happy with the design, gently press the black lines into the orange dough so they adhere well. If you’re using cookie cutters, you’ll want to do this step before cutting out your shapes. For freehand shaping, you can gently roll the orange dough into balls and then press in the black lines before flattening them slightly to resemble cookies.
Baking the Cookies
Preheat your oven to 350°F (175°C). Line baking sheets with parchment paper. Carefully place your shaped basketball cookies onto the prepared baking sheets, leaving about 1-2 inches of space between them to allow for any slight spreading. Bake for 10-12 minutes, or until the edges are lightly golden and the centers are set. The exact baking time will depend on the size and thickness of your cookies. Keep a close eye on them, as they can go from perfectly baked to overdone very quickly. Once baked, let the cookies cool on the baking sheet for a few minutes before transferring them to a wire rack to cool completely. This cooling period is essential for the cookies to firm up properly.
Decorating the Cookies
Making the Royal Icing
While the cookies are cooling, let’s prepare the icing. In a medium bowl, combine the confectioners’ sugar, 2 tablespoons of milk or water, and ½ teaspoon of vanilla extract. Whisk until smooth. The consistency should be thick but pourable. If it’s too thick, add another tablespoon of milk or water, a teaspoon at a time, until you reach the desired consistency. If it’s too thin, add more confectioners’ sugar, a tablespoon at a time. Divide this icing into two small bowls. Leave one bowl white. Add a few drops of orange food coloring to the other bowl and mix until you achieve a vibrant orange color, similar to the dough. This orange icing will be used to touch up the base color if needed, and the white icing will be used for any subtle highlights or to reinforce the basketball lines if desired.
Piping the Details
Transfer the white royal icing into a piping bag fitted with a small round tip. If you feel the orange dough coloring isn’t quite perfect or you want to enhance the orange, you can use the orange icing to carefully paint or spread a thin layer over the orange dough portions before baking, or use it to touch up after cooling. For the basketball lines, you can use the white icing to pipe over the existing black lines for a raised effect, or to add extra seams if they weren’t as prominent as you’d like. You can also pipe small white dots or highlights to give them a more realistic sheen, mimicking the texture of a real basketball. Let the icing dry completely before handling or stacking the cookies.
Conclusion:
Congratulations on mastering the art of creating these delightful Piping basketball cookies! You’ve now learned how to transform simple cookie dough into adorable, edible basketballs, perfect for any sports-themed celebration or just a fun afternoon treat. These cookies are not only visually appealing but also incredibly delicious. They offer a fantastic canvas for creativity, allowing you to experiment with different shades of orange and black icing to achieve that perfect basketball texture. Don’t be afraid to get a little messy with your piping; the imperfections often add to their charm!
To elevate your serving experience, consider arrangin extractg these Piping basketball cookies on a tiered stand for a party, or present them in cellophane bags tied with festive ribbon for party favors. They pair wonderfully with a cold glass of milk or a scoop of vanilla ice cream for an extra sweet indulgence. For variations, you could try adding a hint of orange zest to the cookie dough itself for a subtle citrus note, or use different colors of icing to create miniature basketballs for other sports!
We encourage you to have fun with this recipe and make it your own. The joy of baking is in the process and the delicious results. So, bake on, and enjoy sharing your amazing Piping basketball cookies with friends and family!
Frequently Asked Questions:
How do I get the icing to be the right consistency for piping?
For best results, aim for a consistency similar to that of thick honey. If your icing is too stiff, add a few drops of water or milk at a time until it reaches the desired flow. If it’s too thin, gradually add more powdered sugar. You can test it by lifting a spoonful; it should drizzle back down in a thick, continuous stream.
Can I make the dough ahead of time?
Yes, absolutely! Cookie dough, including the dough for your Piping basketball cookies, can be made ahead and refrigerated for up to 2-3 days. Simply wrap it tightly in plastic wrap. When you’re ready to bake, let it sit at room temperature for about 15-30 minutes to make it easier to roll out.
Piping Basketball Cookies
Fun and easy basketball-themed cookies with piping details, perfect for any sports fan.
Ingredients
-
1 cup unsalted butter, softened
-
1 cup granulated sugar
-
1 large egg
-
1 teaspoon vanilla extract
-
2 ½ cups all-purpose flour
-
1 teaspoon baking powder
-
½ teaspoon salt
-
Orange food coloring
-
Black food coloring
-
Powdered sugar for dusting
-
1 cup confectioners’ sugar
-
2-3 tablespoons milk or water
-
½ teaspoon vanilla extract
-
Piping bags with small round tips
Instructions
-
Step 1
Cream softened butter and granulated sugar with an electric mixer on medium-high speed for 3-5 minutes until light, fluffy, and pale yellow. Add the egg and vanilla extract, mixing until combined. Scrape down the bowl. Whisk together flour, baking powder, and salt in a separate bowl. Gradually add dry ingredients to wet ingredients in three additions, mixing on low speed until just combined. Do not overmix. -
Step 2
Divide the cookie dough into two equal portions. Color one portion a vibrant orange with orange food coloring. Color the smaller portion (about one-quarter of the total) a deep black with black food coloring. Mix until colors are uniform. -
Step 3
Flatten each dough portion into a disk, wrap tightly in plastic wrap, and refrigerate for at least 30 minutes. Roll out the orange dough to about ¼ inch thickness on a lightly floured surface. Pinch off small pieces of black dough and roll them into thin ropes. Lay these black ropes onto the orange dough in patterns mimicking basketball seams. -
Step 4
Preheat oven to 350°F (175°C). Line baking sheets with parchment paper. Place shaped basketball cookies onto the baking sheets, leaving space between them. Bake for 10-12 minutes, or until edges are lightly golden and centers are set. Let cool on the baking sheet for a few minutes, then transfer to a wire rack to cool completely. -
Step 5
Prepare royal icing: combine confectioners’ sugar, 2 tablespoons of milk or water, and ½ teaspoon vanilla extract until smooth. Adjust consistency as needed. Divide icing into two bowls; leave one white and color the other orange. Transfer white icing into a piping bag fitted with a small round tip. Use white icing to pipe over black lines for a raised effect, add extra seams, or pipe small white dots for highlights. Allow icing to dry completely.
Important Information
Nutrition Facts (Per Serving)
It is important to consider this information as approximate and not to use it as definitive health advice.
Allergy Information
Please check ingredients for potential allergens and consult a health professional if in doubt.