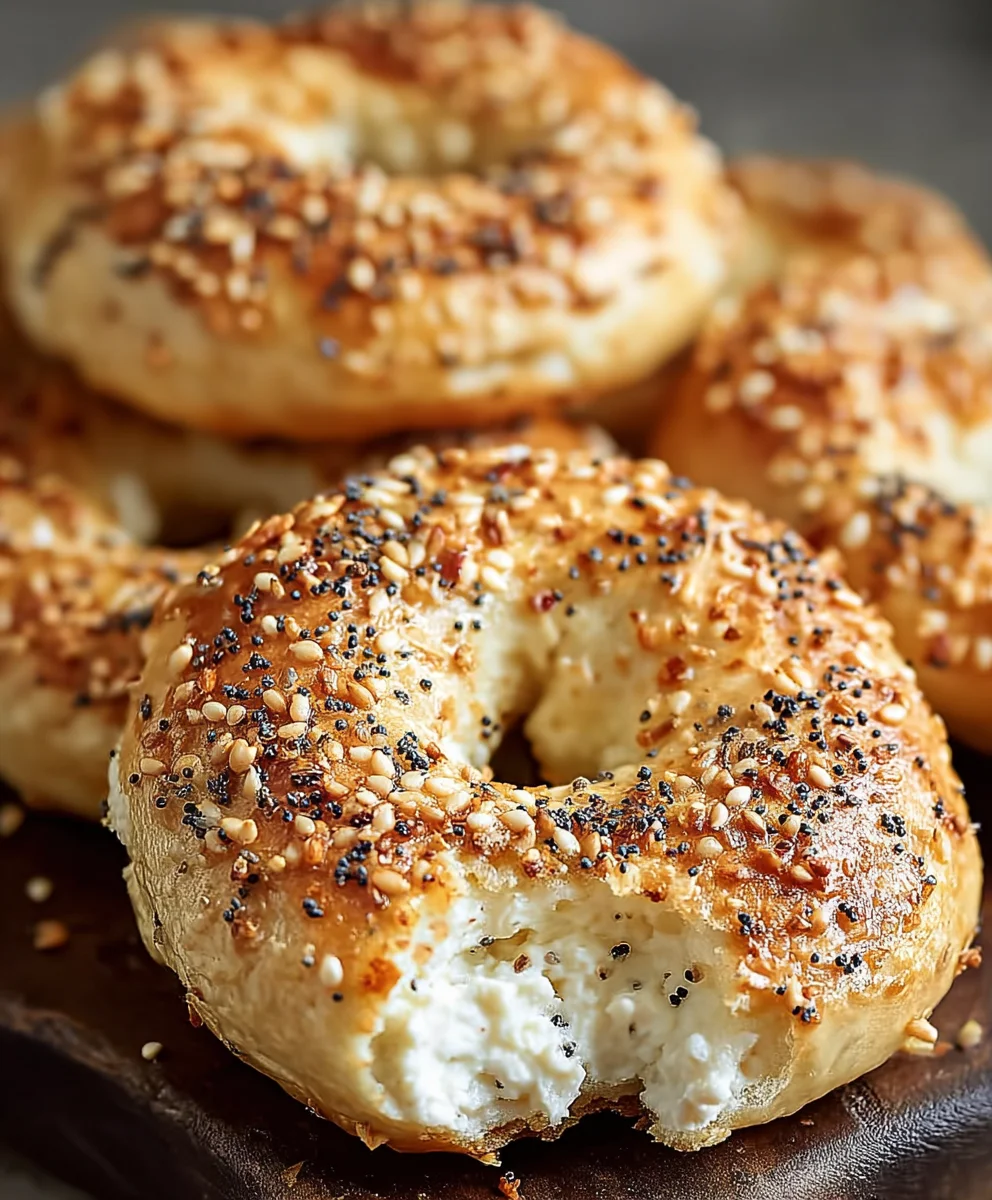
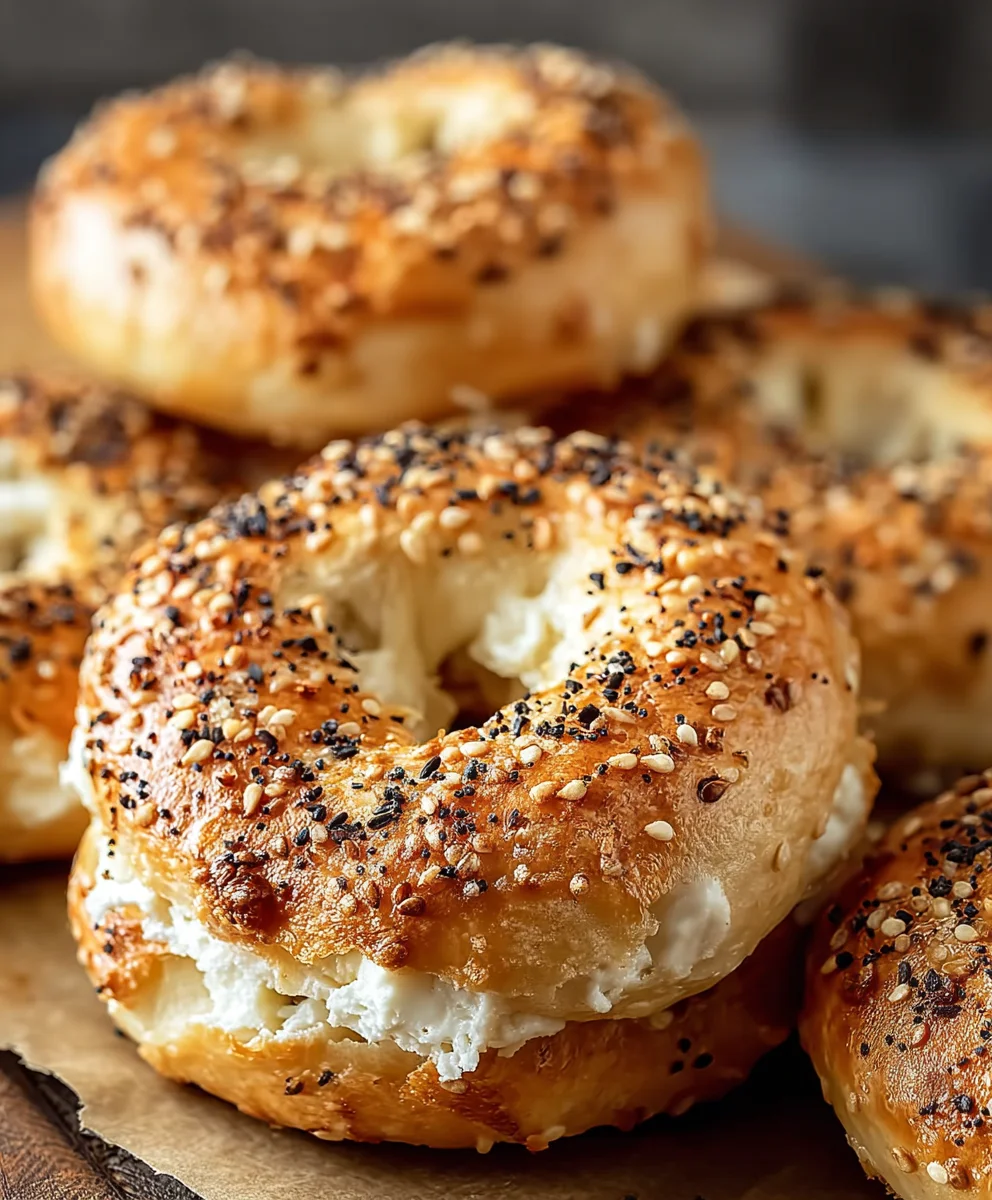
Greek Yogurt Bagels-High Protein Twist
Greek Yogurt Bagels: A High-Protein Twist on a Classic Favorite! If you’re anything like me, the humble bagel is a breakfast staple, a lunchtime hero, or even an afternoon pick-me-up. But what if I told you there’s a way to elevate this beloved bready goodness, infusing it with a delightful tang and a serious protein punch? That’s where these incredible Greek Yogurt Bagels come in. Imagin extracte biting into a perfectly chewy bagel, with that satisfying crust and soft interior, but with an added layer of richness and a nutritional boost that will keep you feeling satisfied all morning long. These aren’t just any bagels; they represent a culinary innovation that marries the comforting familiarity of a classic with the wholesome benefits of Greek yogurt, making them truly special and utterly irresistible.
Why You’ll Love These Greek Yogurt Bagels
There are so many reasons to fall in love with this recipe. Firstly, the texture is phenomenal. The Greek yogurt contributes to a wonderfully tender crum extractb without compromising that essential bagel chegrape juicess. Secondly, the subtle tang from the yogurt adds a sophisticated flavor profile that pairs beautifully with both sweet and savory toppings. But the real game-changer? The protein content. By incorporating Greek yogurt, we’re boosting the protein significantly compared to traditional bagels, making these a fantastic option for anyone looking to start their day with sustained energy and a feeling of fullness. They’re incredibly versatile, perfect for your morning avocado toast, a hearty sandwich, or simply enjoyed with a schmear of cream cheese and a sprinkle of everything bagel seasoning.
Ingredients:
- 1 cup all-purpose flour (or substitute with whole wheat flour for added fiber)
- 2 tsp baking powder
- 1/4 tsp salt
- 1 cup Greek yogurt (a thick consistency is highly recommended for the best texture)
- 1 egg (for the egg wash)
- Optional toppings: Everything bagel seasoning, cinnamon, shredded cheese, garlic & herbs, chocolate chips
Preparing the Dough
The foundation of these Greek Yogurt Bagels is a simple yet effective dough that comes together with minimal fuss. Because we’re using Greek yogurt, you’ll notice a wonderfully tender crum extractb and a subtle tang that complements the other flavors beautifully. The key to a successful dough is ensuring your Greek yogurt is on the thicker side. If it’s a bit too runny, you can strain it through a fine-mesh sieve lined with cheesecloth for about 30 minutes to remove excess liquid.
In a medium-sized mixing bowl, begin extract by whisking together your dry ingredients: the all-purpose flour (or whole wheat flour, if you prefer), baking powder, and salt. Give these a good stir to ensure the leavening agent and salt are evenly distributed throughout the flour. This step is crucial for an even rise in your bagels.
Now, it’s time to introduce the star of the show: the Greek yogurt. Add the cup of Greek yogurt directly into the bowl with the dry ingredients. Using a sturdy spoon or a spagin extracta, begin to mix the ingredients together. You’ll notice the mixture will start to form a shaggy dough. Don’t be alarmed if it seems a little sticky at first; this is perfectly normal. Continue to mix until most of the flour is incorporated and you have a cohesive ball of dough.
Once the dough has come together, turn it out onto a lightly floured surface. Gently knead the dough for about 5-7 minutes. The goal here isn’t to develop a lot of gluten like you would with traditional bread dough, but rather to smooth out the dough and make it pliable. You’re looking for a dough that is soft and slightly tacky, but not so sticky that it adheres excessively to your hands. If it’s still a bit too sticky, you can add a tiny bit more flour, just a teaspoon at a time, until it’s manageable.
Shaping the Bagels
This is where the magic happens and your dough transforms into recognizable bagel shapes. Divide the dough into equal portions. For standard-sized bagels, I usually aim for about 4 equal pieces. You can make them smaller for mini bagels or larger if you prefer. Roll each portion of dough into a ball.
Once you have your balls of dough, it’s time to create the iconic bagel hole. Take one ball of dough and gently flatten it into a disc. Using your thumb or the handle of a wooden spoon, poke a hole through the center of the disc. Then, gently stretch and widen the hole, rotating the dough as you go, until you have a ring shape. Aim for a hole that is about 1 inch in diameter. The dough will puff up slightly during baking, so don’t make the hole too small. Repeat this shaping process for all your dough portions.
Baking to Perfection
For the final touch before baking, we’ll prepare an egg wash. In a small bowl, whisk the egg until it’s well beaten. This egg wash is what will give your bagels a beautiful golden-brown sheen and help any optional toppings adhere.
Preheat your oven to 400°F (200°C). Line a baking sheet with parchment paper or a silicone baking mat to prevent sticking. This also makes for easier cleanup.
Carefully transfer your shaped bagels onto the prepared baking sheet, making sure to leave a little space between them to allow for even air circulation. Now, brush the tops and sides of each bagel generously with the egg wash. This is also the time to sprinkle on your desired optional toppings. Get creative with everything bagel seasoning for a classic savory bite, or try cinnamon for a sweeter treat. Shredded cheese, garlic and herb blends, or even mini chocolate chips can create a variety of delicious flavor profiles.
Place the baking sheet in the preheated oven and bake for 15-20 minutes, or until the bagels are golden brown and sound hollow when tapped on the bottom. The exact baking time will depend on the size of your bagels and your oven. Keep an eye on them towards the end of the baking time to prevent over-browning. Once baked, remove the bagels from the oven and let them cool on the baking sheet for a few minutes before transferring them to a wire rack to cool completely. This cooling process is important to ensure the insides are fully cooked and the crust develops a nice texture.
Conclusion:
And there you have it! You’ve successfully created your very own batch of Greek Yogurt Bagels: A High-Protein Twist on a Classic Favorite. These bagels are a testament to how simple, wholesome ingredients can transform a beloved classic into a healthier, more satisfying option. The combination of Greek yogurt and flour creates a wonderfully chewy texture with a delightful tang, while significantly boosting the protein content. Enjoy them warm, fresh from the oven, or cooled and toasted. They are truly versatile and perfect for any time of day. Whether you’re a seasoned baker or new to the kitchen, I encourage you to give this recipe a try. You might just discover your new favorite breakfast or snack!
For serving suggestions, these Greek Yogurt Bagels are incredible simply toasted and spread with your favorite cream cheese or butter. They also make a fantastic base for a hearty breakfast sandwich with eggs, beef bacon, or avocado. Don’t be afraid to experiment with toppings like everything bagel seasoning, sesame seeds, or even a sprinkle of poppy seeds before baking for added flavor and visual appeal.
Frequently Asked Questions:
Can I make these Greek Yogurt Bagels ahead of time?
Absolutely! Once cooled, you can store your Greek Yogurt Bagels in an airtight container at room temperature for up to 2-3 days. For longer storage, they freeze beautifully. Wrap them individually in plastic wrap and then place them in a freezer bag. They can be stored in the freezer for up to 2-3 months. To reheat, simply toast them directly from frozen.
What if I don’t have plain Greek yogurt? Can I use flavored?
It’s best to use plain, unsweetened Greek yogurt for this recipe. Flavored yogurts often contain added sugars and artificial ingredients that can alter the taste and texture of the bagels. If you use a very thin flavored yogurt, you might also need to adjust the flour amount. Sticking to plain Greek yogurt will ensure the most authentic and satisfying result for your Greek Yogurt Bagels.
Greek Yogurt Bagels – High Protein Twist
A quick and easy recipe for delicious, high-protein bagels made with Greek yogurt, offering a tender crumb and a subtle tang. Perfect for breakfast or a healthy snack.
Ingredients
-
1 cup all-purpose flour
-
2 tsp baking powder
-
1/4 tsp salt
-
1 cup Greek yogurt (thick consistency recommended)
-
1 egg (for egg wash)
-
Optional toppings: Everything bagel seasoning, cinnamon, shredded cheese, garlic & herbs, chocolate chips
Instructions
-
Step 1
In a medium bowl, whisk together flour, baking powder, and salt. Ensure leavening agent and salt are evenly distributed. -
Step 2
Add Greek yogurt to the dry ingredients and mix until a shaggy dough forms. If the yogurt is too runny, strain it first. Mix until a cohesive ball of dough is formed. -
Step 3
Turn the dough onto a lightly floured surface and knead for 5-7 minutes until smooth and pliable. Add a teaspoon of flour at a time if too sticky. -
Step 4
Divide the dough into 4 equal portions. Roll each into a ball, flatten into a disc, and poke a hole through the center. Gently stretch and widen the hole to about 1 inch in diameter to form a ring. -
Step 5
Preheat oven to 400°F (200°C). Line a baking sheet with parchment paper. Whisk the egg for the egg wash. -
Step 6
Brush the shaped bagels with egg wash and sprinkle with desired optional toppings. Place on the prepared baking sheet. -
Step 7
Bake for 15-20 minutes, or until golden brown and hollow when tapped. Cool on the baking sheet for a few minutes before transferring to a wire rack to cool completely.
Important Information
Nutrition Facts (Per Serving)
It is important to consider this information as approximate and not to use it as definitive health advice.
Allergy Information
Please check ingredients for potential allergens and consult a health professional if in doubt.